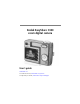
Kodak EasyShare C340 zoom digital camera User’s guide www.kodak.com For interactive tutorials, www.kodak.com/go/howto For help with your camera, www.kodak.
Eastman Kodak Company Rochester, New York 14650 © Eastman Kodak Company, 2004 All screen images are simulated. Kodak, EasyShare, and Retinar are trademarks of Eastman Kodak Company.
Product features Front View 4 3 5 6 2 7 8 9 1 10 1 Grip 6 Flash 2 Mode dial/Power button 7 Speaker 3 Shutter button 8 Viewfinder 4 Flash button 9 Lens 5 Self-timer/Burst button 10 DC-In (3V) ,for optional AC adapter www.kodak.
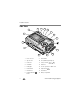
Product features Side View 4 5 6 7 8 9 3 10 11 2 12 1 13 15 16 ii 14 1 Dock connector 9 Delete button 2 Tripod socket 10 Zoom (Wide Angle/Telephoto) 3 LCD screen 11 4-way controller 4 Viewfinder 12 OK button 5 Ready light 13 Slot for optional SD or MMC card 6 Review button 14 USB, A/V Out 7 Menu button 15 Share button 8 LCD On/Off/Status butt button 16 Battery compartment www.kodak.
Table of contents 1 1 Setting up your camera .........................................................................1 Attaching the wrist strap ............................................................................... 1 Loading the batteries .................................................................................... 1 Turning on the camera .................................................................................. 2 Setting the date/time, first time ................................
Table of contents Viewing picture/video information ............................................................... 36 Pre-tagging for album names ...................................................................... 36 Sharing your pictures................................................................................... 39 5 Troubleshooting ..................................................................................44 Camera problems...............................................................
1 Setting up your camera Attaching the wrist strap Loading the batteries 1 Open the battery door. 2 Load the battery, then close the battery door. CRV3 lithium (non-rechargeable) Ni-MH (rechargeable) 2-AA lithium, Ni-MH, or Oxy-Alkaline AA ZR6 For information on replacing batteries and extending battery life, see page 58. www.kodak.
Setting up your camera Turning on the camera Setting the date/time, first time 1 At the prompt, press OK. to change. 2 for previous/next field. OK 2 to accept. www.kodak.
Setting up your camera Setting the language and date/time, other times 1 Press Menu. 2 3 to highlight Setup Menu then press OK. to highlight Language , then press OK. or Date/Time If setting the date/time: to change. OK for previous/next field. to accept. Storing pictures on an SD or MMC card Your camera has 16 MB of internal memory. You can purchase an SD or MMC card to conveniently store more pictures and videos. NOTE: We recommend Kodak SD and MMC cards.
2 Taking pictures and videos Taking a picture 1 Turn on camera. 3 Press Shutter button halfway to focus and set exposure. 4 When the Ready light turns green, press the button completely down. Ready light 2 Frame your subject in the Viewfinder or LCD screen. Taking a video 1 Turn on camera. 2 3 Press the Shutter button completely down and release. To stop recording, press and release the Shutter button again. Frame your subject in the Viewfinder or LCD screen. 4 www.kodak.
Taking pictures and videos Reviewing the picture or video just taken After you take a picture or video, the LCD screen displays a Quickview for approximately 5 seconds. While the picture or video and are displayed: Delete OK to play/pause a video ( to adjust volume.) If you press no buttons, the picture/video is saved. Tag a picture/video for email or as a favorite, or tag a picture for print. To view pictures and videos anytime, see page 9.
Taking pictures and videos Using the auto-focus framing marks (pictures) When using the LCD screen as a viewfinder, framing marks indicate where the camera is focusing. For the best pictures, the camera attempts to focus on foreground subjects, even if the subjects are not centered in the scene. 1 Press the Shutter button halfway. When the framing marks turn green, focus is accomplished.
Taking pictures and videos Capture modes Flash Mode Picture size Self Timer/Burst Pictures/time remaining Date stamp Storage location Album name Zoom: digital, telephoto, wide Focus zone White balance ISO Low battery Camera mode Exposure compensation Capture modes—shutter pressed halfway Framing marks www.kodak.
Taking pictures and videos Using optical zoom Use optical zoom to get up to 3X closer to your subject. Optical zoom is effective when the lens is no closer than 2 ft (0.6 m) to the subject or 5 in. (13 cm) in Close-up mode. You can change optical zoom before (but not during) video recording. 1 Use the Viewfinder or LCD screen to frame your subject. Zoom indicator Digital zoom range Optical zoom range 2 Press Telephoto (T) to zoom in. Press Wide Angle (W) to zoom out. The Zoom indicator shows zoom status.
Taking pictures and videos Using the flash Use the flash when you take pictures at night, indoors, or outdoors in heavy shadows. button repeatedly to scroll Press the through flash modes (see Flash modes table). The active flash icon is displayed in the LCD screen. To change the flash settings, see page 27. Flash-to-subject distance Zoom position Flash distance Wide angle 2–12 ft (0.6–3.6 m) @ ISO 140 Telephoto 2–7 ft (0.6–2.
Taking pictures and videos What the review icons mean Print tag/number of prints Favorite tag Email tag Protected Picture number Image storage location Review mode Scroll arrows Video length Favorite tag Email tag Protected Video number Image storage location Press OK to Play or Pause Review mode 10 www.kodak.
Taking pictures and videos Magnifying a picture during review W/T magnify 1X–8X. OK return to 1X. view other parts of the picture. Viewing multi-up (thumbnails) during review view multi-up thumbnails. view previous/next row of thumbnails. view previous/next thumbnail. OK view single picture. www.kodak.
Taking pictures and videos Cropping a picture You can select and save an area of a picture you take. NOTE: The original picture is kept. Pictures under 2.1 MP cannot be cropped. 1 Press the Review button. 2 Press to locate the picture. 3 Press the Menu button. 4 Choose Crop. A crop box and instructional message appear over the picture. 5 Follow the on-screen instructions. 6 Press to move, or to resize the crop box. 7 The crop box turns red at the maximum zoom point.
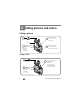
Taking pictures and videos Protecting pictures and videos from deletion 1 Press Review. 2 3 4 Note: To cancel Protect, press OK again. for previous/next. Press Menu. Press to highlight Protect then press OK. , The picture or video is protected and cannot be deleted. The Protect icon with the protected picture or video. appears Press the Menu button to exit the menu. CAUTION: Formatting internal memory or an SD or MMC card deletes all (including protected) pictures, videos.
Taking pictures and videos Deleting pictures and videos 1 2 Press Review. (To exit, press Review again.) for previous/next. 3 Press Delete. 4 Follow the screen prompts. PICTURE or VIDEO—deletes the displayed picture or video. EXIT—exits the Delete screen. ALL—deletes all pictures and videos from your current storage location. NOTE: To delete protected pictures and videos, remove protection before deleting. 14 www.kodak.
3 Transferring and printing pictures CAUTION: Install Kodak EasyShare software before connecting the camera or optional dock to the computer. Failure to do so may cause the software to load incorrectly. Minimum system requirements Windows OS-based computers Macintosh computers ■ Windows 98, 98SE, ME, 2000 SP1, or ■ Power Mac G3, G4, G5, G4 Cube, XP OS ■ Internet Explorer 5.
Transferring and printing pictures Installing the software CAUTION: Install Kodak EasyShare software before connecting the camera or optional dock to the computer. Failure to do so may cause the software to load incorrectly. 1 Close all software applications that are open on your computer (including anti-virus software). 2 Place the Kodak EasyShare software CD into the CD-ROM drive.
Transferring and printing pictures Transferring pictures with the USB cable 1 Turn off the camera. 2 Plug the labeled end of the USB cable into the labeled USB port on your computer. See your computer user’s guide for details. 3 Plug the other end of the USB cable into the labeled USB port on the camera. 4 Turn on the camera. Kodak EasyShare software opens on your computer. The software prompts you through the transfer process. NOTE: Visit www.kodak.com/go/howto for an online tutorial on connecting.
Transferring and printing pictures Printing pictures Printing with a Kodak EasyShare printer dock Dock your camera to the Kodak EasyShare printer dock and print directly—with or without a computer. Purchase this and other accessories at a dealer of Kodak products or www.kodak.com/go/c340accessories. Direct printing with a PictBridge enabled printer Your camera features PictBridge technology, so you can print directly to PictBridge enabled printers.
Transferring and printing pictures Printing from a PictBridge enabled printer 1 Turn on the printer. Turn on the camera. The PictBridge logo is displayed, followed by the current picture and menu. (If no pictures are found, a message is displayed.) If the menu interface turns off, press any button to redisplay it. 2 Press to choose a printing option, then press the OK button. Current Picture Press to choose a picture. Choose the number of copies.
Transferring and printing pictures Disconnecting the camera from a PictBridge enabled printer 1 Turn off the camera and printer. 2 Disconnect the USB cable from the camera and the printer. Ordering prints online Kodak EasyShare print service (provided by Ofoto at www.ofoto.com) is one of the many online print services offered in the Kodak EasyShare software. You can easily: ■ Upload your pictures. ■ Edit, enhance, and add borders to your pictures.
Transferring and printing pictures Dock compatibility for your camera Kodak EasyShare dock Docking configuration ■ printer dock 4000 Not compatible ■ camera dock II ■ LS420, LS443 camera dock ■ printer dock ■ printer dock plus ■ printer dock 6000 Custom camera insert ■ camera dock 6000 D-22 Adapter Dock ■ others, including series 3 printer docks and camera docks Custom camera insert (included with camera) Dock Purchase camera docks, printer docks, and other accessories at a dealer of Kodak prod
4 Doing more with your camera Using the self-timer 1 Place camera on a tripod or flat surface. 2 In any Still mode, press Once for a 10-second delay (so you have time to get into the scene) Once more for a 2-second delay (for a steady, auto-shutter release on a tripod) 3 Compose the scene. 4 Press the Shutter button halfway, then completely down. The picture is taken in 2 or 10 seconds. To cancel the self-timer before the picture is taken, press the Self-timer button.
Doing more with your camera Using burst Option Description Purpose Camera takes up to 3 pictures (3 per second) while the Shutter button is pressed. Burst First 3 pictures are saved. Capture an expected event. Example: A person swinging a golf club. 1 In most Still modes, press the Self Timer/Burst button repeatedly to choose an option. 2 Press the Shutter button halfway to set the auto focus and exposure. 3 Press the Shutter button completely down and hold it to take the pictures.
Doing more with your camera Running a slide show Use the Slide Show to display your pictures and videos on the LCD screen. To run a slide show on a television or on any external device, see page 25. To save battery power, use an optional Kodak 3-Volt AC adapter. (Visit www.kodak.com/go/c340accessories.) Starting the slide show 1 Press the Review button, then press the Menu button. 2 Press to highlight Slide Show , then press the OK button. 3 Press to highlight Begin Show, then press the OK button.
Doing more with your camera Running a continuous slide show loop When you turn on Loop, the slide show is continuously repeated. 1 On the Slide Show menu, press to highlight Loop, then press the OK button. 2 Press to highlight On, then press the OK button. The slide show repeats until you press the OK button or until battery power is exhausted. The Loop feature remains until you change it.
Doing more with your camera Copying pictures and videos You can copy pictures and videos from a card to internal memory or from internal memory to a card. Before you copy, make sure that: ■ A card is inserted in the camera. ■ The camera’s picture storage location is set to the location from which you are copying. See Image Storage (page 36), page 36. Copy pictures or videos: 1 Press the Review button, then press the Menu button.
Doing more with your camera Changing the flash settings Press the Flash button repeatedly to scroll through flash modes (see Flash modes table). The active flash icon is displayed in the LCD screen. Flash button NOTE: Flash settings are pre-set for each picture-taking mode. Some of the flash settings may not be available in all Capture or Scene modes. When you change to Auto or Red-eye in some of these modes, it becomes the default until you change it.
Doing more with your camera Picture-taking modes Choose the mode that best suits your subjects and surroundings. Use this mode For Auto General picture-taking—offers an excellent balance of image quality and ease of use. Scene Point-and-shoot simplicity when taking pictures under 8 special conditions (see Scene modes, page 29). Portrait Full-frame portraits of people. Use Telephoto to exaggerate background blur. Sport Subjects that are in motion. Shutter speed is fast.
Doing more with your camera Scene modes 1 Turn the Mode dial to Scene . 2 Press to display Scene mode descriptions. NOTE: If the Scene mode description turns off, press the OK button. 3 Press the OK button to choose a Scene mode. Use this SCN mode For Camera pre-settings Children Action pictures of f/2.7–f/4.6, Multi-Zone Focus, children in bright light. ISO 80–ISO 160 Party People indoors. Minimizes red eye. Night Portrait Reduces red eye of f/2.7–f/4.
Doing more with your camera Use this SCN mode For Camera pre-settings Backlight Subjects that are in shadow or “backlit” (when light is behind the subject). f/2.7–f/4.6, Multi-Zone Focus, Fill-Flash, ISO 80 NOTE: ISO speed changes depending on whether flash is on or off. Changing picture-taking settings You can change settings to get the best results from your camera: 1 Press the Menu button. (Some settings are unavailable in some modes.
Doing more with your camera Setting Icon Options Picture Size Choose a picture resolution. This setting remains until you change it. 5.0 MP (default)—for printing up to 20 x 30 in. (51 x 76 cm); pictures are highest resolution and largest file size. 4.4 MP (3:2)— ideal for printing 4 x 6 in. (10 x 15 cm) prints without cropping. Also for printing up to 20 x 30 in. (51 x 76 cm) 3.1 MP— for printing up to 20 x 30 in. (51 x 76 cm); pictures are medium resolution with smaller file size. 2.
Doing more with your camera Setting ISO Speed Control the camera’s sensitivity to light This setting remains until you turn the Mode dial. Icon Options Choose a lower ISO setting in brightly lit scenes; use a higher ISO for low-light scenes. Choose Auto (default), 80, 100, 200, 400. NOTE: ISO returns to Auto when the camera is set to Sport, Portrait, or Scene mode, or during Long Time Exposure. Unavailable in Video mode. Focus Zone Select a large or concentrated area of focus.
Doing more with your camera Setting Icon Options Image Storage Choose a storage location for pictures and videos. This setting remains until you change it. Auto (default)—the camera uses the card if one is in the camera. If not, the camera uses internal memory. Internal Memory—the camera always uses internal memory, even if a card is installed. Set Album (Still) Choose Album names. This setting remains until you change it. You can apply different Set Album choices. On or Off.
Doing more with your camera Customizing your camera Use Setup to customize your camera settings. 1 In any mode, press the Menu button. 2 Press to highlight Setup , then press the OK button. 3 Press to highlight the setting you wish to change, then press the OK button. 4 Choose an option, then press the OK button. 5 Press the Menu button to exit. Setting Icon Options Return to previous menu. Liveview Change Liveview default to on or off. (For more information, see page 5.
Doing more with your camera Setting Icon Options Video Out Choose the regional setting that lets you connect the camera to a television or other external device. NTSC (default)—used in North America and Japan; most common format. PAL—used in Europe and China. Orientation Sensor Orient pictures so that they are displayed with the correct side up. On (default) Off NOTE: This rotates images in Review but not in Quickview. Use the Kodak EasyShare software for automatic image rotation for display devices.
Doing more with your camera Viewing picture/video information In Review mode, press the Menu button to access optional review settings. 1 Press Review. 2 Press Status button . To exit Review, press the Review button.
Doing more with your camera First—on your computer Use Kodak EasyShare software that came with your camera to create album names on your computer. Then copy up to 32 album names to the album name list on your camera the next time you connect the camera to the computer. See Kodak EasyShare software Help for details. Second—on your camera 1 In any mode, press the Menu button. 2 Press to highlight Set Album , then press the OK button. 3 Press to highlight an album name, then press the OK button.
Doing more with your camera Tagging pictures/videos for albums Use the Album feature in Review mode to tag the pictures and videos in your camera with album names. First—on your computer Use Kodak EasyShare software that came with your camera to create album names on your computer, then copy up to 32 album names to the camera’s internal memory. See Kodak EasyShare software Help for details. Second—on your camera 1 Press the Review button, then locate the picture or video. 2 Press the Menu button.
Doing more with your camera Sharing your pictures Press the Share button to “tag” your pictures and videos. Share button When they are transferred to your computer, you can share them by: ■ Print (page 39). ■ Email (page 40). ■ Favorites (page 41). When can I tag my pictures and videos? Press the Share button to tag pictures/videos: ■ Any time. (The most recent picture/video taken is then displayed.) ■ Just after you take a picture/video, during Quickview (see page 5).
Doing more with your camera 5 Press the OK button. Then press the Share button to exit the menu. NOTE: To tag all pictures in the storage location, highlight Print All, press the OK button, then indicate the number of copies. To remove print tagging for all pictures in the storage location, highlight Cancel Prints, then press the OK button. Print All and Cancel Prints are not available in Quickview.
Doing more with your camera 4 To remove a selection, highlight a checked address and press the OK button. To remove all email selections, highlight Clear All. 5 Press to highlight Exit, then press the OK button. 6 Press the Share button to exit the menu. Third—transfer and email When you transfer the tagged pictures/videos to your computer, the Email screen opens and lets you send them to the addresses you specified. For details, click the Help button in the Kodak EasyShare software.
Doing more with your camera 3. Transfer pictures to your computer 1 To enjoy full functionality, install and use the EasyShare software that was packaged with this camera. (See page 16.) 2 Connect the camera to the computer using the USB cable (see page 17) or an EasyShare dock. The first time you transfer pictures, the software helps you make choices about your favorite pictures. Then, your pictures are transferred to the computer.
Doing more with your camera Removing all favorites from your camera 1 Turn the Mode dial to Favorites . 2 Press the Menu button. 3 Highlight , then press the OK button. All pictures stored in the Favorites section of internal memory are removed. Favorites are restored the next time you transfer pictures to the computer. 4 Press the Menu button to exit the menu. Preventing favorites from transferring to the camera 1 Open the Kodak EasyShare software. Click the My Collection tab.
5 Troubleshooting Camera problems If... Try one or more of the following Camera does not turn on ■ Remove battery and verify that it’s the correct type, then reinsert it. ■ Insert a new or charged battery. Camera does not ■ Connect the camera to a Kodak 3-volt AC adapter (sold separately), then try again. See page 58 for more battery information. turn off and the lens does not retract Camera buttons and controls do not function Lens does not extend ■ Confirm that the battery in camera is charged.
Troubleshooting If... Try one or more of the following Storage location is ■ Transfer pictures to the computer (page 17). almost or entirely full ■ Delete pictures from the card or insert a new one (page 14). ■ Change image storage location to internal memory (page 36). Battery life is short ■ Make sure the correct battery type is loaded (page 1). ■ Wipe the contacts with a clean, dry cloth (page 58) before inserting a battery in the camera. ■ Insert a new or charged battery (page 1).
Troubleshooting Computer/connectivity problems If... Try one or more of the following Computer does not ■ Insert a charged battery (page 1). communicate with ■ Turn on the camera. the camera ■ Make sure proper USB cable is securely connected on camera and computer port (page 17). (If using an EasyShare dock, check all cable connections. Make sure the camera is seated on the dock.) ■ Make sure the EasyShare software is installed (page 16). ■ Click the Help button in the EasyShare software.
Troubleshooting Picture quality problems If... Try one or more of the following Picture is too dark ■ Reposition camera for more available light. or underexposed ■ Use Fill flash (page 27) or change your position so light is not behind the subject. ■ Move so that the distance between you and the subject is within the effective flash range (page 9). ■ To automatically set exposure and focus, press the Shutter button halfway.
Troubleshooting Camera ready light status If... Try one or more of the following Ready light does ■ Turn on the camera (page 2). not turn on and the ■ Recharge the battery or install a new one (page 1). camera does not ■ Mode dial was on when battery was reloaded. Turn Mode dial off, then work back on. Ready light blinks ■ Picture is being processed and saved to the camera. Camera is operating normally. green ■ Camera is connected. Camera is operating normally.
Troubleshooting Direct printing (PictBridge) problems Status Solution Cannot locate desired picture. ■ Turn the Mode dial to Auto. Make sure the camera is not in Favorites mode. ■ Use the Direct print menu to change the image storage location. The Direct print menu interface ■ Press any button to redisplay the menu. turns off. Cannot print pictures. ■ Ensure that there is a connection between camera and printer (page 18). ■ Ensure the printer and camera have power (page 19).
6 Getting help Helpful links Camera Get support for your product (FAQs, troubleshooting information, etc.) www.kodak.com/go/c340support Purchase camera accessories (camera www.kodak.com/go/c340accessories docks, printer docks, lenses, cards, etc.) Download the latest camera firmware and software www.kodak.com/go/c340downloads See online demonstrations of your camera www.kodak.com/go/howto Software Get information on EasyShare software www.kodak.
Getting help Telephone customer support If you have questions concerning the operation of the software or camera, you may speak with a customer support representative. Before you call, have the camera or dock connected to your computer.
7 Appendix Camera specifications For more specifications, visit www.kodak.com/go/c340support. Kodak EasyShare C340 zoom digital camera CCD (charge-coupled device) CCD 1/2.5 in. CCD, 4:3 aspect ratio Output image size 2576 x 1932 (5 M) pixels 2576 x 1716 (4.4 M) pixels 2048 x 1536 (3.1 M) pixels 1656 x 1242 (2.1 M) pixels 1200 x 900 (1.1 M) pixels Displays Color display 1.6 in. (4 cm) color hybrid LCD, 312 x 230 (72 K) pixels Preview Frame rate: 30 fps; Field-of-view: 87%.
Appendix Kodak EasyShare C340 zoom digital camera Exposure Exposure metering TTL-AE, Center-weighted Exposure compensation* +/-2.0 EV with 0.5 EV step Shutter speed Mechanical with CCD electrical Auto: 4 - 1/1400 sec. Long time exposure* 0.7, 1.0, 1.5, 2.0, 3.0, 4.0 sec. ISO speed* Auto: 80 to 160 Selectable: 80, 100, 200, 400 Flash Electronic flash Guide no. 8.3 (@ ISO 100) Auto flash by pre-flash Working range @ ISO 140: 2–12 ft (0.6–3.6 m) @ Wide; 2–7 ft (0.6–2.
Appendix Kodak EasyShare C340 zoom digital camera Review Quickview Yes Video output NTSC or PAL Power 2 Kodak KAADC Oxy-Alkaline AA digital camera batteries; 2-AA lithium digital camera batteries; 2 Kodak KAARDC Ni-MH AA rechargeable digital camera batteries; Kodak CRV3 lithium digital camera battery; Kodak KAA2HR Ni-MH rechargeable digital camera battery pack; 3V AC adapter Communication with computer USB 2.
Appendix Storage capacities File sizes can vary. You may be able to store more or fewer pictures and videos. Favorites take up additional space in internal memory. Picture storage capacity Number of pictures 5.0 MP 4.4 MP 3.1 MP 1.25 1.12 0.79 0.58 0.
Appendix Power-saving features If no action for The camera To turn it back on 1 minute Screen turns off. Press any button. 10 minutes or select Enters auto power off. 1, 3, or 5 minutes Turn the Mode dial off and on again. Important safety instructions Using this product ■ Read and follow these instructions before using Kodak products. Always follow basic safety procedures.
Appendix Battery safety and handling CAUTION: When removing batteries, allow them to cool first; batteries may be hot. ■ Read and follow all warnings and instructions supplied by the battery manufacturer. ■ Use only batteries that are approved for this product. ■ Keep batteries out of the reach of children. ■ Do not allow batteries to touch metal objects, including coins. Otherwise, a battery may short circuit, discharge energy, become hot, or leak.
Appendix Battery information Battery life for Kodak C-series digital cameras Use the following batteries. Actual battery life may vary based on usage. 350–500 CRV3 lithium battery 275–375 AA (2) lithium batteries KAA2HR Ni-MH rechargeable battery pack* (per charge) 250–350 KAARDC Ni-MH AA (2) rechargeable batteries (per charge) 200–300 KAADC Oxy-Alkaline AA ZR6 (2) non-rechargeable batteries 60–175 0 500 Battery Life (Approx.
Appendix ■ Dirt on the battery contacts can affect battery life. Wipe the contacts with a clean, dry cloth before loading batteries in the camera. ■ Battery performance is reduced at temperatures below 41°F (5°C). When using your camera in cold weather, carry spare batteries and keep them warm. Do not discard cold batteries that do not work; when they return to room temperature, they may be usable. Visit www.kodak.
Appendix Additional care and maintenance ■ If the camera has been subjected to inclement weather or you suspect water has gotten inside the camera, turn off the camera and remove the batteries and card. Allow all components to air-dry for at least 24 hours before using the camera again. ■ Blow gently on the lens or camera screen to remove dust and dirt. Wipe gently with a soft, lint-free cloth or an untreated lens-cleaning tissue.
Appendix any necessary adjustments and/or replacement parts. Such repair or replacement is the sole remedy under this warranty. If replacement parts are used in making repairs, these parts may be remanufactured, or may contain remanufactured materials. If it is necessary to replace the entire product, it may be replaced with a remanufactured product.
Appendix Your rights Some states or jurisdictions do not allow exclusion or limitation of incidental or consequential damages, so the above limitation or exclusion may not apply to you. Some states or jurisdictions do not allow limitations on how long an implied warranty lasts, so the above limitation may not apply to you. This warranty gives you specific rights, and you may have other rights which vary from state to state or by jurisdiction.
Appendix to try to correct the interference by one or more of the following measures: 1) reorient or relocate the receiving antenna; 2) increase the separation between the equipment and the receiver; 3) connect the equipment to an outlet on a circuit different from that to which the receiver is connected; 4) consult the dealer or an experienced radio/TV technician for additional suggestions.
1 Index A A/V out, 25 AA battery, installing, 1 about picture, video, 35 about this camera, 35 AC adapter, 59 accessories, 17 AC adapter, 59 battery, 58 buying, 50 camera dock, 59 printer dock, 18, 59 SD/MMC card, 3 album, 33 albums, tagging pictures for, 36, 38 alkaline batteries, warning, 1 auto flash, 9 focus framing marks, 6 power-down, 56 B backlight, 30 batteries expected life, 58 extending life, 58 loading, 1 types, 58 battery safety, 57 beach, 29 burst, ii 64 burst,using, 23 button burst, 23 delet
Index loading, 1 customer support, 51 customizing camera settings, 34 D date & time, 34 date setting, 2, 3 date stamp, 35 DC-in, i deleting during quickview, 5 from internal memory, 14 from SD/MMC card, 14 protecting pictures, videos, 13 digital zoom, using, 8 displaying slide show, 24 disposal, recycling, 60 dock camera, 59 printer, 18, 59 downloading pictures, 15 E EasyShare software, 15 emailing pictures, videos, 40 expected life, 58 external video device viewing pictures, videos, 25 F favorites removin
Index L language, 35 lens, i cleaning lens, 60 liveview, 34 loading batteries, 1 SD/MMC card, 3 software, 16 N night portrait, 29 P party, 29 PictBridge printer, 18 picture quality, 31 pictures checking settings, 10 copying, 26 deleting, 14 emailing tagged, 40 printing, 20 printing tagged, 39 protecting, 13 reviewing, 9 storage capacity, 55 tagging, 36, 38 taking, modes, 28 transfer via USB cable, 15 power auto off, 56 camera, 2 printer dock, 18, 59 printing from a card, 20 from computer, 20 optimizing p
Index R recycling, disposal, 60 red-eye, flash, 9 regulatory information, 62 removing favorites, 43 review button, 9 reviewing pictures as you take them, 5 camera screen, 9 deleting, 14 protecting, 13 slide show, 24 reviewing videos camera screen, 9 deleting, 14 protecting, 13 slide show, 24 running slide show, 24 S safety battery, 57 SCN, 28 SD/MMC card inserting, 3 printing from, 20 storage capacities, 55 self timer button, ii with pictures, 22 with videos, 22 self-portrait, 29 service and support teleph
Index specifications, camera, 52 storage capacity, 55 support, technical, 51 T tagging favorites, 41 for email, 40 for print, 40 tagging pictures for albums, 36, 38 telephone support, 51 television, slide show, 25 time, setting, 2, 3 timer, shutter delay, 22 tips battery guidelines, 58 care & maintenance, 60 transfer, via USB cable, 15 trash can, deleting, 5 turning camera on and off, 2 U upgrading software, firmware, 59 URLs, Kodak web sites, 50 USB (universal serial bus) transferring pictures, 15 checki