Large Format 4800 Series Inkjet Printers Reference Guide
Reference Guide WARRANTY United States Kodak warrants its printers (“PRODUCT”) to be free from defects in workmanship and materials for a period of one year from the date of purchase. Kodak reserves the right to make changes or improvements to Products, without incurring any obligation to similarly alter Products previously purchased. Buyer’s sole and exclusive rights pursuant to this Warranty shall be for the repair or replacement of defective Product.
Reference Guide FCC Statement (U.S.A.) The United States Federal Communications Commission has specified that the following notice be brought to the attention of users of the KODAK printers. FEDERAL COMMUNICATIONS COMMISSION RADIO AND TELEVISION INTERFERENCE FOR CLASS A DEVICE Statement NOTE: This equipment has been tested and found to comply with the limits for a Class A digital device, pursuant to part 15 of the FCC rules.
Reference Guide VDE statement Hiermit wird bescheinigt, daß der Drucker in Übereinstimmung mit den Bestimmungen der BMPT-AmstbIVfg 234/1991 funkentstört ist. Der vorschriftsmäßige Betrieb mancher Geräte (z.B. Meßsender) kann allerdings gewissen Einschränkungen unterliegen. Beachten Sie deshalb die Hinweise in der Bedienungsanleitung.
Reference Guide Material safety data sheet To obtain information on the proper use, handling, and disposal of Kodak inks, consult the material safety data sheet (MSDS) which should have shipped with your first ink order. MSDSs can also be obtained from the Kodak Environmental Services web page (http:// www.kodak.com/go/kes) by using the product name or catalog number. MSDSs can also be obtained by calling the Kodak Information Center (KIC) at 1-800-23KODAK.
Reference Guide Dryer safety CAUTION: Never open the dryer. There are no user serviceable parts inside. Refer servicing to qualified service personnel only. CAUTION: This assembly heat by radiation. CAUTION: Once the dryer is plugged in, there is continuous power to the dryer, even when the printer is turned off. DISCONNECT POWER CORD BEFORE SERVICING! Manual conventions ê ! 3 Indicates a procedure for you to follow in order to perform a specific function.
Reference Guide Contents Introduction .................................................................................................... 1-1 Printing with 4800 Series printers .................................................................................... 1-1 Obtaining quality results .................................................................................................. 1-2 Use the Correct Inks and Media ....................................................................................
Reference Guide HP-GL/2 options ............................................................................................. 3-1 Printing vector data .......................................................................................................... 3-1 Accessing HP-GL/2 features ........................................................................................... 3-1 Palette select ...............................................................................................................
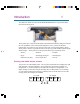
Introduction 1 This Reference Guide describes the KODAK PROFESSIONAL Large Format 4800 Series Printer inkjet printer. These printers give you professional-quality output with all the brilliance and gloss of liquid ink. For signmakers, service bureaus, photographic services, creative and business professionals, our printers let you experience the value of exceptional graphics quality. These printers cut hours of production time, while giving you the dramatic impact of high fidelity images.
Reference Guide Featuring a continuous-feeding ink system which uses 500ml reservoirs for each color, you never have to worry about running out of ink halfway through a big print job. Before starting a print job, just look at the transparent plastic reservoirs to check the ink supply. When the ink supply is low, just open the cap and refill. In addition, the printer features dual ink lines on the 1 x 4 Left cartridge set, which makes fast work of switching from one type of ink to another.
Reference Guide Operating Environment These media work best in an environment ranging from 68 to 82° F (20 to 28° C) at 30 to 70% relative humidity. Image drying time depends on the humidity, temperature, and amount of ink coverage. Inks dry more slowly when relative humidity is high. When relative humidity is too low, inks may not spread enough to obscure scan lines resulting in banding which is usually first observed in areas of solid colors.
Reference Guide Choose the right media You can rely on KODAK PROFESSIONAL media for rich, vivid images across the entire color spectrum. They are specially formulated to demanding specifications, strict performance criteria, and uncompromising quality controls. This assures superb interaction with KODAK PROFESSIONAL Ink and flawless performance with the printer. KODAK offers a wide range of sheet and roll media and is always adding new products.
Reference Guide Nine Factors that Affect Print Quality Understanding all the factors that contribute to print quality is the only way to ensure perfect printing each and every time. This section details nine important factors; by controlling them, you can achieve the very best print quality possible. 1. 2. 3. 4. 5. 6. 7. 8. 9. Use the highest quality type of image possible. Check to make sure the image is in focus and exposed properly. Scan it with the best scanner possible.
Reference Guide 2. Original Image Clarity and Color The quality of the original photograph, transparency, or digital file plays a key role in final print quality as this is where the clarity and color of the image is created. If the original photographer took a picture that was not in focus, or was fuzzy for any reason, sharpening or after-effects cannot correct it and a poor inkjet print will result. Differences in film, speed, grain, or developing process can also affect quality of prints.
Reference Guide DO NOT USE INTERPOLATED RESOLUTION OF YOUR SCANNER TO COMPUTE IMAGE SIZE Most 300 dpi scanners can interpolate or “imitate” 600 dpi scanning. This is really not really scanning at 600 dpi and will degrade the image quality. When scanning, ensure that you are using the scanner's true optical resolution, not its interpolated resolution. Scanning at the highest optical resolution (300 dpi) is better than scanning at the scanner's highest interpolated resolution (600 dpi). 5.
Reference Guide 6. RIP Color Profile The engine that converts your image into a series of C, M, Y, K dots is called the Raster Image Processor or RIP. Before it can actually create these dot patterns, it must first adjust for the colors of the inks, color of the media, dot volume of the cartridges on a particular machine, and the humidity/temperature of the environment on the day of printing (as this affects how far the ink will spread or dot gain).
Reference Guide 8. Ink and Media Using the right ink and media is a much bigger factor in print quality than most inkjet users realize. Then and only then can they fully appreciate what quality materials and inks can do. Inks must be developed specifically for a particular head, otherwise, cartridge reliability will be severely reduced. KODAK inks are specifically developed for KODAK cartridges, printers, and media.
Printer options 2 You can define printer options through your application software or by choosing settings from the printer's control panel. The following printer options are described in this chapter: • Cartridge set • Print mode • Paper Options • User Setup • Initialize (return to printer default settings) Cartridge set Your printer is an eight-head inkjet printer. The eight cartridges are grouped into two sets of four cartridges.
Reference Guide Choosing print mode options Your printer offers four quality modes, three of them pre-defined, which let you make tradeoffs between speed and quality. The quality mode you use depends on various factors, such as your software application, whether you’re printing in color or monochrome, and the type of media you’re using. Each quality mode directly affects the printing speed and quality of the image you print, so you should understand the differences.
Reference Guide Color mode ê Color mode refers to whether you are printing in color or monochrome. To choose the color mode 1 2 3 Press Setup Menu/Print Mode Menu/Color Mode. Choose Color, Mono or Gray. Press OK. Quality modes There are four print quality modes: Production - This setting is useful for fast, better than average quality printing on paper media. Photo - For high quality continuous tone images where quality is more important than printing speed.
Reference Guide Dots per inch For best results, be sure the printer dpi setting matches the image resolution in the file you are printing. The printer always prints at 600 dpi, even when the dpi setting in the Print Mode menu is set to 300 dpi. The dpi setting refers to the resolution at which your image is created, not the resolution at which it is printed.
Reference Guide Print passes The number of passes indicates how many times the cartridges must fire to lay down the ink for a complete scan line. You may select multiple passes, so that on a single pass, the jets fire only a fraction of the dots. If you're printing an image with heavy fill or shading, setting the print mode to an option that lays down less ink can help prevent running and bleeding. Note: When using the 2 x 4 cartridge set, a single pass fires ink from two cartridges for each color.
Reference Guide Print direction ê Print direction specifies whether the inkjets fire on both passes of the carriage over the print area (bidirectional), or just on the return pass (unidirectional). If you’re printing an image with heavy fill or shading, unidirectional can reduce running and ink bleeding. If you’re more concerned with printer speed, bidirectional firing can decrease your printing time. To change the print direction 1 2 3 Press Setup Menu/Print Mode Menu/Print Direction.
Reference Guide A few rules regarding the End of Media feature: • • • • • ê will not work with Cut Sheet selected as supply type. setting is remembered across power cycles. setting is not stored as a user parameter. setting cannot be changed once a plot begins to print. if you press PAUSE to resume the print, detection is disabled for the remainder of the print. • if enabled, detection is reinstated at the beginning of each print.
Reference Guide ê ê ê To display the current value 1 2 3 Press Feed Media Menu/Display Counter. View the current value. Press EXIT. To print the current value 1 2 3 Press Feed Media Menu/Display Counter. Press Print Counter. Press EXIT. To reset the media counter 0 1 2 Press Feed Media Menu/Media Counter. Press Reset Counter. 3 Press OK.
Reference Guide Supply Type ê This setting allows you to select your supply options. The available options are sheet, roll, roll2 or takeup. Select sheet if you intend to use cut sheet stock. Select roll if you are going to use roll paper on the upper roll feeder. (No takeup available with this option.) Select roll2 if you are going to use roll paper with the lower roll feeder. (No takeup available with this option.) Select takeup if you intend to use roll paper with the optional takeup system.
Reference Guide The tables which follow provide details on the media sizes and maximum printing areas for rollfeed and sheet media. Media Sizes and Maximum Printing Areas for Rollfeed Media Paper Size Normal Print Area Expanded Print Area GRAPHICS (U.S. OFFSET) 19.0" x 25.0" 17.8" x 23.8" 18.6" x 24.6" 20.0" x 28.0" 18.8" x 26.8" 19.6" x 27.6" 22.0" x 26.0" 20.8" x 24.8" 21.6" x 25.6" 23.0" x 35.0" 21.8' x 33.8" 22.6" x 34.6" 24.0" x 29.0" 22.8" x 27.8" 23.
Reference Guide Media Sizes and Maximum Printing Areas for Sheet Media Paper Size Normal Print Area Expanded Print Area GRAPHICS (U.S. OFFSET) 19.0" x 25.0" 17.8" x 22.4" 18.6" x 22.8" 20.0" x 28.0" 18.8" x 25.4" 19.6" x 25.8" 22.0" x 26.0" 20.8" x 23.4" 21.6" x 23.8" 23.0" x 35.0" 21.8" x 32.4" 22.6" x 32.8" 24.0" x 29.0" 22.8" x 26.4" 23.6" x 26.8" 25.0" x 38.0" 23.8" x 35.4" 24.6" x 35.8" 26.0" x 38.0" 24.8" x 35.4" 25.6" x 35.8" 27.
Reference Guide Margins Margins can be set to Normal or Expanded. The Expanded setting expands the print area and decreases the margins. Any part of the image that extends into the margin will be clipped. When the Margins option is set to Expanded, make sure that you align the media accurately using the guide on the right of the platen so that the ink doesn’t exceed the edge of the media. Cut sheet maximum printing area Normal: 0.59" (15 mm) margin on each of three sides and 1.
Reference Guide ê To set margins 1 2 3 Press Setup Menu/Paper Option Menu/Margins. Choose Normal or Expanded. Press OK. Auto-Load Delay ê Auto-Load Delay lets you set the time between when the printer senses the media and when printing starts. This lets you manually reposition the media, if necessary. The default is 6 seconds, selectable from a range of 1-12 seconds. To set auto-load delay 1 2 3 Press Setup Menu/Paper Option Menu/Auto-Load Delay. Choose the delay time. Press OK.
Reference Guide Auto-Cut Delay ê Auto-Cut Delay allows you to set a delay time before the printer automatically performs the Auto-cut function. This provides additional time for unattended prints to dry. In addition, you may want to delay auto-cut depending on the media you are using, the ambient temperature and the humidity. Auto-Cut Delay values range from 0 to 55 seconds in five second intervals and 1 to 60 minutes in one minute intervals.
Reference Guide Save Media ê When the Save Media is On (the default), the media advances only as far as needed to print the image. With the Save Media option turned off, the printer advances the full print area of the loaded media. For example, if a 36 inch roll is loaded, the printer advances the length of the print area for a standard 36 x 48" sheet even if the printed image is only 30 inches long. To turn off Save Media 1 2 3 Press Setup Menu/Paper Option Menu/Save Media. Choose Off. Press OK.
Reference Guide ê To use a previously saved user setting 1 2 3 Press Setup Menu/User Setup Menu/Select User. Scroll to the number for the user settings (i.e. user 1, user 2, etc.) to use. Press OK. Choosing a language ê Printer menus and options can be displayed in the following languages: English, German, French, Italian, Portuguese, Spanish, simplified and traditional Chinese, Japanese, and Korean. To choose a language 1 2 3 Press Setup Menu/User Setup Menu/Language.
Reference Guide ê You can set preheat values for each cartridge in the Left and Right cartridge sets. The following example sets the preheat value for cartridge 4 of the Left cartridge set. To set the ink preheat value for cartridge 4 of the left cartridge set 1 2 3 ê Press Setup Menu/Ink Option Menu/Ink Preheat Menu/Left/4 Preheat. Choose a preheat value. Press OK. The following example sets the preheat value for cartridge Y of the Right cartridge set.
Reference Guide Dryer The dryer helps to dry ink. When set to Auto, the dryer automatically turns on, samples the ambient temperature/humidity and calculates the required dryer output temperature. When set to On, the dryer is at maximum dryer output. Ambient temperature and humidity are ignored and the dryer is at maximum output for every print job. Choices are Off, On and Auto. Note: When using the dryer, Auto is the recommended setting.
Reference Guide Printing the settings Pressing the SetupMenu/User Setup Menu/Print Settings buttons causes the printer to print a listing of its current settings. Be sure to have paper loaded before you start. Returning to the default settings Pressing the SetupMenu/User Setup Menu/Init Settings buttons returns all printer options to the factory defaults. All saved user settings are lost. The following table shows the printer defaults.
Reference Guide Printer Default Settings USER SETTINGS COLOR MODE DEFAULT COLOR OTHER OPTIONS MONO, GRAY CARTRIDGE SET 2x4 1x4 RIGHT, 1x4 LEFT QUALITY MODE PHOTO PRODUCTION, ENHANCED, USER DOTS PER INCH 600 300 PRINT PASSES 4 (1x4) 3 (2x4) 1, 2, 3, 4, 6, 8, 10 (1x4) 1, 2, 3, 4, 5 (2x4) CARRIAGE SPEED 10 1-10 PRINT DIRECTION BI UNI AUTO-LOAD DELAY 6 1-12 SEC.
HP-GL/2 options 3 This chapter describes the setting of printing parameters generally used with vectorbased files, including palette selection, printer control, rotation, reprints, nesting, ink reduction and ink limiting. KODAK's implementation of HP-GL/2 supports vector/raster merge and conforms to "The HP-GL/2 and HP RTL Reference Guide, Third Edition" by Hewlett-Packard Company (Addison-Wesley, 1997, ISBN 0-201-31014-7). Please refer to this guide for detail on HP-GL/2 commands.
Reference Guide Palette select Palette select lets you choose either the HP-GL/2 or AutoCAD palette. Both palettes allow 256 active colors with eight colors predefined. The predefined colors for each palette are shown in the following table. Pen 0 Pen 1 Pen 2 Pen 3 Pen 4 Pen 5 Pen 6 Pen 7 ê HP-GL/2 AutoCAD White Black Red Green Yellow Blue Magenta Cyan White Red Yellow Green Cyan Blue Magenta Black To choose a palette type 1 Press Setup Menu/HP-GL/2 menu/Palette Select.
Reference Guide ê To set control 1 Press Setup Menu/HP-GL/2 menu/Control. 2 Choose either Software or Printer. 3 Press OK. Rotation The printer automatically prints an image with the long side on the paper axis. To better fit images and save media, you can use the Rotation option to turn vector files counterclockwise 90 degrees at a time. If the rotation specified won't fit on the media or contains raster images, it will not be rotated.
Reference Guide Ink reduction Ink reduction lets you reduce the percentage of ink laid down by the printer. This feature applies only to HPGL/2 format images (vector-based images) and has no effect on continuous tone images. It is especially useful for images with large amounts of printed area and helps to avoid bleeding or oversaturating the media. It does, however, change the appearance of colors, so you may want to run a small test print.
Reference Guide Parameters which are monitored for Nest compatibility: • • • • • • • • • • Print quality; Number of passes; Print direction; Speed; Color mode; DPI; Dry time; Margins; Wipe on/off; and Media Save. The following parameters will not affect nesting: ê • Ink limiting; • Replots; • If Auto Rotation is enabled, then the nesting algorithm is free to rotate the plot if it determines that doing so will save media.
Reference Guide ê To define nesting wait time 1 Press Setup Menu/HP-GL/2 menu/Nesting Menu. 2 Choose Nest Enable/On. 3 Press OK. 4 On the Nesting menu, choose Nest Time. 5 Choose the Nest Time (30 seconds, 1 minute, 2 minutes). 6 Press OK. Ink limit The printer can assign an ink limit to polygon fills and wide vectors. This helps prevent bleeding when printing on inexpensive inkjet media. The default for this option is On.
Installing additional memory A The 4800 Series inkjet printers ship with 64 MB of RAM and are upgradable to a maximum of 256 MB. Additional memory helps to free the host computer more quickly. Acceptable DIMM sizes Printer memory may be upgraded by installing PC133 (or faster) 168-pin DIMMs (Dual In-line Memory Modules). The printer will accept 64 MB, 128 MB or 256MB DIMMs. DIMM installation The DIMM is located on the MPCB (Main Printed Circuit Board) inside the right cover.
Reference Guide ê To remove the DIMM 1 Facing the top of the DIMM, push the side clips gently away from the DIMM. DIMM Slot ê 2 The DIMM should pop up. Pull the DIMM straight up out of the slot. To install the new DIMM 1 With the large label on the DIMM facing the away from the board, insert into the slots on the side clips and push straight down. Next push the left side of the DIMM down while pulling the clip up over the notch on the DIMM. Repeat on the right side.
Technical information MEDIA TYPES: Photo paper, paper matte, drafting films, and specialty. MEDIA ROLL PARAMETERS Inner roll core: 2" and 3" Max. outside roll diameter: 6" Max.
Reference Guide DIMENSIONS 60" model 42" model Height (platen above floor) 44" (1.12m) 44" (1.12m) Width 111" (2.82m) 93" (2.37m) Depth 28" (0.71m) 28" (0.71m) Weight 165 lbs. 150 lbs. Print width up to 59.6" printable up to 41.
Menu tree C This section contains an overview of the printer's menu tree. In the figures that follow, items in italics indicate that selecting the option gives access to a menu with further options. Items in bold are the default option.
Reference Guide Main menu l l l l Load M edia Feed Media Menu Cut Setup Menu Pause Utility Menu Reset l l l l LOAD MEDIA moves media into or away from the platen. CUT cuts media. FEED MEDIA MENU provides access to further options for moving the media forward or backward; setting end of media; and entering/displaying media length values. PAUSE stops printing and allows the operator to cancel print jobs, reinitialize the printer, or examine the print job.
Reference Guide Feed media menu l l l l Forward Media Counter Display Counter Backward End of Media Exit l l l l Forward advances media toward the front of the printer. Media Counter provides access to additional options where the length of a roll of media can be entered and the media counter reset. Display Counter displays a screen where the current value of the media length can be viewed and printed on the media. Backward moves media toward the back of the printer.
Reference Guide Setup menu at a glance Setup Print Mode Menu Color Mode Quality Mode Dots per Inch Cartridge Set Print Passes Carriage Speed Print Direction Exit Paper Option Menu Supply Type Media Standard Margins Auto-Load Delay Auto-Cut Menu Save Media Exit HP-GL/2 Menu Palette Select Control Rotation Ink Reduction Nesting Menu Reprints Ink Limit Exit User Setup Menu Select User Save User Units Select Language Init Settings Print Settings LCD Contrast Exit Color, mono, gray User, Production, Photo, En
Reference Guide Ink Option Menu Ink Preheat Menu Dryer Auto-Wipe Exit Left, Right Auto/Off/On On/Off Exit Setup menu l l l l Print Mode Menu User Setup Menu Paper Option Menu Ink Option Menu HP-GL/2 Menu Exit l l l l Print Mode Menu provides access to options for color, quality, cartridge set, print passes, carriage speed and print direction. Paper Option Menu provides access to options for loading media, margins, media selection and other media features.
Reference Guide Print Mode Menu l l l l Color M ode Print Passes Quality Mode Carriage Speed Dots per Inch Print Direction Cartridge Set Exit l l l l Color mode provides access to a further menu to select color, monochrome, or grayscale printing. Quality mode provides access to a further menu to select the pre-defined or userdefined quality modes. Dots per inch provides access to a further menu to select print resolution.
Reference Guide Paper Option Menu l l l l Supply T ype M edia Standard A uto-C ut M enu Save M edia M argins A uto-L oad D elay E xit l l l l Supply type provides access to a further menu to select the paper feed mode: roll, roll2, sheet, or takeup. Media standard provides access to a further menu to select the media standard: All, US_Engr, US_Arch, ISO_A, Met over A, ISO_B, Special, Graphics, US_All, Metric_All.
Reference Guide HP-GL/2 Menu l l l l Palette Select Nesting Menu Control Reprints Rotation Ink Limit Ink Reduction Exit l l l l Palette Select provides access to a further menu to select an AutoCAD color palette or a generic HP-GL/2 palette. Control determines whether certain printing parameters are set in the software application or overriden by the printer's fron panel display. Rotation provides access to a further menu to enable rotation and set the rotation angle.
Reference Guide User Setup Menu l l l l Select User Save User Units Select Language Init Settings Print Settings LCD Contrast Exit l l l l Select user provides access to a further menu to select a previously saved user configuration. Default = User 1. Save user provides access to a further menu to save the current printer configuration to the selected user number. Default = User 1. Units select provides access to a further menu to choose the calibration units: English or Metric.
Reference Guide Ink Option Menu l l l l Ink Preheat Menu Dryer Auto-Wipe Exit l l l l Ink preheat provides access to a further menu to set the ink preheat value for each cartridge. Dryer provides access to a further menu to turn the dryer Off or Auto. Auto-Wipe provides access to a further menu to turn the Auto-wipe function On or Off. When on, the cartridges are wiped during printing. Exit returns to the Setup menu.
Reference Guide Utility menu at a glance Prime Access Menu Access Left Access Right Access Home Color Calib Menu Vertical 4321YMC Horizontal 4321YMC Vert Calib Test Horiz Calib Test Calibration Menu Use Paper Calib On/Off Paper Axis Test Color Db Menu Left, Right, Color Db Test Paper Axis 32.00 - 34.00 (33.
Reference Guide Utility menu l l l l Prim e D isplay Settings Access M enu Print Settings C olor C alib M enu Service M enu C alibration M enu Exit l l l l Prime prints the prime pattern. Access Menu provides access to a further menu for options to move the ink carriage away from the service station to access left and right cartridge sets for installation/replacement of cartridges and the media cutter.
Reference Guide Calibration Menu l l l l Use Paper Calib Paper Axis Test Open Jet Menu Paper Axis Color Db Menu Exit l l l l Use Paper Calib provides access to a further menu in which you can set this function On or Off. Paper Axis Test prints the paper axis test pattern. Color Db Menu provides access to a further set of menus in which you can print the color deadband test pattern and set deadband velocity compensation for each cartridge.
Reference Guide Service Menu l l l l C alibration M enu A bout D iagnostics M enu C artridge Info Test Print Exit l l l l Calibration Menu provides access to calibration options. Diagnostics Menu provides access to a further set of menus for performing diagnostics (tech support only) and for printing the color test. About provides information about the printer's firmware version, BROM, RAM and printer size.
Error messages D These display messages are helpful in determining the status of the printer and possible corrective action when operation does not appear to be normal. Error Messages Error messages consist of the message “Internal ERROR: Shutdown” on line 2 of the display. On line 4, a specific message will appear. If you cannot clear the error, record the message and the sequence of events leading to the message so that you can describe the problem to technical support personnel.
Reference Guide The following table shows cartridge-related error messages. Error Message Corrective Action Unrecognized cartridge Be sure the cartridge is the correct cartridge for your printer model. Your printer will not work with cartridges from other models. Remember, the printer is reading the value programmed into the chip on the cartridge. Replace the cartridge if necessary. Cartridge end of life attained. Replace cartridge.
Troubleshooting E This appendix contains valuable information to help you solve the most common printer problems.
Reference Guide If any of the previous steps failed, your printer may not be correctly connected to your computer and/or network. Contact your network administrator or your reseller. Otherwise, continue with the steps that follow. 8. Print directly to the printer from several software applications. 9. If you are networked, login and try printing from several software applications. 10. If steps 8 or 9 fail, repeat them using another computer or remove from the network and test standalone.
Reference Guide File will not print If you are using a parallel cable, be sure it meets the specifications of IEEE 1284. Check your electrical connections. From your software application, print to a file and send the file to the printer in DOS using the DOS Copy command. At the DOS prompt, type COPY /b filename portname (LPT or COM port). Slow printing under Windows Windows applications naturally print slower than DOS applications. Be sure the Windows Print Manager is turned OFF.
Reference Guide ok, inspect the area below service station for anything that might cause it to elevate. Carriage axis failure This may be caused by using media which may curl and cause carriage axis failure. Be sure to use inkjet quality media. An obstruction in the path of the carriage assembly is hindering carriage movement. The obstruction may or may not be visible.
Reference Guide Remove the cutter from the left side of the carriage and check it for visible damage. Make sure cutter version 3 (or newer) is installed (see the figure below). 3 Check the shaft for visible damage (carriage moves back and forth on it during operation). Clean the shaft with a lint free cloth and isopropyl alcohol (let it dry completely before trying to operate the printer). Check the belt for visible damage such as fraying and pieces coming off it.
Reference Guide Ink cartridges do not fire properly Be sure that cartridges and the service station are cleaned periodically to maintain good print quality. (See the Maintenance Guide.) Cartridges may wear out after extended use. Try replacing the cartridge. Store cartridges in a sealed container at room temperature when not in use for extended periods of time. Make sure the protective tape is removed from the cartridges.
Reference Guide Run the jet status plot as described in the Quick Start Guide. If sections of the print are missing, add the affected jets to the compensation list. Replace the cartridge if necessary. Ink spills on the flex cable Flex cable refers to the copper contacts on the carriage where the cartridge seats. Clean the flex cable gently with a cotton swab moistened with water. Do not use acetone or any other harsh cleaner as this may cause damage to the flex cable.
Reference Guide Overall print quality is poor Prime, clean, calibrate, or replace cartridges. Make sure the printer is positioned on level ground. Use a higher quality print mode, such as Enhanced. Be sure you are using genuine KODAK PROFESSIONAL inks and media. Cartridge spits small amounts of ink on paper Nozzle plate may be flooded. Try using a lower firing rate or replacing the cartridge. Adjust cartridge preheat as described in Chapter 2.
Reference Guide Smudged or dark characters Be sure you are using the correct type of paper for the application. Make sure the paper is straight and unwrinkled when loading it into the printer. Prime, clean, calibrate, or replace cartridges. Try a different print mode. Improperly formed or misaligned characters Calibrate cartridges. Color problems or shadowing Calibrate cartridges. Excessive graininess Perform color deadband compensation. Refer to the Quick Start Guide.
Reference Guide STEPS TO MINIMIZE GHOSTING (PARASITIC SUPPRESSION) 1. Use the preheat function and set the heat to 4 on all the cartridges. - On the Main Menu, press Setup Menu/Ink Options Menu/Ink Preheat Menu. In the Ink Preheat menu you will see Cyan - Preheat, Yellow Preheat, Magenta - Preheat, and Black Preheat. Go into first preheat function and adjust the value to 4 and press OK. Continue this with the three remaining preheat functions. 2. Slow the carriage speed down to 5 or lower.
Reference Guide The printer automatically prints in portrait orientation (X axis = paper axis). If you rotated the image in your application to save paper, set the paper size to the next larger size (for example, if you are printing a C size image, choose D size paper). Be sure to set Save Media to ON. This stops the printer from scrolling the full paper height. Jagged vertical lines Prime, clean, calibrate, or replace cartridges.
Reference Guide Data Transfer Printer doesn’t generate a print Be sure your printer is connected to the port to which you are sending the file. If you are printing over a network, you will need to determine whether the problem is in the network. Try connecting the printer directly to your computer and send the file again. Parallel printing doesn’t work Some UNIX workstations have difficulty communicating with the printer using a parallel connection.
Reference Guide · Use the printer’s self-test feature or run the demo print to assure that the printer is functioning. · Check that the baud settings for the computer and printer are correct. If the settings do not match, the file may be printed incorrectly or not at all. 2. Verify network connections. • On a print client or server, type ping system-name and press Return. This command checks that the network link between the print server and print client is set up correctly.
Reference Guide • On the print server, make sure the printer is not waiting because of a fault. • Make sure the printer is not set up as a login terminal. Application Software Isolating a problem to your software Sometimes printing problems are application software-specific. Try printing the “Test File” as described on page 3-6 of this guide. If the test file prints, the printer’s health is probably good. Try printing a simple file from your application or from another application.
Reference Guide Calling for Help If you have tried the suggestions in this manual and still need assistance, call the reseller where you purchased your printer.