Super12 Document Printer User’s Guide A-61121 Part No.
Using the Super12 Document Printer The Kodak Digital Science Super12 Document Printer prints customerspecified information on documents as they pass through the transport system.
Printed information The information printed by the Super12 Document Printer is defined during installation. The Super12 Document Printer prints up to 12 lines per document.
Changing the print location and print position The location of the information you want printed on a document is determined by the print location of the Super12 Document Printer and the pre-defined print position. Print Location The Super12 Document Printer can be placed in one of six available locations across the transport plate. The orientation of the printer when in position 1, 2 or 3 is different than when the printer is in position 4, 5 or 6.
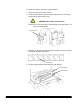
To remove the plastic strips from a print location: 1. Open the front cover of the scanner. 2. Lift the printer from the printer bracket and place it on the hanger bracket to keep it out of the way. CAUTION: Hot surface, avoid contact. NOTE: Be sure the flex cable is placed between the two hooks so it does not get damaged. Hanger bracket 3. Remove the plastic strips from any print locations (on the transport plate) that you will be printing in. Plastic strips 4.
5. Remove the plastic strips from the desired print locations from the underside of the belt module. The print locations that you remove the plastic strips from should correspond with the strips you removed from the transport plate. Plastic strips NOTE: Verify that the maintenance tray is in place before continuing. If the maintenance tray is not in place, see “Replacing the maintenance tray ” for more information. 6. Replace the belt module. 7. Lower the transport plate. 8.
Print Position The print position specifies how far from the leading edge (fed into the transport first) of the document the information will be printed. The default print position is defined at installation. You can temporarily change the default print position by using function code F46.
Enabling/disabling the Super12 Document Printer Make sure the Super12 Document Printer is enabled before feeding documents. • The Super12 Document Printer may be enabled/disabled separately at the mode level using function code F43. • If you have enabled the Super12 Document Printer, but do not want to print on the next document fed into the transport, you may omit printing on the next document only by entering function code F44.
Function codes The information printed by the Super12 Document Printer is defined during installation. Individual modes are defined for use with specific applications. If a Super12 Document Printer has been installed, some or all modes may allow use of the Super12 Document Printer. In addition, the customerspecified information to be printed is defined for each mode. The Super12 Document Printer provides easy installation and cleaning of two print cartridges for 12-character printing.
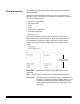
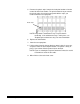
F45 — Verifying print quality Perform the following procedure to verify the print quality is satisfactory: 1. Enter function code F45 (Print Test) and press Enter. 2. Press 2 (Test Pattern). The transport starts automatically. 3. Feed a blank sheet of paper; a test pattern will be printed. 4. Evaluate the appearance of the test pattern. A complete test pattern should look similar to the following illustration: • If the pattern is complete, begin work.
F49 — Aligning the print image To align the print image so the left half of the image matches the right half of the image: 1. Enter function code F49. 2. Press Enter. The current alignment value will be displayed. 3. Press the up (↑) arrow to move the left half of the image closer to the leading edge of the document (the value will decrease) or press the down (↓) arrow to move the left half of the image farther away from the leading edge of the document (the value will increase). 4.
F56 — Checking the print cartridge jet connections To determine if all ink jets are functioning properly: 1. Enter function code F56. 2. Press Enter. The number of jets out per character, as well as the total number of jets out, will be displayed. Print Cartridge Status 0 0 0 0 0 0 0 0 0 0 0 0 00 All zeros will be displayed if the ink jets on both cartridges are operating correctly.
Installing a new print cartridge Before you begin, be sure the scanner is powered-on. IMPORTANT: Do not remove or insert print cartridges while the printer is in the capped position. Use function code F40, Option 1 - Change Head(s) or damage can be done to the Super12 Document Printer. To install a new print cartridge(s): 1. Enter function code F40 and press Enter. The following message will be displayed: Print Head Position 1=Change Head(s) 2=Clean Printer 2.
4. If the print cartridges are already installed, remove the cartridges. 5. Open the new print cartridge package and remove the print cartridge from the package. 6. Remove the protective tape from the bottom of the print cartridge. NOTE: Do not discard the protective tape if you plan on storing a partially used print cartridge. You will need to place this tape over the orifice plate on the print cartridge to keep it from drying out.
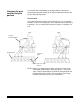
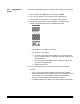
7. Slide a new print cartridge in the Super12 Document Printer slots, then gently push the cartridge forward until you hear and feel it click into place. Use the illustration below as a guide. IMPORTANT: If changing both print cartridges, install the one that is farthest away from the Orientation switch first. 8. When inserting the second print cartridge, hold it closer to the orientation switch when sliding it in place CAUTION: Hot surface, avoid contact. Orientation switch 9.
If either (or both) print cartridges are not seated correctly, one (or both) of the yellow lights on the flex cable will flash. If this happens, repeat Steps 7 through 9 until the print cartridges are installed correctly. NOTE: The flashing lights on the flex cable correspond with the print cartridge(s) that is not positioned correctly. 10. When the print cartridges are installed correctly, reinstall the Super12 Document Printer in the desired print location.
Maintenance This section provides: • Recommended cleaning guidelines. • A list of catalog numbers and supplies needed to maintain the Super12 Document Printer. • Cleaning procedures for the Super12 Document Printer. • Instructions for changing the maintenance tray. Cleaning guidelines Use the following information as a guide when performing routine maintenance of the Super12 Document Printer.
Cleaning materials and supplies Use the Super12 Maintenance Kit that comes with the Super12 Document Printer. The Maintenance Kit contains the following: • Cleaning swabs • Rubber gaskets • A maintenance tray The following supplies are available through your Kodak sales contact. Cleaning the document printer Supply CAT No.
7. Enter function code F40 and press Enter. The following message will be displayed: Print Head Position 1=Change Head(s) 2=Clean Printer 8. Select 2; a Please Wait message will be displayed. When this message is no longer displayed, open the front cover of the scanner. 9. Lift the printer out of the printer bracket and place it on the feeder top cover. 10. With a supplied swab, wipe off the rubber gaskets and the area around the gaskets. NOTE: The rubber gaskets can be removed and cleaned.
To replace the print cartridges: 15. Enter function code F40 and press Enter. The following message will be displayed: Print Head Position 1=Change Head(s) 2=Clean Printer 16. Select 1; a Please Wait message will be displayed. When this message is no longer displayed, open the front cover of the scanner. 17. Lift the printer out of the printer bracket and place it on the feeder top cover. 18. Reinsert the print cartridges. 19.
Cleaning the transport area To thoroughly clean the transport area, perform the following procedure: 1. Open the front cover. 2. Note the current location of the Super12 Document Printer, then lift it from the printer bracket, being careful not to strain the flex cable. 3. Place the Super12 Document Printer on the hanger bracket to keep it out of the way while you are cleaning other areas of the machine. CAUTION: Hot surface, avoid contact.
Replacing the maintenance tray Periodically the Super12 Document Printer maintenance tray may need to be replaced. To access and replace the maintenance tray: 1. Open the front cover of the scanner. 2. Place the printer on the hanger bracket so it is out of the way. CAUTION: Hot surface, avoid contact. Hanger bracket NOTE: Be sure the flex cable is placed between the two hooks so it does not get damaged. 3. Lift and lock the transport plate into place. 4.
5. Lift out the used maintenance tray and dispose of it according to your local and state regulations. Maintenance tray 6. Open the package containing the new maintenance tray and remove it. 7. Insert the new maintenance tray; be sure it is firmly in place.
Storage and handling of print cartridges If unused print cartridges are going to be stored for a period of time, replace the protective tape on the orifice plate of the print cartridge. Orifice plate Protective tape NOTE: Dispose empty print cartridges according to your local and state regulations.
Troubleshooting This section lists possible problems you may encounter when using the Kodak Digital Science Super12 Document Printer. Problem Solution Printing a partial image or printing backwards Be sure the Super12 Document Printer is seated correctly on the printer bracket.
How print position is effected by patch reading The ability to print at the designated print position will be effected by patch reading, and by the amount of printed information which changes for each document. If you encounter print position drift, it may be necessary to change your print template using the Mode Setup Software or change your current print position further down the page. Following are some examples illustrating print drifting with Patch Reading turned off and on.
If the print position is set at less than 1 inch, the patch window will close at 2.5 inches after the lead edge; the printer can change up to 1 full print line and be able to print at the designated position. However, if more than 1 full print line needs to be changed, the image may drift down the page depending on how much more information needs to be changed. Patch Reading ON — Print Position 0.25 inches — Patch Window is 2.
Error codes Following is a list of errors codes you may encounter when using the Super12 Document Printer. Error: E133 Feeder waiting for printer. Probable cause: The feeder will not be ready until the printer has moved to the print position. Solution: Wait until the printer has moved into the print position.
If E206 continues to be displayed or the flex cable lights continue to flash, enter F45 to do a Print Test. If the print quality is acceptable, ignore the E206 error or the flashing flex cable lights. If the print quality is not acceptable, try changing one or both of the print cartridges, then enter F45 again to do another Print Test. If the print quality is still not acceptable, the flex cable may not be working properly. Call service.
EASTMAN KODAK COMPANY Document Imaging Rochester, New York 14650 Kodak, Imagelink, Digital Science and the ds monogram symbol are trademarks of Eastman Kodak Company. Printed on recycled paper. A-61121 Part No. 1H7191 3/99 © Eastman Kodak Company, 1999 Printed in U.S.A.