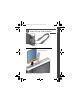
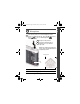
urg_01146.book Page 1 Monday, May 17, 2010 8:43 AM ENGLISH Attach the strap, load the battery KODAK Li-Ion Rechargeable Digital Camera Battery KLIC-7000 www.kodak.
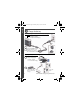
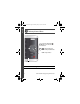
urg_01146.book Page 2 Monday, May 17, 2010 8:43 AM ENGLISH Charge the battery If your package includes this battery charger: Battery Charging light: • Blinking: charging • Steady: finished charging Yours may differ. 1 Turn OFF the camera. 2 Connect the KODAK Camera USB Cable, Micro B / 5-Pin and charger.
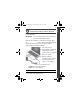
urg_01146.book Page 3 Monday, May 17, 2010 8:43 AM ENGLISH Use a microSD/SDHC Card Your camera has internal memory. We recommend purchasing a microSD or microSDHC Card to conveniently store more pictures/videos. CAUTION: A card can only be inserted one way; forcing it may cause damage. Inserting or removing a card while the camera is on may damage the pictures, the card, or the camera. 1 Turn off the camera. 2 Insert a card until it clicks. 3 Turn on the camera.
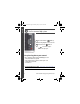
urg_01146.book Page 4 Monday, May 17, 2010 8:43 AM ENGLISH Turn on the camera Set the language and date/time Language: to change. OK to accept. OK Date/Time: At the prompt, press OK. to change current field. for previous/next field. OK to accept. See the Extended user guide www.kodak.com/go/m590support 4 www.kodak.
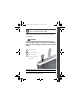
urg_01146.book Page 5 Monday, May 17, 2010 8:43 AM ENGLISH Take a picture 1 The camera turns on in Smart Capture mode. (If it’s in a different mode, press the Mode button, . to choose Smart Capture then Then press OK.) 2 Compose the picture. 3 Press the Shutter button halfway to focus and set exposure. When the framing marks turn green, press the Shutter button completely down. Framing marks Mode button See other modes see page 11 See the Extended user guide www.kodak.com/go/m590support www.
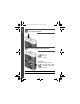
urg_01146.book Page 6 Monday, May 17, 2010 8:43 AM ENGLISH Review pictures/videos the Review 1 Press button to enter/exit Review. 2 OK View previous/ next picture/video. OK Play a video. Review See the Extended user guide www.kodak.com/go/m590support 6 www.kodak.
urg_01146.book Page 7 Monday, May 17, 2010 8:43 AM ENGLISH Download software, transfer pictures Download KODAK Software—so it’s easy to transfer and share pictures and videos. IMPORTANT: To use the sharing and social networking features, you must download KODAK Software. Make sure the computer is connected to the Internet. When you connect the camera to the computer, the KODAK Software Downloader automatically runs. Follow the prompts to download and install KODAK Software. 1 Turn off the camera.
urg_01146.book Page 8 Monday, May 17, 2010 8:43 AM ENGLISH Use the camera Help system button, then highlight a menu choice. 1 Press the Menu 2 Press the Info button. Scroll through a Help topic. Keep learning about your camera! Go to www.kodak.com/go/m590support for: • the Extended user guide • the step-by-step solutions and repair tool • interactive tutorials • and more! See the Extended user guide www.kodak.com/go/m590support 8 www.kodak.
ENGLISH urg_01146.book Page 9 Monday, May 17, 2010 8:43 AM Front View Shutter button Power button Self-timer/Video light/AF Assist light Lens Flash Microphone www.kodak.
urg_01146.book Page 10 Monday, May 17, 2010 8:43 AM ENGLISH Back View Buttons: Flash, Delete, Menu, Info, Review Wide Angle/ Telephoto button Speaker OK, Strap post Mode button Share button USB port Battery compartment, microSD/SDHC Card slot LCD 10 Tripod socket www.kodak.
urg_01146.book Page 11 Monday, May 17, 2010 8:43 AM 1 Do more with your camera Press the Mode button, then to choose the mode that best suits your subjects and surroundings, then press OK. Mode button Use this mode For Smart Capture General picture taking—excellent image quality and ease of use. Program Advanced picture taking—allows access to manual settings. Point-and-shoot simplicity when taking pictures in practically any situation. (See page 12.) Capturing video with sound. (See page 12.
urg_01146.book Page 12 Monday, May 17, 2010 8:43 AM Do more with your camera Take a video 1 Press the Mode button, then to choose Video , then press OK. 2 Press the Shutter button completely down, then release it. To stop recording, press and release the Shutter button again. Use Scene (SCN) modes Choose a Scene mode—for great pictures in any situation. 1 Press the Mode button, then press OK. 2 Press to choose SCN, then to choose a mode and read its description.
urg_01146.book Page 13 Monday, May 17, 2010 8:43 AM Do more with your camera Use the flash Flash button Press the Flash button repeatedly until the LCD displays the desired flash mode. Flash modes Flash fires Auto When the lighting conditions require it. Fill (Flash On) Every time you take a picture, regardless of the lighting conditions. Use when the subject is in shadow or is “backlit” (when the light is behind the subject). NOTE: Not available in Smart Capture mode.
urg_01146.book Page 14 Monday, May 17, 2010 8:43 AM Do more with your camera Use the optical zoom 1 Use the LCD to frame your subject. T 2 To zoom in, press Telephoto (T). To zoom out, press Wide Angle (W). W 3 Take the picture. Use shortcuts Your camera has a clean, uncluttered interface. For quick access to the most popular capture and review functions: 1 Press the Info button. The shortcuts appear. To hide the shortcuts again, press .
urg_01146.book Page 15 Monday, May 17, 2010 8:43 AM Do more with your camera Delete pictures/videos 1 Press the Review 2 Press button. for previous/next picture/video. 3 Press the Delete button. 4 Follow the screen prompts. Use the menu button to change settings You can change settings to get the best results from your camera. Some modes offer limited settings. 1 Press the Menu 2 Press button.
urg_01146.book Page 16 Monday, May 17, 2010 8:43 AM Do more with your camera Understand the picture-taking icons Focus mode Self timer/Burst Exposure compensation Flash mode Capture mode Pictures/time remaining Zoom slider Preset keyword tag Battery level Understand the review icons Video duration Select picture/video Print/Quantity Protected Email Picture/Video number Add text tag View thumbnails Play video Upload Favorite Text tag 16 Battery level www.kodak.
urg_01146.book Page 17 Monday, May 17, 2010 8:43 AM 2 Share and tag pictures It’s never been easier to share pictures on your favorite social networking sites. IMPORTANT: To use the camera social networking features, you need to download KODAK Software. (See page 7.) 1 Press the Review button, then to find a picture. 2 Press the Share button. If it’s your first time, a Help screen appears. 3 Press to choose a social networking site, then press OK. A check mark appears.
urg_01146.book Page 18 Monday, May 17, 2010 8:43 AM Share and tag pictures Choose networking sites to show You can show/hide social networking sites on your camera so that only your favorite sites appear. 1 Press the Review button, then press the Menu 2 Press to choose the Setup tab, then Share Button Settings, then press OK. button. to choose 3 Press to choose a social networking site, then press to choose Show/Hide. Repeat this step for each network.
urg_01146.book Page 19 Monday, May 17, 2010 8:43 AM Share and tag pictures Manage email addresses and KODAK PULSE Digital Frames You can add, edit, or delete email addresses and KODAK PULSE Digital Frames on your camera. 1 In Review, press the Share button. Press to choose Manage Email Addresses (or Manage Frames), then press OK. 2 To add an email address or frame, press to choose New Email or New Frame, then press OK. Use the on-screen keyboard to make the addition. See page 20. (Example: JohnDoe@domain.
urg_01146.book Page 20 Monday, May 17, 2010 8:43 AM Share and tag pictures Use the keyboard The keyboard appears when you need it. 1 Press to choose a letter, then press OK. 2 When finished, press to choose OK, then press OK. 3 If you’ve added a new name, the camera prompts you to update all faces to match assigned names. Choose Yes, then press OK. The name is assigned to all faces that match this one. Tag pictures Tag pictures to make them easy to find, later.
urg_01146.book Page 21 Monday, May 17, 2010 8:43 AM Share and tag pictures Tag people When you tag faces, you’re helping your camera to recognize people by name. Then it matches names and faces in pictures you’ve taken—and those you take in the future! 1 Press the Review that contains faces. button, then 2 Press the Menu button. Press People, then press OK. 3 Press to find a picture to choose Tag to choose Apply Tags, then press OK.
urg_01146.book Page 22 Monday, May 17, 2010 8:43 AM Share and tag pictures Need to update a name? If you meet a new friend—James—but you already have pictures tagged with an old friend, James, you can: ■ Tag the new James with “James Smith” and/or ■ Update the old James to “James Monroe” 1 Press the Review button. 2 Press the Menu button. Press People, then press OK. to choose Tag 3 Press to choose Modify Names List, then press OK. 4 Press press OK.
urg_01146.book Page 23 Monday, May 17, 2010 8:43 AM Share and tag pictures Tag with keywords 1 Press the Review button, then 2 Press the Menu button. Press Tag, then press OK. to find a picture. to choose Keyword 3 Press to choose an existing keyword or New Keyword to add a new one, then press OK. 4 Press to add keywords to other pictures. When finished, press to choose Done, then press OK. To return to picture-taking mode, press the Shutter button halfway down.
urg_01146.book Page 24 Monday, May 17, 2010 8:43 AM Share and tag pictures A smarter way to find your pictures Tag pictures—by people or keywords—to make them easy to find, later. For example, the camera can find all pictures that contain “Mary” or “Dad’s 60th Birthday.” (See Tag people, page 21 or Tag with keywords, page 23.) 1 Press the Review button. 2 Press the Wide Angle (W) button to view pictures/videos by thumbnail (or choose View Thumbnails shortcut).
urg_01146.book Page 25 Monday, May 17, 2010 8:43 AM 3 Solve camera problems To access the camera Help system, see page 8. Go to www.kodak.com/go/support for the Extended user guide and for the Step-by-Step Solutions & Repair tool. Status Solution Camera does not turn on or off ■ Make sure the battery is charged and installed correctly (see page 1). Camera buttons and controls do not function Flash does not fire ■ Check the flash setting, and change as needed (see page 13).
urg_01146.book Page 26 Monday, May 17, 2010 8:43 AM 4 Appendix CAUTION: Do not disassemble this product; there are no user-serviceable parts inside. Refer servicing to qualified service personnel. KODAK AC Adapters and Battery Chargers are intended for indoor use only. The use of controls, adjustments, or procedures other than those specified herein may result in exposure to shock and/or electrical or mechanical hazards. If the LCD breaks, do not touch the glass or liquid. Contact Kodak customer support.
urg_01146.book Page 27 Monday, May 17, 2010 8:43 AM Appendix malfunctions and defects in both materials and workmanship for the warranty period specified on your KODAK Product packaging. Retain the original dated sales receipt. Proof of purchase date is required with any request for warranty repair. Limited warranty coverage Warranty service is only available from within the country where the products were originally purchased.
urg_01146.book Page 28 Monday, May 17, 2010 8:43 AM Appendix Outside the United States and Canada In countries other than the United States and Canada, the terms and conditions of this warranty may be different. Unless a specific Kodak warranty is communicated to the purchaser in writing by a Kodak company, no warranty or liability exists beyond any minimum requirements imposed by law, even though defect, damage, or loss may be by negligence or other act.
urg_01146.book Page 29 Monday, May 17, 2010 8:43 AM Appendix Korean Class B ITE Korean Li-Ion Regulatory Eastman Kodak Company Rochester, New York 14650 © Kodak, 2010 Kodak, EasyShare, and Pulse are trademarks of Eastman Kodak Company. 4H7185_en www.kodak.