Kodak EasyShare M763/M863/MD863 digital camera Extended User Guide www.kodak.com For interactive tutorials: www.kodak.com/go/howto For help with your camera: www.kodak.com/go/m763support, www.kodak.com/go/m863support, www.kodak.
Eastman Kodak Company Rochester, NY 14650 © Eastman Kodak Company, 2007 All screen images are simulated. Kodak, EasyShare, and Perfect Touch are trademarks of Eastman Kodak Company.
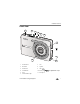
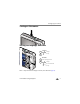
Product features Front view 1 2 3 4 5 6 7 8 9 11 10 1 Shutter button 7 Lens 2 Mode dial 8 Speaker 3 Flash button 9 USB 4 On/Off button 10 DC-In (5V) 5 Flash 11 Microphone 6 Self-timer/video light www.kodak.
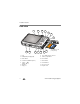
Product features Back view 1 2 3 4 5 6 7 14 13 12 11 10 9 8 1 2 3 4 5 LCD Ready/Battery charging light Delete button Zoom button (Wide/Telephoto) 8 9 10 11 12 6 7 OK button Strap post 13 Dock connector 14 Tripod socket ii optional memory card (sold separately) SD or SDHC memory card slot Battery compartment Share button Menu button Review button www.kodak.
Table of contents 1 1 Setting up your camera .........................................................................1 Attaching the strap ....................................................................................... 1 Loading the battery ....................................................................................... 1 Charging the battery ..................................................................................... 2 Turning on the camera .......................................
Table of contents 4 Doing more with your camera .............................................................29 Using the menu button to change settings................................................... 29 Customizing your camera ............................................................................ 33 Using the self-timer..................................................................................... 36 Using burst ...............................................................................
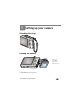
1 Setting up your camera Attaching the strap Loading the battery Kodak Li-Ion rechargeable digital camera battery KLIC 7001 To extend battery life, see page 63. www.kodak.
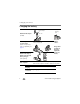
Setting up your camera Charging the battery Battery Charging light USB AC adapter USB cable Kodak USB AC adapter (included) First, turn OFF the camera. Kodak EasyShare camera Battery Charging light or printer docks (may be sold separately) For dock compatibility, see page 49. Charge until the Battery Charging light turns off (up to 3 hours). Kodak 5V AC adapter, Kodak Li-Ion universal battery chargers (sold separately) Your computer 2 Connect the USB cable to the computer’s USB port, not a Hub.
Setting up your camera Turning on the camera Setting the language, date/time 1 2 1 Language: to change. OK to accept. Date/Time: At the prompt, press OK. 2 to change. for previous/next field. OK to accept. NOTE: To change the date/time and language in the future, use the Menu button (page 33). www.kodak.
Setting up your camera Storing pictures on an SD/SDHC card Your camera has internal memory. You can purchase an SD or SDHC memory card to conveniently store more pictures and videos (www.kodak.com/go/m763accessories, www.kodak.com/go/m863accessories, www.kodak.com/go/md863accessories). We recommend Kodak SD or SDHC cards. 1 2 3 Turn off the camera. Insert or remove the optional card. Turn on the camera. CAUTION: A card can only be inserted one way; forcing it may cause damage.
2 Taking pictures/videos Taking a picture 1 3 Press the Shutter button halfway to focus and set exposure. On/Off button When the framing marks turn green, press the Shutter button completely down. 2 Framing marks Reviewing the picture just taken After you take a picture or video, the LCD displays a quickview for approximately 10 seconds. (To exit the quickview sooner, press the Shutter button halfway.) The picture is saved unless you press the Delete button. Delete button Press to play a video.
Taking pictures/videos Using the framing marks Framing marks indicate the camera focus area. The camera attempts to focus on foreground subjects, even if the subjects are not centered in the scene. Framing marks 1 Press the Shutter button halfway. When the framing marks turn green, focus is accomplished. 2 If the camera is not focusing on the desired subject (or if the framing marks disappear), release the Shutter button and recompose the scene.
Taking pictures/videos Using optical zoom Use optical zoom to get up to 3X closer to your subject. 1 Use the LCD to frame your subject. 2 Press Telephoto (T) to zoom in. Press Wide Angle (W) to zoom out. The zoom indicator shows zoom status. 3 Take the picture or video. NOTE: For focus distances, see page 58. Optical zoom range W T ■ Always use the auto focus framing marks, page 6. Digital zoom range ■ If you are not using zoom (1X, wide angle), you can be as close as 13.8 in.
Taking pictures/videos Using the flash Use the flash when you take pictures at night, indoors, or outdoors in heavy shadows. button repeatedly to scroll Press the through flash modes (see Flash modes below). The current flash mode appears in the LCD screen. Flash-to-subject distance Zoom position Flash distance Wide angle 0.6–3.5 m (2–11.5 ft) @ ISO 320 Telephoto 0.6–2.0 m (2–6.6 ft) @ ISO 320 Flash modes Flash fires Auto Flash When the lighting conditions require it. Off Never.
Taking pictures/videos Using different picture-taking modes Mode dial Choose the mode that best suits your subjects and surroundings. Use this mode Auto For General picture taking—offers an excellent balance of image quality and ease of use. Digital Image Minimizing the effects of camera shake and subject movement. Stabilization Close-up SCN Scene ISO Close range. Use available light instead of flash if possible. Point-and-shoot simplicity when taking pictures under special conditions. (See page 10.
Taking pictures/videos Scene modes Choose a Scene mode—for great pictures in practically any situation! 1 Turn the Mode dial to Scene . 2 Press to display Scene mode descriptions. If the mode description turns off before you finish reading it, press OK. 3 Press OK to choose a Scene mode. Use this For SCN mode Portrait Panorama Left-Right Full-frame portraits of people. Stitching up to 3 captured images from left to right into one image.
Taking pictures/videos Use this For SCN mode Manner/ Museum Self-Portrait Children Backlight Candle light Sunset Quiet occasions, like a wedding or lecture. Flash and sound are disabled. Close-ups of yourself. Assures proper focus and minimizes red eye. Action pictures of children in bright light. Subjects that are in shadow or “backlit” (when light is behind the subject). Capturing subjects in low light. Capturing the deep hues seen at sunset.
Taking pictures/videos Taking panoramic pictures Use panorama to “stitch” up to 3 pictures into a panoramic scene. NOTE: For best results, use a tripod. Individual pictures are not saved, even if panorama capture is cancelled before stitching occurs. (Picture size is set to 3.1 MP for each picture. Exposure Compensation, White Balance, AF Zone, AF Control, and Color Mode are set with the first picture. The flash is set to Off.) 1 Turn the Mode dial to SCN.
Taking pictures/videos Understanding the picture-taking icons Self-timer/Burst Flash Camera mode Album name Picture size Framing marks Date stamp Pictures/time remaining Storage location Zoom: Wide, Telephoto, Digital Focus zone Exposure metering White balance Long time exposure Framing grid ISO speed Battery level Exposure compensation In capture mode—shutter pressed halfway Camera mode Auto Exposure/ Auto Focus warning Battery level Exposure compensation www.kodak.
3 Working with pictures/videos Reviewing pictures/videos Press the Review button to view and work with your pictures/videos. Press Review again to exit. (To display pictures/videos on a television, see page 25.) 1 Press the Review button. 2 Press OK to view previous/next picture/video. To save battery power, use an optional Kodak EasyShare dock or Kodak 5-volt AC adapter. (Visit: www.kodak.com/go/m763accessories, www.kodak.com/go/m863accessories, www.kodak.com/go/md863accessories.
Working with pictures/videos Playing a video 1 Press during playback to reverse at 2X, 4X. 2 Press the Review button. 3 Press 4 Press Playback speed 4X 2X 1X 2X Reverse 4X to find previous/next video. to play. Press OK to pause/unpause. 5 Press during pause to view previous/next video frame. Forward 6 Press volume. 7 Press during playback to adjust the during playback to play at 2X, 4X. Viewing picture/video information 1 Press the Review button.
Working with pictures/videos Using sound tags You can add a unique sound/message (up to 1 minute long) to your picture. NOTE: Only one tag can be added to each picture (not to videos). Recording a sound tag 1 Press the Review button, then picture. to find a 2 Press the Menu button, then highlight Sound Tag. Press the OK button. to 3 Choose Record, then press OK. 4 Follow the screen prompts. The sound tag is applied to your picture. ■ Press the Menu button to exit the menu.
Working with pictures/videos Deleting pictures/videos 1 Press the Review button. 2 Press for previous/next picture/video. 3 Press the Delete button. 4 Follow the screen prompts. Using the undo delete feature If you accidentally delete a picture, use Undo Delete to retrieve it. This feature is available only immediately after you delete a picture in Review mode and when the Undo Delete option appears. 1 Press to highlight Undo Delete. 2 Press OK.
Working with pictures/videos Using the menu button in Review 1 Press the Review button, then the Menu button. 2 Press to find: ■ Review to view pictures/videos ■ Edit to edit pictures/videos ■ Setup for other camera settings (page 33) 3 Press to highlight a setting, then press the OK button. 4 Choose an option, then press the OK button.
Working with pictures/videos Using Kodak Perfect Touch technology Kodak Perfect Touch technology helps ensure better, brighter pictures. 1 Press the Review button, then for previous/next picture. 2 Press the Menu button, then press to find Edit. 3 Press to highlight Perfect Touch tech., then press OK. The enhancement is previewed in a split screen. Press to view other parts of the picture. 4 Press OK.
Working with pictures/videos Editing videos Making a picture from a video You can choose a single frame from a video, then make a picture suitable for printing. 1 Press the Review button, then to find a video. 2 Press the Menu button. Press to find Edit. 3 Press press OK. Video to highlight Make Picture, then Picture 4 Press to select a video frame. 5 Follow the screen prompts to save the picture. A picture is created. (The original video is saved.) ■ Press the Menu button to exit the menu.
Working with pictures/videos Making a video action print From a video, you can make a 4-, 9-, or 16-up picture, suitable for a 4 x 6-inch (10 x 15 cm) print. 1 Press the Review button, then video. 2 Press the Menu button. Press Video 4-, 9-, or 16-up picture to find a to find Edit. 3 Press to highlight Video Action Print, then press OK. 4 Choose an option, then press OK. Auto options: The camera includes the first and last frames, then 2, 7, or 14 equally spaced frames.
Working with pictures/videos Changing the slide show display interval The default interval setting displays each picture for 5 seconds. You can set the display interval from 3–60 seconds. 1 On the Slide Show menu, press button. to highlight Interval, then press the OK 2 Select a display interval. To scroll through the seconds quickly, press and hold . 3 Press the OK button. The interval setting remains until you change it.
Working with pictures/videos Running a multimedia slide show Multimedia Slide Show is similar to Slide Show, but also offers music and visual effects. First, select 2-20 pictures (see page 26). Then: 1 Press the Review button. 2 Press to highlight Multimedia Slide Show, then press the OK button. 3 Press button. to highlight a choice from the menu below, then press the OK ■ Begin Show ■ Music ■ Effect ■ Play Order Each picture/video is displayed once.
Working with pictures/videos Viewing pictures/videos in different ways Viewing as thumbnails (multi-up) 1 Press the Review button. 2 Press the Zoom Wide Angle (W) button to change from single-picture view to multi-up thumbnails. 3 Press Telephoto (T) to return to single-picture view. ■ To select multiple pictures/videos, see page 26. ■ Press the Review button to exit Review. Viewing by date or by album 1 Press the Review button, then the Menu button.
Working with pictures/videos Viewing on a television using an A/V cable You can display pictures/videos/slide shows on a television, computer monitor, or any device equipped with a video input. To connect the camera to a television, use an A/V (audio/video) cable (may be sold separately), then see page 14 or page 21. NOTE: Ensure that the Video Out setting (NTSC or PAL) is correct (see page 35). The slide show stops if you connect/disconnect a cable while the slide show is running.
Working with pictures/videos Selecting multiple pictures/videos Use the multi-select feature when you have two or more pictures/videos to print, transfer, delete, etc. (Multi-select is used most effectively in Multi-Up mode, page 24.) 1 Press the Review button, then picture/video. to find a 2 Press the OK button to select pictures/videos. A check mark appears on the picture. You can now print, transfer, or delete the selected pictures. You can press OK a second time to remove a check mark.
Working with pictures/videos Understanding the review icons Pictures Favorite Protect Email tag Kodak Perfect Touch Blur warning Review mode Album name Print tag/number of prints Picture number Image storage location Play time Volume control indicator (sound tags) Battery level Videos Video length Video number Review mode Image storage location Play time Video control indicator Battery level www.kodak.
Working with pictures/videos Understanding blur warning icons A picture blur warning icon is displayed during quickview and review. Green—Picture is sharp enough for an acceptable 4 x 6-inch (10 x 15 cm) print. Yellow—Picture may be sharp enough for an acceptable 4 x 6-inch (10 x 15 cm) print or sharpness is not determined. Red—Picture is not sharp enough for an acceptable 4 x 6-inch (10 x 15 cm) print. White—Printability is still being determined. 28 www.kodak.
4 Doing more with your camera Using the menu button to change settings You can change settings to get the best results from your camera. NOTE: Some settings remain until you change them; others, until you change modes or turn off the camera. Some modes offer limited settings. 1 Press the Menu button.
Doing more with your camera Using the capture tab Press Menu, , , and OK to access settings Picture Size Choose a picture resolution. For recommended print sizes, visit: www.kodak.com/go/printsizes Long Time Exposure Choose how long the shutter stays open. 30 Options M763 For M863 7.1 MP (4:3) Pictures at the highest resolution, largest file size 8.1 MP (4:3) 6.3 MP (3:2) Printing on EasyShare printer docks and photo printers 7.2 MP (3:2) 5.3 MP (16:9) HDTV format in high resolution 6.
Doing more with your camera Press Menu, , , and OK to access settings Color Mode Choose color tones. Unavailable in Video mode. Options High Color Natural Color Low Color Black & White Sepia—pictures have a reddish-brown, antique look. NOTE: EasyShare software also lets you change a color picture to black-and-white or sepia. Unavailable in Video mode. Date Stamp Imprint the date on pictures. Not available on panoramic pictures.
Doing more with your camera Press Menu, , , and OK to access settings Face Detection Capture Choose if faces get focus priority. Options On—In Auto mode (and in SCN modes designed for pictures of people), the camera attempts to focus on faces. Off Exposure Metering Multi-Pattern—evaluates lighting conditions throughout Evaluate light levels at specific the image to give an optimum picture exposure. Ideal for general picture taking. areas of a scene.
Doing more with your camera Press Menu, , , and OK to access settings Options Red-eye Pre-flash Choose whether a pre-flash fires when the flash is in Red Eye mode. On—red eye flash fires before the picture is taken. Off—red eye flash does not fire. Blur Warning See page 28. On Off Maintain Settings Choose which settings are saved, even after the camera is turned off. Available only in Auto mode.
Doing more with your camera NOTE: Press the T (Telephoto Zoom) button for information about camera settings and options. These settings remain until you change them. Press Menu, access settings LCD Brightness , , and OK to Options Power Save High Power Image Storage Choose a storage location for pictures/videos. Auto—the camera uses the card if one is in the camera. If not, the camera uses internal memory. Internal Memory—the camera always uses internal memory, even if a card is installed.
Doing more with your camera Press Menu, , , and OK to Options access settings Auto Power Off 10 minutes Choose inactivity time until camera turns off. 5 minutes 3 minutes 1 minute Video Out NTSC—used in North America and Japan. Choose the regional setting that lets you PAL—used in Europe and China. connect the camera to a television or other external device. Language See page 3. Reset Camera Reset settings to their default. Available in all modes except SCN-Custom.
Doing more with your camera Using the self-timer Use the self-timer when you want to be included in a picture, or to ensure a steady Shutter button press. Place the camera on a steady surface or tripod. button 1 In any Still mode, press the button repeatedly to choose: 10 seconds—A picture is taken after a 10-second delay (so you have time to get into the scene). 2 seconds—A picture is taken after a 2-second delay (for a steady, auto-shutter release on a tripod).
Doing more with your camera Using burst Use burst to take up to 3 pictures in rapid succession. 1 In most Still modes, press the button repeatedly until appears on the LCD. 2 Press the Shutter button halfway to focus and set exposure. button 3 Press the Shutter button completely down and hold it to take pictures. The camera stops taking pictures when you release the Shutter button, when the pictures are taken, or when there is no more storage space.
Doing more with your camera Using the framing grid to compose a picture The framing grid divides the LCD into thirds—vertically and horizontally. This is helpful if, for example, you want to balance a picture between water, earth, and sky. To turn on/off the framing grid, repeatedly press . Sharing your pictures Press the Share button to tag your pictures and videos. When they are transferred to your computer, you can share them. Use the Share button: ■ Any time.
Doing more with your camera Printing tagged pictures When you transfer the tagged pictures to your computer, the Kodak EasyShare software print screen opens. For details, click the Help button in EasyShare software. For more information on printing from your computer, printer dock, PictBridge enabled printer, or card, see page 47. NOTE: For the best 4 x 6 in. (10 x 15 cm) prints, set the camera to the 3:2 picture size setting (see page 30.
Doing more with your camera Third—transfer and email When you transfer the tagged pictures/videos to your computer, the Email screen opens and lets you send them to the addresses you specified. For details, click the Help button in Kodak EasyShare software. Tagging pictures as favorites Want to keep copies of your favorite pictures on your camera? Start with the Share button! 1. Tag pictures as 1 Press the Share button. Press to locate a picture. favorites 2 Press to highlight Favorite, then press OK.
Doing more with your camera Optional settings In Favorites mode, press the Menu button to access optional settings. Slide Show (page 21) Remove favorites (page 41) Multi-up (page 24) NOTE: Pictures taken at 3:2 and 16:9 picture sizes have a black bar at the top and bottom. A video’s duration is displayed at the top of the LCD. Removing favorites from your camera 1 Turn the Mode dial to Favorites . 2 Press the Menu button. 3 Highlight Remove Favorites, then press OK.
Doing more with your camera Preventing camera favorites from synchronizing with the software If you don’t want to use the favorites feature: 1 Open EasyShare software. 2 From the Tools menu, select Cameras/Viewers > Sync and Transfer Manager. 3 Click to highlight your camera, then click Camera Favorites Album Properties. NOTE: If your camera model is not visible, use the USB cable to connect your camera to the computer. 4 Drag the Internal Memory slider to 0%, then click OK.
Doing more with your camera Second—on your camera 1 Press the Review button, then locate the picture or video. 2 Press the Menu button. 3 Press to highlight Album, then press OK. 4 Press to highlight an album folder, then press OK. To add other pictures to the same album, press to scroll through the pictures. When the picture you want is displayed, press OK. To add the pictures to more than one album, repeat step 4 for each album. The album name appears with the picture.
Doing more with your camera Second—on your camera 1 In any mode, press the Menu button. 2 Press to highlight Set Album, then press OK. 3 Press to highlight an album name, then press OK. Repeat to mark pictures or videos for albums. Selected albums are noted with a check mark. 4 To remove a selection, highlight an album name and press OK. To remove all album selections, select Clear All. 5 Highlight Exit, then press OK. Your selections are saved.
5 Transferring and printing pictures Installing the software CAUTION: Install EasyShare software before connecting the camera to the computer. Failure to do so may cause the software to load incorrectly. 1 Close all software applications that are open on your computer (including anti-virus software). 2 Place the EasyShare software CD into the CD-ROM drive. 3 Load the software: Windows OS—if the install window does not appear, choose Run from the Start menu and type d:\setup.
Transferring and printing pictures Transferring pictures with the USB cable 1 Turn off the camera. 2 Connect the USB cable (U-8). 3 Turn on the camera. Kodak EasyShare software opens on your computer and prompts you through the transfer process. NOTE: Visit www.kodak.com/go/howto for an online tutorial on connecting. Also available for transferring You can also use these Kodak products to transfer your pictures and videos.
Transferring and printing pictures Printing pictures Printing with a Kodak EasyShare printer dock Dock your camera to the Kodak EasyShare printer dock and print directly—with or without a computer. Purchase this and other accessories at a dealer of Kodak products or visit www.kodak.com/go/m763accessories, www.kodak.com/go/m863accessories, www.kodak.com/go/md863accessories.
Transferring and printing pictures Printing from a PictBridge enabled printer 1 Turn on the printer. Turn on the camera. The PictBridge logo is displayed, followed by the current picture and menu. (If no pictures are found, a message is displayed.) If the menu interface turns off, press any button to redisplay it. 2 Press to choose a printing option, then press OK. Current Picture—Press to choose a picture. Choose the number of copies.
Transferring and printing pictures Ordering prints online Kodak Gallery (www.kodakgallery.com) is one of the many online print services offered in the Kodak EasyShare software. You can easily: ■ Upload your pictures. ■ Edit, enhance, and add borders to your pictures. ■ Store pictures, and share them with family and friends. ■ Order high-quality prints, photo greeting cards, frames, and albums—and have them delivered to your door.
6 Troubleshooting For step-by-step product support, visit www.kodak.com/go/m763support, www.kodak.com/go/m863support, or www.kodak.com/go/md863support and select Interactive Troubleshooting & Repairs. Camera problems If... Try one or more of the following Camera does not turn on. Camera does not turn off. ■ Remove the battery, then reinsert correctly (see page 1). ■ Install new battery. ■ Charge rechargeable battery (see page 2).
Troubleshooting If... Try one or more of the following Stored pictures are ■ Retake pictures. Do not remove card while the camera is accessing it. corrupted. Keep rechargeable batteries charged. ■ Transfer pictures to the computer (see page 46), then format the card in the camera (see page 35). Caution: Formatting a card deletes all pictures and videos, including protected files. In Review mode, ■ Check the image storage location setting (see page 34).
Troubleshooting If... Try one or more of the following Camera does not ■ Purchase a certified SD/SDHC card. recognize SD card. ■ Reformat the card (see page 35). Caution: Formatting a card deletes all pictures and videos, including protected files. ■ Insert a card into the slot, then push to seat (see page 4). Camera freezes up ■ Turn the camera off, then back on. when a card is ■ Make sure the camera is turned off before inserting or removing a inserted or card. removed. Memory card full.
Troubleshooting If... Try one or more of the following Cannot transfer pictures. (The Add New Hardware Wizard cannot locate drivers.) ■ Disconnect the USB cable. (If using camera dock or printer dock, disconnect cable and remove camera from dock). Close all open applications. Re-install the software (see page 45). ■ Disconnect the USB cable. Close all software applications. Re-install the software (see page 45). ■ Reboot the computer. ■ Try another computer.
Troubleshooting If... Try one or more of the following Internal memory requires formatting Internal memory cannot be read (Please format internal memory) No memory card (Files not copied) Not enough space to copy files (Files not copied) Memory card is protected (Reset switch on memory card) Memory card is unusable (Insert new memory card) ■ Format the internal memory (see page 35). Caution: Formatting deletes all pictures and videos, including protected files.
Troubleshooting If... Try one or more of the following No album names on camera (Connect with computer to import album names) High camera temperature. (Camera will be turned off.) Unrecognized file format ■ Create and copy album names from computer. See the Kodak Camera error #XXXX. ■ Turn camera off, then back on. If the message reappears, visit EasyShare software Help. ■ Leave the camera off for 10 minutes, then turn it back on.
7 Getting help Camera Email, write, or phone customer support Get support for your product (FAQs, troubleshooting information, arrange for repairs, etc.) www.kodak.com/go/contact Purchase camera accessories (camera docks, printer docks, lenses, cards, etc.) www.kodak.com/go/m763accessories www.kodak.com/go/m863accessories www.kodak.com/go/md863accessories Download the latest camera firmware and software www.kodak.com/go/m763downloads www.kodak.com/go/m863downloads www.kodak.com/go/md863downloads www.
Getting help NOTE: If you have questions concerning this product, you may speak with Kodak customer support.
8 Appendix Camera specifications For more specifications, visit www.kodak.com/go/m763support, www.kodak.com/go/m863support, www.kodak.com/go/md863support. CCD—M763: 1/2.5 in. CCD, 4:3 aspect ratio; 7.4 MP (total), 7.2 MP (effective) M863: 1/ 2.5 in. CCD, 4:3 aspect ratio; 8.3 MP (total), 8.2 MP (effective) Picture sizes— M763 M863 7.1 MP (4:3): 3072 x 2304 pixels 8.1 MP (4:3): 3280 x 2460 pixels 6.3 MP (3:2): 3072 x 2048 pixels 7.2 MP (3:2): 3280 x 2186 pixels 5.3 MP (16:9): 3072 x 1728 pixels 6.
Appendix 0.60 cm (23.6 in.)–infinity @ normal 0.10–0.7 m (3.9–28 in.) @ close-up/macro, wide 0.35–0.7 m (13.8–28 in.) @ close-up/macro, tele 10 m (32.8 ft)–infinity @ Landscape Exposure metering—Multi-pattern, Center-weight, Spot Exposure compensation—+/-2.0 EV with 0.3 EV steps Long Time Exposure—None, 0.5, 1.0, 2.0, 4.0 seconds Shutter speed—Mechanical shutter with CCD; Auto: 4–1/1400 sec.
Appendix Video capture—VGA (640 x 480) @ 15 fps; QVGA (320 x 240) @ 30 fps Image file format—Still: EXIF 2.21 (JPEG compression); file organization: DCF (movie): MOV; CODEC Motion JPEG (video); G.711 (audio) Image storage—Optional SD/SDHC Card the SD Card Association.) .
Appendix Care and maintenance ■ If you suspect water has gotten inside the camera, remove the battery and card. Allow all components to air-dry for at least 24 hours before using the camera. ■ Blow gently on the lens or LCD to remove dust and dirt. Wipe gently with a soft, lint-free cloth or an untreated lens-cleaning tissue. Do not use cleaning solutions unless designed specifically for camera lenses. Do not allow chemicals, such as suntan lotion, to contact painted surfaces.
Appendix Important safety instructions CAUTION: Do not disassemble this product; there are no user-serviceable parts inside. Refer servicing to qualified service personnel. Kodak AC adapters and battery chargers are intended for indoor use only. The use of controls, adjustments, or procedures other than those specified herein may result in exposure to shock and/or electrical or mechanical hazards. If the LCD breaks, do not touch the glass or liquid. Contact Kodak customer support.
Appendix ■ Dispose of batteries according to local and national regulations. Visit www.kodak.com/go/kes. ■ Do not charge non-rechargeable batteries. For more information on batteries, visit www.kodak.com/go/batterytypes. Battery life Kodak Li-Ion rechargeable digital camera battery KLIC-7001: 250-300 pictures per charge. Battery life per CIPA testing method. (Approximate number of pictures in Auto mode, using internal memory.) Actual life may vary based on usage.
Appendix Kodak will repair or replace Products if they fail to function properly during the warranty period, subject to any conditions and/or limitations stated herein. Warranty service will include all labor as well as any necessary adjustments and/or replacement parts. If Kodak is unable to repair or replace a Product, Kodak will, at its option, refund the purchase price paid for the Product provided the Product has been returned to Kodak along with proof of the purchase price paid.
Appendix equipment, facilities or services, or claims of your customers for such damages resulting from the purchase, use, or failure of the Product), regardless of cause or for breach of any written or implied warranty is expressly disclaimed. Your rights Some states or jurisdictions do not allow exclusion or limitation of incidental or consequential damages, so the above limitation or exclusion may not apply to you.
Appendix If this equipment does cause harmful interference to radio or television reception, which can be determined by turning the equipment off and on, the user is encouraged to try to correct the interference by one or more of the following measures: 1) reorient or relocate the receiving antenna; 2) increase the separation between the equipment and the receiver; 3) connect the equipment to an outlet on a circuit different from that to which the receiver is connected; 4) consult the dealer or an experien
Appendix Australian C-Tick N137 Waste Electrical and Electronic Equipment labeling EU: It is the user’s responsibility to discard this equipment into an approved, segregated collection scheme to enable its suitable treatment/disposal and to improve human/environmental protection. For more information, see your retailer, local authority or www.kodak.com/go/recycle. (Product weight: 125 g.) Korean Class B ITE VCCI Class B ITE www.kodak.
Appendix China RoHS ⦃ֱՓ⫼ᳳ䰤 (EPUP) ਛ࿖ᄢ䰚䯸䆹ؐ␜ѻຠਛሽ⊛છෂ䰽‛䋼ਇᓧ䞞䯸એෂੱりஜᐽ䫺䋶ѻᚗ⦃Ⴚ⊛ᯊ䯈ᦼ㒢䯴એᐕ䅵䯵䫻䆹ؐᩮᝪᠲ䇈 ਛᚲ㾘ቯ⊛ѻຠᱜᏱ↪⠰ቯ䫻 ᳝↦᳝ᆇ⠽䋼ܗ㋴ৡ⿄ঞ䞣ᷛ䆚㸼 䚼ӊৡ⿄ 䪙 h h h ∲ ƻ ƻ ƻ ᳝↦᳝ᆇ⠽䋼ܗ㋴ 䬝 ݁Ӌ䫀 ⒈㘨㣃 ⒈Ѡ㣃䝮 ƻ ƻ ƻ ƻ ƻ ƻ ƻ ƻ ƻ ƻ ƻ ƻ ᭄ⷕⳌᴎ⬉䏃ᵓܗӊ 䫖⬉∴ Ѹ⌕বय़఼ ƻ˖㸼⼎䆹᳝↦᳝ᆇ⠽䋼䆹䚼ӊ᠔᳝ഛ䋼ᴤ᭭Ёⱘ䞣ഛ6- 7 㾘ᅮⱘ䰤䞣㽕∖ҹϟDŽ h˖㸼⼎䆹᳝↦᳝ᆇ⠽䋼㟇ᇥ䆹䚼ӊⱘᶤϔഛ䋼ᴤ᭭Ёⱘ䞣䍙ߎ6- 7 㾘ᅮⱘ䰤䞣㽕∖DŽ USB ᢙᝪ㒓 Russian GOST-R Eastman Kodak Company Rochester, NY 14650 AIO-40 68 www.kodak.
1 Index A A/V cable, 25 about picture, video, 15 about this camera, 35 accessories, 46 battery, 63 buying, 56 printer dock, 47 SD/SDHC card, 4 album tagging pictures, 43 albums set, 34 appendix, 58 auto, 9 flash, 8 focus control, 18 focus framing marks, 6 B backlight, 11 battery charging, 2 compartment, ii extending life, 63 loading, 1 types, 60 beach, 10 blur, 28 blur warning, 33 burst, using, 37 button www.kodak.
Index setting, 3 DC-in, i deleting during quickview, 5 from internal memory, 17 from SD/SDHC card, 17 protecting pictures, videos, 17 digital image stabilization, 9 digital zoom, using, 7 displaying slide show, 21 disposal, recycling, 61, 67 dock compatibility, 49 connector, ii printer, 47 doing more with your camera, 29 download pictures, 45 E EasyShare software installing, 45 emailing pictures, videos, 39 exposure compensation, 37 long time, 30 metering, 32 external video device viewing pictures/videos,
Index K Kodak EasyShare software, 45, 61 Perfect Touch technology, 19 L landscape, 10 LCD, ii brightness, 34 reviewing pictures, 14 reviewing videos, 14 lens cleaning lens, 61 loading batteries, 1 SD/SDHC card, 4 software, 45 long time exposure, 30 M Macintosh computers, installing software on, 45 maintenance, camera, 61 manner/museum, 11 memory inserting card, 4 storage capacities, 61 menu settings, 29 mode dial, i, 9 modes auto, 9 backlight, 11 beach, 10 candle light, 11 www.kodak.
Index checking settings, 27 copying, 26 cropping, 19, 20 deleting, 17 emailing tagged, 39 printing, 48 protecting, 17 reviewing, 14 storage capacity, 61 tagging, 43 taking, modes, 9 transfer, 45 portrait, 10 power, camera, 3 printer dock, 47 printing from a card, 49 from computer, 48 order online, 49 PictBridge technology, 47 tagged pictures, 49 with EasyShare printer dock, 47 problem-solving, 50 protecting pictures, videos, 17 Q quickview, using, 5 R recycling, disposal, 61, 67 red-eye, flash, 8 regulator
Index date and time, 3 exposure metering, 32 flash, 8 focus zone, 32 image storage, 34 ISO, 32 LCD brightness, 34 long time exposure, 30 orientation sensor, 34 picture size, 30 picture taking mode, 9 self-timer, 36 sharpness, 32 sound volume, 34 video out, 35 video size, 18, 33 white balance, 31 setting, albums, 34 setup mode, using, 33 shaking hand, 28 share button, ii sharing pictures, videos, 38 sharpness, 32 shutter button, i self-timer delay, 36 slide show continuous loop, 22 running, 21 snow, 10 soft
Index upgrading software, firmware, 61 USB cable, 46 USB, A/V out, i V VCCI compliance, 67, 68 video action print, 21 checking settings, 27 copying, 26 deleting, 17 out, 25, 35 protecting, 17 reviewing, 14 size, 18, 33 storage capacities, 61 viewing, 14 videos emailing tagged, 39 transfer, 45 viewing by date, album, 24 by multi-up, 24 viewing picture after taking, 5, 14 viewing picture, video information, 15 volume, 34 wrist strap, 1 Z zoom digital, 7 optical, 7 W warranty, 63 WEEE, 67 white balance, 31