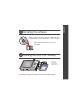
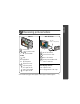
ENGLISH Installing the software Before connecting any cables, install the software that was included with your camera. Follow the on-screen instructions. After installing the software, return to this User guide. Loading the KLIC-7001 battery Kodak Li-Ion rechargeable digital camera battery KLIC 7001 www.kodak.
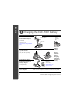
ENGLISH Charging the KLIC-7001 battery USB AC adapter Kodak USB AC adapter (included) Learn more at: www.kodak.com/go/USBchar ging. Kodak EasyShare camera or printer docks (may be sold separately) Kodak 5V AC adapter, Kodak Li-Ion universal battery chargers (sold separately) Your computer 2 Battery Charging light USB cable First, turn OFF the camera. Battery Charging light Purchase accessories: www.kodak.com/ go/accessories. Charge until the Battery Charging light turns off (up to 3 hours).
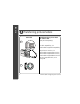
ENGLISH Turning on the camera Setting the language, date/time Language: to change. 2 OK to accept. 1 Date/Time: 1 At the prompt, press OK. 2 to change. for previous/next field. OK to accept. OK www.kodak.
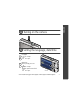
ENGLISH Taking a picture/video Pictures 1 Videos 2 1 3 2 3 Ready/Battery charging light T - Turn on Help button Press the Shutter button halfway to focus and set exposure. Press it completely down when the Ready light turns green. Press to turn on/off: •Status icons •Framing grid 4 Press the Shutter button completely down and release. To stop recording, press the Shutter button again. www.kodak.
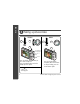
ENGLISH Reviewing pictures/videos Camera Your television A/V cable (may be sold separately) 1 Press Review. 2 for previous/next picture/video. Videos Play. During playback: OK pause/unpause. 1 Turn off the camera. 2 Connect the A/V cable. 3 Turn on the camera. 4 Review pictures/videos/slide shows on television. adjust the volume. play at 2X speed; press again for 4X. reverse at 2X speed; press again for 4X. Other display devices: •Your computer monitor •Devices equipped with a video input www.
ENGLISH Transferring pictures/videos USB cable 1 Kodak EasyShare printer dock or camera dock (May be sold separately.) For dock compatibility, visit www.kodak.com/go/dockcompatibility. To purchase accessories, visit www.kodak.com/go/m763accessories, www.kodak.com/go/m863accessories, www.kodak.com/go/md863accessories. To use an EasyShare dock, see its User guide. 2 6 www.kodak.
Congratulations! You have: • set up your camera • taken pictures • transferred pictures to your computer Keep learning! Finish reading this book, so you can take and share your best pictures! Visit www.kodak.com/go/m763support, m863support, or md863support and www.kodak.com/go/easysharecenter for: • the Extended user guide • interactive troubleshooting and repairs • interactive tutorials • FAQs • downloads • accessories • printing information • product registration www.kodak.
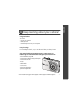
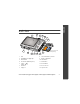
ENGLISH Front view 1 2 3 4 5 6 7 8 9 11 10 1 Shutter button 7 Lens 2 Mode dial 8 Speaker 3 Flash button 9 USB 4 On/Off button 10 DC-In (5V) 5 Flash 11 Microphone 6 Self-timer/video light 8 , for optional AC adapter www.kodak.
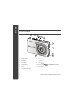
ENGLISH Back view 2 1 3 4 5 6 7 14 13 12 11 10 9 8 1 2 3 4 5 LCD Ready/Battery charging light Delete button Zoom button (Wide/Telephoto) 8 9 10 11 12 6 7 OK button Strap post 13 Dock connector 14 Tripod socket optional memory card (sold separately) SD or SDHC memory card slot Battery compartment Share button Menu button Review button www.kodak.
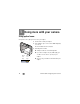
1 Doing more with your camera Using optical zoom Use optical zoom to get up to 3X closer to your subject. 1 Use the LCD to frame your subject. 2 Press Telephoto (T) to zoom in. Press Wide Angle (W) to zoom out. The zoom indicator shows zoom status. 3 Take the picture or video. Digital zoom range Optical zoom range W 10 T ■ Always use the auto focus framing marks. ■ If you are not using zoom (1X, wide angle), you can be as close as 13.8 in. (35 cm) to your subject.
Doing more with your camera Using the flash Use the flash when you take pictures at night, indoors, or outdoors in heavy shadows. button repeatedly to scroll Press the through flash modes (see Flash modes below). The current flash mode appears in the LCD screen. Flash modes Flash fires Auto Flash When the lighting conditions require it. Off Never. Fill Every time you take a picture, regardless of the lighting conditions.
Doing more with your camera Using different picture-taking modes Choose the mode that best suits your subjects and surroundings. Use this mode Auto For General picture taking—offers an excellent balance of image quality and ease of use. Digital Image Minimizing the effects of camera shake and subject movement. Stabilization Close-up SCN Scene ISO 12 Close range. Use available light instead of flash if possible. Point-and-shoot simplicity when taking pictures under special conditions. (See page 13.
Doing more with your camera Scene modes Choose a Scene mode—for great pictures in practically any situation! 1 Turn the Mode dial to Scene . 2 Press to display Scene mode descriptions. If the mode description turns off before you finish reading it, press OK. 3 Press OK to choose a Scene mode. Using camera Help To better understand each menu option, use camera Help. Select an option you want to learn more about, then press the Zoom telephoto (T) button.
Doing more with your camera Taking panoramic pictures Use panorama to “stitch” up to 3 pictures into a panoramic scene. 1 Turn the Mode dial to SCN. 2 Press on the 4-way button to highlight Panorama Left-Right or Panorama Right-Left (depending on the direction you want to pan), then press the OK button. 3 Take the first picture. After a quickview, the LCD displays the liveview and an “overlay” from the first picture. 4 Compose the second picture.
Doing more with your camera Understanding picture-taking icons Self-timer/Burst Flash Camera mode Album name Framing marks Picture size Date stamp Pictures/time remaining Storage location Zoom: Wide, Telephoto, Digital Focus zone Exposure metering White balance Long time exposure Framing grid ISO speed Battery level Exposure compensation www.kodak.
2 Working with pictures/videos Magnifying pictures 1 Press the Review button. 2 Press W/T to magnify 2X–8X. 3 Press picture. to view other parts of the 4 Press OK to return to 1X. Cropping pictures You can crop a picture so that only the desired portion of the picture remains. Picture Cropped picture 1 Press the Review button, then picture. to find a 2 Press the Menu button. Press to find Edit. 3 Press 4 Press Telephoto (T) to zoom in, or to highlight Crop, then press OK. to move the crop box.
Working with pictures/videos Using sound tags You can add a unique sound/message (up to 1 minute long) to your picture (not to videos). Recording a sound tag 1 Press the Review button, then to find a picture. 2 Press the Menu button, then highlight Sound Tag. Press the OK button. to 3 Choose Record, then press OK. 4 Follow the screen prompts. The sound tag is applied to your picture. Playing a sound tag OK 1 Press the Review button, then picture.
Working with pictures/videos Viewing thumbnails (multi-up) 1 Press the Review button. 2 Press the Zoom Wide Angle (W) button to change from single-picture view to multi-up thumbnails. 3 Press Telephoto (T) to return to single-picture view. ■ To select multiple pictures/videos, see page 21. Using Kodak Perfect Touch technology Kodak Perfect Touch technology helps ensure better, brighter pictures. 1 Press the Review button, then for previous/next picture. 2 Press the Menu button. Press to find Edit.
Working with pictures/videos Editing videos Making a picture from a video You can choose a single frame from a video, then make a picture suitable for printing. Video Picture 1 Press the Review button, then to find a video. 2 Press the Menu button. Press to find Edit. 3 Press OK. 4 Press to highlight Make Picture, then press to select a video frame. 5 Follow the screen prompts to save the picture. Trimming a video You can delete an unwanted portion from the beginning or end of a video.
Working with pictures/videos Making a video action print From a video, you can make a 4-, 9-, or 16-up picture, suitable for a 4 x 6-inch (10 x 15 cm) print. Video 4-, 9-, or 16-up picture 1 Press the Review button, then to find a video. 2 Press the Menu button. Press Edit Video, then press OK. to highlight 3 Press press OK. to highlight Video Action Print, then 4 Choose an option, then press OK. Auto options: The camera includes the first and last frames, then 2, 7, or 14 equally spaced frames.
Working with pictures/videos Running a multimedia slide show Multimedia Slide Show is similar to Slide Show, but also offers music and visual effects. First, select 2-20 pictures (see page 21). Then: 1 Press the Review button. 2 Press to highlight Multimedia Slide Show, then press the OK button. 3 Press to highlight a choice from the menu, then press the OK button. Selecting multiple pictures/videos Use the multi-select feature when you have two or more pictures/videos to print, transfer, delete, etc.
Working with pictures/videos Deleting pictures/videos 1 Press the Review button. 2 Press for previous/next picture/video. 3 Press the Delete button. 4 Follow the screen prompts. NOTE: After you delete a picture, the next picture (overlaid with the Delete menu with the Undo Delete option) appears. If there are no more pictures, the Delete menu on a blank screen appears. See Using the undo delete feature for more information.
3 Solving camera problems For support, visit www.kodak.com/go/m763support, www.kodak.com/go/m863support, www.kodak.com/go/md863support and select Interactive Troubleshooting & Repairs. Camera problems If... Try one or more of the following Camera does not turn on/off. ■ Remove the battery, then reinsert correctly (see page 1). ■ Install new battery. ■ Charge rechargeable battery (see page 2). Camera does not ■ Purchase a certified SD/SDHC card. recognize SD card. ■ Reformat the card.
4 Appendix Important safety instructions CAUTION: Do not disassemble this product; there are no user-serviceable parts inside. Refer servicing to qualified service personnel. Do not expose this product to liquid, moisture, or extreme temperatures. Kodak AC adapters and battery chargers are intended for indoor use only. The use of controls, adjustments, or procedures other than those specified herein may result in exposure to shock and/or electrical or mechanical hazards.
Appendix Upgrading your software and firmware Download the latest versions of the software included on the Kodak EasyShare software CD and the camera firmware (the software that runs on the camera). See www.kodak.com/go/m763downloads, www.kodak.com/go/m863downloads, or www.kodak.com/go/md863downloads. Additional care and maintenance ■ If the camera has been subjected to inclement weather or you suspect water has gotten inside the camera, turn off the camera and remove the batteries and card.
Appendix be remanufactured, or may contain remanufactured materials. If it is necessary to replace the entire Product, it may be replaced with a remanufactured Product. Remanufactured Products, parts and materials are warranted for the remaining warranty term of the original Product, or 90 days after the date of repair or replacement, whichever is longer. Limitations This warranty does not cover circumstances beyond Kodak's control.
Appendix FCC compliance and advisory Kodak EasyShare M763/M863/MD863 digital camera This equipment has been tested and found to comply with the limits for a Class B digital device, pursuant to Part 15 of the FCC Rules. These limits are designed to provide reasonable protection against harmful interference in a residential installation.
Appendix Canadian DOC statement DOC Class B Compliance This Class B digital apparatus complies with Canadian ICES-003. Observation des normes-Classe B Cet appareil numérique de la classe B est conforme à la norme NMB-003 du Canada. Australian C-tick N137 Waste Electrical and Electronic Equipment labeling EU: It is the user’s responsibility to discard this equipment into an approved, segregated collection scheme to enable its suitable treatment/disposal and to improve human/environmental protection.
Appendix China RoHS ⦃ֱՓ⫼ᳳ䰤 (EPUP) ਛ࿖ᄢ䰚䯸䆹ؐ␜ѻຠਛሽ⊛છෂ䰽‛䋼ਇᓧ䞞䯸એෂੱりஜᐽ䫺䋶ѻᚗ⦃Ⴚ⊛ᯊ䯈ᦼ㒢䯴એᐕ䅵䯵䫻䆹ؐᩮᝪᠲ䇈 ਛᚲ㾘ቯ⊛ѻຠᱜᏱ↪⠰ቯ䫻 ᳝↦᳝ᆇ⠽䋼ܗ㋴ৡ⿄ঞ䞣ᷛ䆚㸼 䚼ӊৡ⿄ 䪙 h h h ∲ ƻ ƻ ƻ ᳝↦᳝ᆇ⠽䋼ܗ㋴ 䬝 ݁Ӌ䫀 ⒈㘨㣃 ⒈Ѡ㣃䝮 ƻ ƻ ƻ ƻ ƻ ƻ ƻ ƻ ƻ ƻ ƻ ƻ ᭄ⷕⳌᴎ⬉䏃ᵓܗӊ 䫖⬉∴ Ѹ⌕বय़఼ ƻ˖㸼⼎䆹᳝↦᳝ᆇ⠽䋼䆹䚼ӊ᠔᳝ഛ䋼ᴤ᭭Ёⱘ䞣ഛ6- 7 㾘ᅮⱘ䰤䞣㽕∖ҹϟDŽ h˖㸼⼎䆹᳝↦᳝ᆇ⠽䋼㟇ᇥ䆹䚼ӊⱘᶤϔഛ䋼ᴤ᭭Ёⱘ䞣䍙ߎ6- 7 㾘ᅮⱘ䰤䞣㽕∖DŽ USB ᢙᝪ㒓 Eastman Kodak Company Rochester, NY 14650 Eastman Kodak Company, 2007 Kodak, EasyShare, and Perfect Touch are trademarks of Eastman Kodak Company.