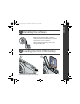
ENGLISH urg_00773.book Page 1 Wednesday, October 24, 2007 2:08 PM Installing the software Before connecting any cables, install the software that was included with your camera. Follow the on-screen instructions. After installing the software, return to this Getting Started Guide. Loading the KLIC-7006 battery 1 www.kodak.
urg_00773.book Page 2 Wednesday, October 24, 2007 2:08 PM ENGLISH Charging the battery 1 Ensure that your camera is running firmware version 1.02 or higher. Press the Menu button. Press to highlight the Setup tab. Press About, then press the OK button. to highlight 2 If your camera is running a lower version, download and install version 1.02 or higher from www.kodak.com/go/m883support. 3 When your camera is up to date, charge the battery: Turn ON the camera, then connect then USB cable.
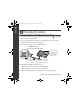
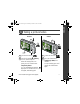
ENGLISH urg_00773.book Page 3 Wednesday, October 24, 2007 2:08 PM Charging the battery using other accessories To purchase optional accessories, visit www.kodak.com/go/m883accessories. Kodak USB AC adapter Turn OFF the camera first. Battery charging light glows during charging, and turns off when charging is complete (approx.10 hours). USB / A/V adapter Kodak 5V AC adapter Turn OFF the camera first. Kodak EasyShare photo frame dock 2 Turn OFF the camera first.
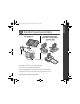
urg_00773.book Page 4 Wednesday, October 24, 2007 2:08 PM ENGLISH Turning on the camera 2 1 Setting the language and date/time 1 2 1 Language: to change. OK Date/Time: At the prompt, press OK. 2 to change. for previous/next field. OK OK 4 to accept. to accept. www.kodak.
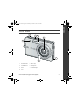
ENGLISH urg_00773.book Page 5 Wednesday, October 24, 2007 2:08 PM Taking a picture/video Pictures Videos 2 2 1 1 Framing marks 1 Slide the Mode switch to . 2 Press the Shutter button halfway to focus and set exposure. When the framing marks turn green, press the Shutter button completely down. You can repeatedly press Display Display to turn on/off status icons, histogram, and framing grid. www.kodak.com/go/m883support 1 Slide the Mode switch to .
urg_00773.book Page 6 Wednesday, October 24, 2007 2:08 PM ENGLISH Reviewing pictures/videos 1 Press Review. (Press again to exit.) 2 for previous/next. Videos: Play. (Press OK to pause/unpause.) During playback to adjust the volume. During playback to play at 2X speed; press again for 4X. During playback to reverse at 2X speed; press again for 4X. Press and hold for 4 seconds to jump to a bookmark. 6 www.kodak.
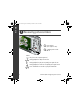
ENGLISH urg_00773.book Page 7 Wednesday, October 24, 2007 2:08 PM Transferring pictures/videos Kodak EasyShare photo frame dock 2, camera dock, or printer dock USB cable (U-8) (included) (may be sold separately) USB / A/V adapter USB cable (U-8) Turn camera on. For package contents, see your product package. To use a dock, see its Getting Started Guide. For dock compatibility, visit www.kodak.com/go/dockcompatibility. To purchase accessories, visit www.kodak.com/go/m883accessories. www.kodak.
urg_00773.book Page 8 Wednesday, October 24, 2007 2:08 PM ENGLISH Keep learning about your camera! Congratulations! You have: • set up your camera • taken pictures • transferred pictures to your computer Keep learning! Finish reading this book, so you can take and share your best pictures! To better understand each menu option, use camera Help. (Highlight a menu choice, then press the Zoom telephoto T button.) Visit www.kodak.
ENGLISH urg_00773.book Page 9 Wednesday, October 24, 2007 2:08 PM Front View 1 2 3 4 7 5 6 1 Shutter button 5 DC-In (5V) 2 On/Off button 6 Microphone 3 Flash 7 Self-timer light 4 Lens www.kodak.
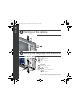
urg_00773.book Page 10 Wednesday, October 24, 2007 2:08 PM ENGLISH Back View 1 2 3 4 5 6 13 8 12 7 11 10 9 optional 1 2 3 4 5 6 7 8 10 LCD Battery charging/Video light Delete, Menu, Review buttons Wide angle button Telephoto/Help button Mode switch Strap post Share button 9 , Display button , Flash button , Self-timer, Burst button , Macro, Landscape button OK button 10 11 12 13 Battery slot Slot for optional SD or MMC card USB/charging port, dock connector Tripod socket www.kodak.
urg_00773.book Page 11 Wednesday, October 24, 2007 2:08 PM 1 Doing more with your camera Using the 3X optical zoom 1 Use the LCD to frame your subject. 2 To zoom in, press Telephoto (T). To zoom out, press Wide Angle (W). The zoom indicator shows the zoom status. 3 Take the picture or video. D Digital zoom range T Optical zoom range (36-108 mm) W Using digital zoom Use digital zoom in any picture-taking mode to get up to 5X magnification beyond optical zoom.
urg_00773.book Page 12 Wednesday, October 24, 2007 2:08 PM Doing more with your camera Using the self-timer In this mode A picture is taken after... 10 A 10-second delay (so you have time to get into the scene). 2 A 2-second delay (for a steady, auto-shutter release on a tripod). A 10-second delay. A second picture is taken 8 seconds later. 2x until the desired self-timer icon Press appears in the LCD status area. 1 Choose the desired self-timer mode, then compose the scene.
urg_00773.book Page 13 Wednesday, October 24, 2007 2:08 PM Doing more with your camera Using the flash Press the flash button repeatedly to scroll through flash modes. The current flash mode is shown in the LCD status area. Flash modes Flash fires Auto When the lighting conditions require it. Fill Every time you take a picture, regardless of the lighting conditions. Use when the subject is in shadow or is “backlit” (when light is behind the subject).
urg_00773.book Page 14 Wednesday, October 24, 2007 2:08 PM Doing more with your camera Using different modes Choose the mode that best suits your subjects and surroundings. Use this mode For Auto General picture taking—offers an excellent balance of image quality and ease of use. Scene Point-and-shoot simplicity when taking pictures under special conditions. Video Capturing video with sound. (See page 5.) Slide the Mode switch to choose a mode. Use this mode For Landscape Far-away scenes.
urg_00773.book Page 15 Wednesday, October 24, 2007 2:08 PM Doing more with your camera Using Scene (SCN) modes Choose a Scene mode—for great pictures in practically any situation! 1 Slide the Mode switch to SCN. 2 Press to view scene mode descriptions. The date/time and the mode description appear. If the mode description turns off before you finish reading it, press the OK button. 3 Press the OK button to choose a Scene mode. Using camera Help To better understand each menu option, use camera Help.
urg_00773.book Page 16 Wednesday, October 24, 2007 2:08 PM Doing more with your camera Understanding the picture-taking icons Date stamp Flash Self timer Picture size Macro/Landscape Pictures/time remaining Image storage location Long time exposure AF mode Focus zone Camera mode Album name Zoom: digital telephoto wide Exposure metering White Balance ISO Histogram Battery level Exposure compensation Framing grid 16 www.kodak.com/go/easysharecenter view single picture.
urg_00773.book Page 17 Wednesday, October 24, 2007 2:08 PM 2 Working with pictures/videos Magnifying a picture 1 Press the Review button, then press T to magnify. 2 Press to view other parts of a picture. 3 Press OK to return to 1X. Deleting pictures/videos 1 Press the Review button. 2 Press for previous/next picture/video. 3 Press the Delete button. 4 Follow the screen prompts. Using the undo delete feature If you accidentally delete a picture, you may be able to use Undo Delete to retrieve it.
urg_00773.book Page 18 Wednesday, October 24, 2007 2:08 PM Working with pictures/videos Using Kodak Perfect Touch technology Kodak Perfect Touch technology helps ensure better, brighter pictures. 1 Press the Review button. 2 Press for previous/next picture. 3 Press the Menu button, then to highlight the Edit tab. Highlight Perfect Touch tech, then press the OK button. The enhancement is previewed in a split screen. Press to view other parts of the picture. 4 Press the OK button.
urg_00773.book Page 19 Wednesday, October 24, 2007 2:08 PM Working with pictures/videos Editing videos Making a picture from a video You can choose a single frame from a video, then make a picture suitable for a 4 x 6-inch (10 x 15 cm) print. 1 Press the Review button, then Video Picture to find a video. 2 Press the Menu button, then to highlight the Edit tab. Highlight Make Picture, then press the OK button. 3 Follow the screen prompts. A picture is created. (The original video is saved.
urg_00773.book Page 20 Wednesday, October 24, 2007 2:08 PM Working with pictures/videos Making a video action print From a video, you can make a 4-, 9-, or 16-up picture, suitable for a 4 x 6-inch (10 x 15 cm) print. 1 Press the Review button, then Video 4-, 9-, or 16-up picture to find a video. 2 Press the Menu button, then to highlight the Edit tab. Highlight Action Print, then press the OK button. 3 Highlight an option, then press the OK button.
urg_00773.book Page 21 Wednesday, October 24, 2007 2:08 PM Working with pictures/videos Selecting multiple pictures/videos Use the multi-select feature when you have two or more pictures/videos to print, transfer, delete, etc. (Multi-select is used most effectively in Multi-Up mode.) 1 Press the Review button, then picture/video. Selected pictures to find a 2 Press the OK button to select pictures/videos. A check mark appears on the picture. You can now print, transfer, delete, etc.
urg_00773.book Page 22 Wednesday, October 24, 2007 2:08 PM 3 Solving camera problems Camera problems Status Solution Camera does not turn on ■ Make sure the battery is charged and installed correctly (see Camera does not turn off page 1). ■ Turn the camera off, then on again. Camera buttons and controls do not function The battery does not charge using USB charging ■ See page 2 or visit www.kodak.com/go/USBcharging. Pictures remaining ■ Continue taking pictures. The camera is operating normally.
urg_00773.book Page 23 Wednesday, October 24, 2007 2:08 PM 4 Appendix CAUTION: Do not disassemble this product; there are no user-serviceable parts inside. Refer servicing to qualified service personnel. Kodak AC adapters and battery chargers are intended for indoor use only. The use of controls, adjustments, or procedures other than those specified herein may result in exposure to shock and/or electrical or mechanical hazards. If the LCD breaks, do not touch the glass or liquid.
urg_00773.book Page 24 Wednesday, October 24, 2007 2:08 PM Appendix Limited warranty coverage Kodak warrants Kodak consumer electronic products and accessories (“Products”), excluding batteries, to be free from malfunctions and defects in both materials and workmanship for one year from the date of purchase. Retain the original dated sales receipt. Proof of the date of purchase will be required with any request for warranty repair.
urg_00773.book Page 25 Wednesday, October 24, 2007 2:08 PM Appendix Your rights Some states or jurisdictions do not allow exclusion or limitation of incidental or consequential damages, so the above limitation or exclusion may not apply to you. Some states or jurisdictions do not allow limitations on how long an implied warranty lasts, so the above limitation may not apply to you. This warranty gives you specific rights, and you may have other rights which vary from state to state or by jurisdiction.
urg_00773.book Page 26 Wednesday, October 24, 2007 2:08 PM Appendix Canadian DOC statement DOC Class B Compliance—This Class B digital apparatus complies with Canadian ICES-003. Observation des normes-Classe B—Cet appareil numérique de la classe B est conforme à la norme NMB-003 du Canada.
urg_00773.book Page 27 Wednesday, October 24, 2007 2:08 PM Appendix China RoHS Eastman Kodak Company Rochester, New York 14650 © Eastman Kodak Company, 2007 Kodak, EasyShare, and Perfect Touch are trademarks of Eastman Kodak Company. 4J6239_en www.kodak.