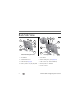
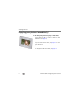
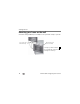
Front View 1 2 3 Kodak EasyShare P520 digital frame 1 1 LCD screen 2 Quick Touch Border (right side, tap only) 3 Quick Touch Border (bottom, tap/slide) To use the Quick Touch Borders, see page 5. 2 3 Kodak EasyShare P720/P725/P820 digital frames www.kodak.com/go/digitalframesupport 1 ENGLISH See the extended user guide – for more information about using your frame, visit www.kodak.com/go/digitalframesupport. See the frame package for package contents.
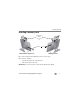
Back/Side View 4 1 5 1 8 4 5 6 6 7 2 8 7 2 3 9 P520/P720/P725 digital frames 3 P820 digital frame 1 On/Off button 5 Reset button 2 Stand attachment slot 6 Wall mounting holes, 3 (see page 10) 3 Frame stand (see page 3) 7 USB connector (to camera/USB device) 4 Memory card slot - SD, MS, xD, MMC 8 Memory card slot - SD/SDHC 9 9 Power connector 2 www.kodak.
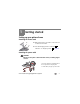
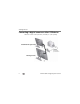
1 Getting started Setting up your picture frame Attaching the frame stand Tab Slot ■ Make sure the tab on the stand is secure in the slot on the back of the frame. ■ Your frame displays pictures in landscape orientation. To change to portrait , see page 9. Attaching the power cable CAUTION: Do not use this power cable with other devices, including digital cameras. Your power cable may look different from the one pictured. Use the plug that accommodates your type of power outlet. www.kodak.
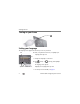
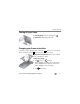
Getting started Turning on your frame Power button Setting your language The language screen appears the first time you turn on your frame. ■ Slide Slide, or tap below small arrows, to highlight your language, then tap Save. Save To change the language at a later time: ■ Tap below small arrows Tap (Home) → (Settings), then highlight Language. The language screen appears. Highlight your language, then tap Save. To use the Quick Touch Borders, see page 5. 4 www.kodak.
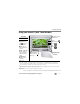
Getting started Using your frame’s Quick Touch Borders Tap next to buttons No slide here Touch tips Tap and slide on the Quick Touch Borders* only. Tap a border to display the icons. Tap (Close) to dismiss them. Tap next to or below a button to select it. Slide to highlight menus, pictures, videos, options.** Tap OK to select them. Don’t hover, borders can be sensitive.
Getting started Enjoying your pictures immediately! ■ To view your pictures or play a slide show, insert a memory card, or connect a camera or other USB device (see page 8). If you are at the Home screen, see page 12 to start your slide show. To change the slide show order, see page 13. 6 www.kodak.
Getting started Inserting a memory card MultiMedia Card SD/SDHC Memory Stick xD SD/SDHC P520/P720/P725 digital frame P820 digital frame ■ To insert a card, push the card firmly into the slot until it stops. ■ To remove a card from: – top card slot, push in the card to release it. – side card slot, pull out the card. IMPORTANT: Do not insert a micro or mini memory card without an adapter. www.kodak.
Getting started Connecting a digital camera or other USB device USB devices include a camera, flash drive, card reader, etc. (sold separately) P520/P720/P725 digital frame USB cable included with your USB device P820 digital frame 8 www.kodak.
Getting started Turning off your frame ■ Standby mode—Press the power button ■ Power off—Unplug the power cable. . Changing your frame orientation Your frame is set up to display pictures in landscape orientation. You can turn the stand to change it to portrait but you must also change the setting. Change the stand position: Remove the stand, turn it 90 °, and replace as shown. Change the setting: 1 Tap (Home) → (Settings). 2 Slide to highlight Set viewing options, then tap OK.
Getting started Mounting your frame on the wall Use wall-anchoring hardware (not included) to mount your frame securely to your wall. Secure power cable with attached clip Wall mounting holes (on back of frame) To change to portrait orientation , turn your frame 90° and use the wall mounting holes at the top. 10 www.kodak.
2 Doing more with your frame Accessing your pictures Tap Home to access pictures from your memory card and all connected devices (see page 8). Use the Quick Touch Borders to make your selections (see page 5). 1 Tap (Home). All connected sources and the Settings icon are displayed. 2 Slide to highlight a picture source, then: ■ Tap (Play Slide show) to start a slide show. OR ■ Tap OK to view thumbnails. Picture source icons: Memory card—appears when you insert a card (page 7).
Doing more with your frame Viewing your pictures Playing a slide show There are three ways to start a slide show on your frame: ■ Insert a memory card or USB device, then turn on the frame. ■ Turn on the frame, then insert a card or connect a USB device—a new slide show starts automatically, replacing a currently running slide show or single view picture. Highlight a picture in thumbnails view or highlight a picture source on the Home screen, then tap (Play Slide show).
Doing more with your frame There are 3 ways to navigate through the thumbnails: ■ Tap below the arrows at the ends of the scroll bar to move the highlight one picture at a time. ■ Slide your finger left/right along the bottom touch border. ■ Touch and hold until the screen changes (about 3 seconds) to move even faster through a large number of thumbnails. Viewing a single picture ■ To view a single, full-screen picture, highlight it in thumbnails view, then tap OK.
Doing more with your frame (Slide show options). For P520 digital frame—tap (Home), then (Settings). 2 Highlight Sort, then tap Select. 3 Select a sort order, as follows. Then tap OK or Save. – Filename, A - Z – Filename, Z - A – Date, oldest to newest (default) – Date, newest to oldest Copying pictures Copy pictures from your current viewing location to other connected devices ( page 8). CAUTION: Removing a card or disconnecting a device while copying may damage your card, pictures, or device.
Doing more with your frame 3 Tap (Copy). Your connected devices appear. 4 Tap the device you want to copy to, then tap OK. The picture is copied. 5 Tap Connected devices (Close) to close the menu. To copy multiple pictures, see page 16. Deleting pictures CAUTION: Removing a card or disconnecting a device while deleting may damage your card, pictures, or device. 1 Highlight a picture in thumbnails view or display a picture in single view. 2 Tap 3 Tap (Actions). (Delete), then tap Yes to confirm.
Doing more with your frame Selecting multiple pictures Use the multi-select feature to: ■ copy or delete two or more pictures ■ play a slide show of selected pictures Selecting individual pictures 1 In thumbnails view, touch and slide to highlight a picture, then tap A check mark appears on the selected picture. 2 Continue selecting pictures. (Select). To remove a check mark, highlight a picture, then tap Unselect. Tip: To remove all check marks at once, tap Select All, then tap Unselect All.
Doing more with your frame Copying from your computer Use Kodak EasyShare digital display software to drag and drop pictures easily from your computer to a memory card (or other removable USB device). Insert the card into your frame and play a slide show right away (see page 8). The CD that was packaged with your frame contains two applications that work well independently, but also work together for the best experience with your frame: CD packaged with your frame.
Doing more with your frame Copying with EasyShare digital display software 1 On your computer’s desktop, double-click software) to start using the software. (Kodak EasyShare digital display 2 Insert a memory card into your computer or card reader. Or insert a removable USB device into the computer’s USB port. 3 Click Drag & Drop Zone to see the card or USB device. 4 In Pictures & Videos, click the folder or location on your computer that contains the pictures you want to copy.
Doing more with your frame Customizing your frame For a custom look, remove the adhesive matte (included) from its liner, align it carefully, then attach it to your frame. You can reapply the matte to your frame several times. When you are not using the matte, reapply it to the liner and store in a plastic bag to keep the adhesive backing clean. Maintaining your frame and mattes IMPORTANT: Always disconnect the power before cleaning.
Doing more with your frame Resetting factory defaults Reset button slot 1 Make sure the power cable is connected and the frame is turned on. 2 Insert a small sharp object into the reset button slot and press the recessed reset button. When the reset is successful, the set language screen appears. All settings return to the original factory defaults. 3 Reset your language. See page 4. Learning more about your frame www.kodak.
3 Solving frame problems For step-by-step product support, visit www.kodak.com/go/digitalframesupport and select Interactive Troubleshooting & Repairs. If... Try one or more of the following Frame does not turn on. ■ Make sure the power cable that was included with your frame is connected securely (see page 3). ■ Unplug the power cable from the frame. Wait 5 seconds, then reconnect the cable. ■ Press and hold the power button for 1 second.
4 Appendix Important safety instructions CAUTION: Do not disassemble this product; there are no user-serviceable parts inside. Refer servicing to qualified service personnel. Do not expose this product to liquid, moisture, or extreme temperatures. The use of controls, adjustments, or procedures other than those specified herein may result in exposure to shock and/or electrical or mechanical hazards. If the LCD breaks, do not touch the glass or liquid. Contact Kodak customer support.
Appendix ■ Service agreements are available in some countries. Contact a dealer of Kodak products for more information. ■ For digital frame disposal or recycling information, contact your local authorities. In the US, visit the Electronics Industry Alliance at www.eiae.org or visit www.kodak.com/go/digitalframesupport.
Appendix only obligation. Kodak will not be responsible for any special, consequential or incidental damages resulting from the sale, purchase, or use of this product regardless of the cause.
Appendix Any changes or modifications not expressly approved by the party responsible for compliance could void the user’s authority to operate the equipment. Where shielded interface cables have been provided with the product or specified additional components or accessories elsewhere defined to be used with the installation of the product, they must be used in order to ensure compliance with FCC regulation. FCC and Industry Canada This device complies with Industry Canada RSS-210 and FCC Rules.
Appendix Australian C-Tick N137 China RoHS 26 www.kodak.
Appendix Russian GOST-R Eastman Kodak Company Rochester, New York 14650 Licensing Supply of this product does not convey a license nor imply any right to distribute content created with this product in revenue-generating broadcast systems (terrestrial, satellite, cable and/or other distribution channels), streaming applications (via Internet, intranets and/or other networks), other content distribution systems (pay-audio or audio-on-demand applications and the like) or on physical media (compact discs, dig