Kodak EasyShare printer dock User’s Guide www.kodak.com For interactive tutorials, www.kodak.
Eastman Kodak Company 343 State Street Rochester, New York 14650 © Eastman Kodak Company, 2004 All screen images are simulated. Kodak and EasyShare are trademarks of Eastman Kodak Company.
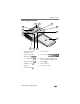
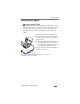
Product features Front/top/side view 1 2 3 4 13 12 5 11 10 6 9 8 7 1 Universal camera insert (installed as shown) 8 Picture size button 2 Battery charging lights/ Refresh button 9 Picture size lights 3 Color cartridge light 10 USB connector (for Kodak 8-in-1 card reader or PictBridge compatible device) 4 Transfer button/light 11 Paper light 5 Left/Right control 12 Camera connector 6 Paper tray 13 Locator pin for camera 7 Print button/light www.kodak.
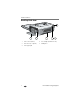
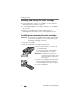
Product features Back/top/side view 1 5 4 3 2 1 Power connector (DC-in) 4 Color cartridge (installed as shown) 2 USB connector (to computer) 5 Cartridge door 3 Slot for paper path ii www.kodak.
Table of contents 1 1 Getting started ........................................................................... 1 Package contents.............................................................................. 1 Finding a location for your printer dock.............................................. 2 Installing the custom camera insert.................................................... 2 Connecting the power.......................................................................
Table of contents 5 Using the printer dock with a computer ................................... 22 Transferring pictures from your Kodak EasyShare digital camera....... 22 Transferring pictures from a Kodak 8-in-1 card reader...................... 23 Printing from a computer................................................................. 24 Printing with Kodak EasyShare software ..................................... 24 Printing using other applications.................................................
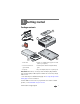
1 Getting started Package contents 2 6 1 5 3 4 1 Printer dock 4 Kodak color cartridge & photo paper kit / PH-10 (makes up to 10 prints) 2 Universal camera insert (pre-installed) 5 Kodak EasyShare Ni-MH rechargeable battery pack* 3 Paper tray 6 AC power adapter (may be two separate pieces) Not shown: Welcome Kit, consisting of User’s Guide (may be provided on CD), Start Here! guide, Kodak EasyShare software CD. Contents may change without notice. *Your camera may use a different battery type.
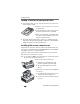
Getting started Finding a location for your printer dock ■ ■ Place the printer dock on a flat, clean, dust-free surface, in a dry location, and out of direct sunlight. ■ Allow 5 in. (12.7 cm) clearance on all sides of the printer dock. ■ For proper ventilation, make sure the top and back of the printer dock are not blocked. ■ When connecting power or USB cables, keep the cables clear of the paper path to the front and rear of the printer dock.
Getting started Connecting the power RISK OF ELECTRIC SHOCK: Use only the AC power adapter included with your printer dock. Other adapters or cords can damage your camera, printer dock, or computer. If you purchased your printer dock in the U.S. and plan to take it with you outside the U.S., do not use a common plug adapter. Instead, purchase the printer dock AC power adapter for the region to which you are traveling. 1 Remove the camera from the printer dock.
Getting started Handling and storing the color cartridge ■ For best quality prints, store the color cartridge in a location where the temperature does not exceed 85 °F (30 °C). ■ To avoid getting fingerprints on the ribbon, handle the color cartridge by the spool ends. ■ Keep the color cartridge away from direct sunlight and out of high-temperature environments (such as a vehicle parked in the sun).
Getting started When the cartridge is almost empty, the color cartridge light blinks slowly for 60 seconds. When the cartridge is depleted, the color cartridge light glows steady amber. IMPORTANT: The color cartridge may lock in place if there is a paper error. Do not attempt to remove the color cartridge without first clearing the paper error. Make sure the paper light is off before attempting to remove the color cartridge.
Getting started Handling and storing the paper ■ ■ To avoid fingerprints, handle the paper by the edges or by the perforated tabs. Do not touch the glossy side of the paper. ■ When storing, remove the paper tray, then close the paper tray cover and paper tray door to keep out dust and debris. Store paper flat. Keep the paper away from direct sunlight and out of high-temperature environments (such as a vehicle parked in the sun).
Getting started Installing and removing the paper tray To install the paper tray: 1 Open the paper tray door on the printer dock. 2 Slide the paper tray cover back until it stops; about 1.25 in. (3 cm). 3 Slide the paper tray in the printer tray slot until the tray locks into place. If you try to make a print when the paper tray is empty, the paper light glows steady amber. Pull the paper tray out to remove it. www.kodak.
2 Preparing your EasyShare digital camera Choosing the right camera battery IMPORTANT: The printer dock is intended to charge only the Kodak EasyShare Ni-MH rechargeable battery pack (included) and the Kodak EasyShare Li-Ion rechargeable battery (included with some cameras). Batteries made by manufacturers other than Kodak are not supported. Damage caused by unauthorized accessories is not covered under warranty.
Preparing your EasyShare digital camera Important battery information Battery safety and handling ■ Do not allow batteries to touch metal objects, including coins. If they do, batteries may short circuit, discharge energy, become hot, or leak. ■ For rechargeable battery disposal information, visit the Rechargeable Battery Recycling Corporation Web site at www.rbrc.com.
Preparing your EasyShare digital camera Docking and charging your EasyShare digital camera The Kodak EasyShare printer dock is compatible with Kodak EasyShare CX/DX6000/7000 series and LS600/700 series digital cameras. Docking your camera lets you make prints directly from the camera, transfer pictures from the camera to the computer, and charge the camera battery.
Preparing your EasyShare digital camera Refreshing the Ni-MH rechargeable battery pack If you are getting fewer than 20 pictures per charge with your Ni-MH rechargeable battery pack, follow the tips under Extending battery life, page 9. If these don’t help, the battery pack needs to be refreshed. The refresh cycle completely discharges the battery pack, then fully recharges it. NOTE: A full refresh cycle can take up to 8 hours, depending on how much charge is left in your battery pack.
Preparing your EasyShare digital camera Setting the picture quality Before taking pictures, change the Picture Quality setting on your Kodak EasyShare camera to Best (3:2) . This ensures that the pictures you take are proportional to the printer dock photo paper, preventing unwanted cropping of your pictures. See your camera user’s guide for more information. Tagging pictures for automatic printing On your Kodak EasyShare digital camera: 1 Press the Share button. 2 Press to locate a picture.
3 Printing without a computer IMPORTANT: Wait until printing is complete before removing prints, the paper tray, or the camera. Failure to do so can cause paper misfeeds or jams and can damage the printer dock. Printing from your EasyShare digital camera 1 Make sure the power is connected, and the color cartridge and paper are loaded (see Chapter 1, Getting started). 2 Take a picture with your camera (see your camera user’s guide). 3 Place the camera in the printer dock (see page 10).
Printing without a computer Printing tagged pictures If your camera or camera card contains pictures tagged for printing (see page 12 or your camera user’s guide), when you place the camera on the printer dock, a message appears indicating that tagged pictures have been found: ■ ■ To print tagged pictures—press . Printing starts, and tagged pictures are printed. Print tags are removed from tagged pictures on your camera or card as they are printed. To bypass printing of tagged pictures—press .
Printing without a computer Printing from a Kodak 8-in-1 card reader Connect a Kodak 8-in-1 card reader to the printer dock to print pictures from your camera card. NOTE: Other Kodak USB card readers may work with the printer dock, however card readers made by manufacturers other than Kodak are not supported. 1 For best results, tag pictures on your camera card for printing (see page 12 or your camera user’s guide).
Printing without a computer Changing the printed picture size 1 Follow the procedure for printing from your EasyShare camera (see page 13), Kodak 8-in-1 card reader (see page 15), or PictBridge device (see page 15). 2 Before printing, while making selections or changing settings, press the Picture size button repeatedly to scroll through the available options: 1 up—one 4 x 6 in. (102 x 152 mm) picture per print (default) 2 up—two 2.1 x 3.3 in. (54 x 85 mm) pictures per print 4 up—four 2 x 3 in.
Printing without a computer Removing perforated tabs from prints IMPORTANT: Remove perforated tabs from prints only after printing. Paper missing perforated tabs will not feed properly. 1 Fold the tabs up, then down. 2 Remove each tab and discard. www.kodak.
4 Installing software and connecting to a computer Minimum system requirements Windows OS-based computers Macintosh computers ■ Windows 98, 98SE, ME, 2000 ■ Power Mac G3, G4, G5, G4 Cube, iMac; ■ Internet Explorer 5.01 or higher ■ Mac OS 10.2 or higher ■ 233 MHz processor or greater ■ Safari 1.
Installing software and connecting to a computer 3 Load the software: Windows OS-based computer—if the install window does not appear, choose Run from the Start menu and type d:\setup.exe where d is the drive letter that contains the CD. Mac OS X—double-click the CD icon on the desktop, then click the Install icon. 4 Follow the on-screen instructions to install the software. Select Complete to automatically install the most commonly used applications.
Installing software and connecting to a computer Uninstalling the software If you wish to remove the printer dock driver or EasyShare software from your computer, use the following procedure: Windows OS-based computer: 1 Open Control Panel: From the Start menu, select Settings, then select Control Panel. (On Windows XP operating systems, Control Panel may be found in the Start menu.) 2 Double-click Add/Remove Programs. 3 Select Kodak EasyShare software, then click Remove.
Installing software and connecting to a computer Connecting to a computer A USB cable is required to connect to a computer. Use the USB cable that came with your Kodak EasyShare camera. To purchase one separately, see a retailer of Kodak products, or visit www.kodak.com/go/accessories. IMPORTANT: Make sure your camera is NOT in the printer dock when you are connecting to the computer.
5 Using the printer dock with a computer Transferring pictures from your Kodak EasyShare digital camera 1 Make sure Kodak EasyShare software is installed (see page 18) and the printer dock is connected to your computer (see page 21). 2 If you have the optional USB card reader, disconnect it from the printer dock. 3 Place the camera in the printer dock (see page 10). 4 Press the Transfer button, , on the printer dock. Kodak EasyShare software opens on your computer (if it is installed).
Using the printer dock with a computer Transferring pictures from a Kodak 8-in-1 card reader NOTE: Other Kodak USB card readers may work with the printer dock, however card readers made by manufacturers other than Kodak are not supported. 1 Make sure Kodak EasyShare software is installed (see page 18) and the printer dock is connected to your computer (see page 21). 2 Plug the USB connector from the card reader into the USB connector located on the side of the printer dock.
Using the printer dock with a computer Printing from a computer We recommend using Kodak EasyShare software (included) for printing. This software lets you take advantage of a wide range of features, including full color enhancement, red-eye reduction, picture organization, and much more. If there are no pictures on your computer, use the printer dock to transfer pictures from your camera before printing (see page 22).
Using the printer dock with a computer Printing using other applications 1 Make sure the printer driver is installed (see page 18), and the printer dock is connected to your computer (see page 21). 2 Open the pictures you wish to print in the application from which you want to print. 3 Access printer settings by selecting Print or Page Setup from the File menu (depending on your application and operating system).
Using the printer dock with a computer Windows 98/ME OS: 1 From the Start menu, select Settings, then select Printers. 2 Right-click the printer dock icon, then select Properties. 3 Click the Printer Options tab. 4 Under Color Control, select a color mode option. 5 Click OK when complete. Mac OS X: 1 Make sure the printer dock is selected as the current printer. 2 From an application File menu, select Print. 3 Click the drop-down menu, then select Color. 4 Select Kodak Color. 5 Select a color mode option.
6 Care and maintenance General care IMPORTANT: Always disconnect the power before cleaning. Do not use harsh or abrasive cleaners or organic solvents on the printer dock or any of its parts. ■ To clean the printer dock, wipe the outside of the printer dock with a clean, dry cloth. ■ Support the printer dock and tray by placing it on a flat, level surface. Do not block the air vents. ■ Avoid blocking the back of the printer dock and paper tray exit.
Care and maintenance Cleaning the paper feed roller To prevent misfeeds and to make sure your pictures look their best, we recommend that you keep the feed roller clean. Inspect the roller weekly for debris particles, and clean if necessary. IMPORTANT: Unplug the power before cleaning the feed roller. 1 Unplug the AC power adapter. 2 Remove the paper tray from the printer dock, and leave the paper tray door open. 3 Lightly moisten a lint-free cloth with water.
Care and maintenance Traveling with your printer dock IMPORTANT: When traveling, keep the printer dock, accessories, and supplies away from direct sunlight and out of high-temperature environments (such as a vehicle parked in the sun). 1 Disconnect the AC power adapter and remove all cables. RISK OF ELECTRIC SHOCK: If you purchased your printer dock in the U.S. and plan to take it with you outside the U.S., do not use a common plug adapter.
7 Troubleshooting When you have questions about your printer dock, start here. Additional technical information is available in the ReadMe file located on the Kodak EasyShare software CD. For updates to Troubleshooting information, visit www.kodak.com/go/printerdock. Printing problems If... Try the following Paper does not feed (Paper light may glow steady amber) IMPORTANT: Use only Kodak color cartridge & paper kits with your printer dock. Do not use inkjet paper. ■ The paper tray may be empty.
Troubleshooting If... Try the following Printer is jammed IMPORTANT: Use only Kodak color cartridge & paper kits with your printer dock. Do not use inkjet (Paper and/or paper. cartridge lights may blink quickly) ■ If paper light is blinking quickly: 1 Remove the paper tray (page 7). 2 Disconnect the AC power adapter, wait 5 seconds, then plug it back in. If paper does not automatically eject, carefully remove the paper manually.
Troubleshooting If... Try the following IMPORTANT: Use only Kodak color cartridge & paper kits Printing stops with your printer dock. Do not use inkjet during mid-print paper. (paper stops feeding, and Paper ■ Check the paper: light may blink) 1 Remove the paper tray (page 7). 2 Check the paper slot on the back of the printer dock. 3 Remove loose paper from the printer dock. If paper is jammed, see page 31. 4 Inspect the paper supply: make sure removable tabs have not been detached from the paper.
Troubleshooting If... Try the following Print is too light IMPORTANT: Use only Kodak color cartridge & paper kits with your printer dock. Do not use inkjet paper. ■ Make sure the paper is loaded with the glossy side up and the Kodak logo facing down. Reload if necessary (page 6). ■ Try re-taking the picture with the flash off. ■ Adjust the exposure compensation on your camera, and try re-taking the picture. See your camera user’s guide for details.
Troubleshooting If... Try the following Nothing happens ■ Camera may not be properly seated on connector. Reseat the camera on the printer dock (page 10). when you try to print (from docked ■ Re-establish the connection: remove, then reseat the camera on the printer dock. camera) ■ Make sure there is at least one picture in the camera’s internal memory or camera card.
Troubleshooting If... Try the following Printing is slow NOTE: When printing a large number of prints, printing may slow down to prevent the print head from overheating. ■ Make sure the printer dock is not placed in direct sunlight or is not operating in a high-temperature environment. ■ Make sure the cooling vents are not blocked or dirty (page 2). ■ Close unnecessary software applications. ■ Make sure your computer meets the minimum system requirements (page 18). Upgrade your system if necessary.
Troubleshooting Problems transferring pictures If... Try one or more of the following Nothing happens NOTE: You cannot use the Transfer button to transfer pictures from a PictBridge device. when you try to transfer pictures to ■ Press the Transfer button, , on the printer dock. the computer ■ Check the power and USB connections from the printer dock to computer (page 21). ■ If you are trying to transfer pictures from a docked camera, make sure to disconnect the optional USB card reader first (page 22).
Troubleshooting Printer dock status lights Color cartridge light Light status Cause Action/solution IMPORTANT: The color cartridge may lock in place if there is a paper error. Do not attempt to remove the color cartridge without first clearing the paper error. Make sure the paper light is off before attempting to remove the color cartridge. Light is off The color cartridge is properly installed and is working normally. Light blinks amber Slow blink (for 60 seconds): the color None required.
Troubleshooting Paper light Light status Cause Action/solution IMPORTANT: The color cartridge may lock in place if there is a paper error. Do not attempt to remove the color cartridge without first clearing the paper error. Make sure the paper light is off before attempting to remove the color cartridge. Light is off The paper tray is properly installed None required. and has an ample supply of paper. Light blinks amber There is a paper jam. Clear the jam (page 31), then press .
Troubleshooting Battery charging lights Light status Cause All lights are off Camera may not be properly Reseat the camera on the seated on connector. printer dock (page 10). Camera is turned on. Action/solution Turn off the camera. Unrecognized battery type is Install a Kodak EasyShare installed. Ni-MH rechargeable battery pack or Kodak EasyShare Li-Ion rechargeable battery (page 8). One steady green light Camera was just placed in camera dock.
Troubleshooting Print light Light status Cause Action/solution Light glows steady green The printer dock is ready for printing. None required. Light blinks green The printer dock is printing. Light is off There are no pictures in the camera or on the card. Camera is not docked or Kodak 8-in-1 card reader is not connected. None required. To enable Print: 1 Take pictures. 2 Dock camera, or connect Kodak 8-in-1 card reader. If using card reader, make sure card is inserted.
Troubleshooting Picture size lights Light status Cause Action/solution One light glows steady The picture size is available and None required. green selected. To change picture size, push the Picture size button repeatedly. All lights are off There are no pictures in the camera, on the card, or on the PictBridge device. To enable the Picture size option: 1 Take pictures. Camera is not docked, or Kodak 2 Dock camera, or 8-in-1 card reader or PictBridge connect Kodak 8-in-1 device is not connected.
Troubleshooting Transfer light Light status Cause Action/solution Light glows steady The printer dock is ready for None required. green transferring pictures. Light blinks green Pictures are being transferred to the computer. None required. After transferring pictures, the transfer light continues to blink green until either the Transfer button is pressed again or the connection has timed-out. Light is off There are no pictures in the None required. camera or on the card.
8 Getting help Helpful web links Help with your printer dock www.kodak.com/go/printerdock Help with Windows operating system www.kodak.com/go/pcbasics and working with digital pictures Download latest printer dock software, firmware and drivers www.kodak.com/go/printerdockdownloads Get support for docks, cameras, software, accessories, more www.kodak.com/go/support To purchase a full range of digital camera and dock accessories www.kodak.com/go/accessories Register your printer dock www.kodak.
Getting help Australia 1800 147 701 Netherlands 020 346 9372 Austria 0179 567 357 New Zealand 0800 440 786 Belgium 02 713 14 45 Norway/Norge 23 16 21 33 Brazil 0800 150000 Philippines 1 800 1 888 9600 Canada 1 800 465 6325 Portugal 021 415 4125 China 800 820 6027 Singapore 800 6363 036 Denmark 3 848 71 30 Spain 91 749 76 53 Ireland 01 407 3054 Sweden 08 587 704 21 Finland 0800 1 17056 Switzerland 01 838 53 51 France 01 55 1740 77 Taiwan 0800 096 868 Germany 069 5007
9 Appendix Printer dock specifications For more specifications, visit www.kodak.com/go/printerdock.
Appendix Additional safety and maintenance tips ■ Always follow basic safety precautions. Refer to the “Important Safety Instructions” sheet packed with your printer dock. ■ Do not allow chemicals, such as suntan lotion, to come into contact with the painted surface of the printer dock. ■ If the printer dock has been subjected to inclement weather or you suspect water has gotten inside the printer dock, turn off the printer dock and remove the paper tray and color cartridge.
Appendix Regulatory information FCC compliance and advisory Kodak EasyShare printer dock This equipment has been tested and found to comply with the limits for a Class B digital device, pursuant to Part 15 of the FCC Rules. These limits are designed to provide reasonable protection against harmful interference in a residential installation.
Appendix VCCI Class B ITE English translation: This is a Class B product based on the standard of the Voluntary Control Council for Interference from Information Technology Equipment (VCCI). If this is used near a radio or television receiver in a domestic environment, it may cause radio interference. Install and use the equipment according to the instruction manual. 48 www.kodak.
Index A AC power adapter, 1 connecting, 3 accessories & supplies, ordering, 42 B battery charging, 10 charging lights, i, 10, 11, 38 extending life, 9, 11 loading, 8 refreshing Ni-MH battery pack, 11 safety and handling, 9 types, 8 button left/right control, i picture size, i print, i refresh, i transfer, i C cable power adapter, AC, 1, 3 USB, 14, 15, 21, 23 camera battery, loading, 8 connector, i docking and charging, 10 locator pin, i, 10 preparing for use with printer dock, 8 printing from, 13 setting pi
Index copies, selecting number of, 12, 13, 16 custom camera insert, installing, 2 customer support, 42 D DC-in, power connector, ii, 3 disposal and recycling of batteries, 9 of printer dock, 45 docking and charging the camera, 10 door cartridge, ii, 4 paper tray, 7 E EasyShare software.
Index P package contents, 1 paper feed roller, cleaning, 28 handling, storing, 6, 17 light, i, 37 loading, 6 removing perforated tabs, 17 slot, ii paper tray, i, 1 installing, removing, 7 PictBridge device printing from, 15 picture size and number of copies, 16 button, i changing default, 16 lights, i, 40 printing different sizes/layouts, 16 pictures automatic color correction of (Kodak color mode), 25 printing from Kodak 8-in-1 card reader, 14 printing from PictBridge device, 15 printing tagged, 14 review
Index S safety battery, 9 general, 45 service and support, 42 setup camera insert, 2 color cartridge, 4 connecting power, 3 loading paper, 6 location for printer dock, 2 package contents, 1 paper tray, 7 slot, paper path, ii software help, 42 installing, 18 Kodak EasyShare, printing with, 24 minimum system requirements, 18 printing from applications, 25 uninstalling, 20 upgrading, 42, 45 specifications, 44 status lights, 37 supplies & accessories, ordering, 42 support, technical, 42 system requirements, co