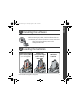
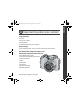
ENGLISH urg_00672.book Page 1 Thursday, August 16, 2007 8:32 AM Installing the software Before connecting any cables, install the software that was included with your camera. Follow the on-screen instructions. After installing the software, return to this Getting Started Guide. Loading the batteries Kodak lithium digital camera battery CRV3 (non-rechargeable) Kodak Li-Ion rechargeable digital camera battery KLIC-8000 www.kodak.
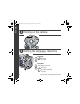
urg_00672.book Page 2 Thursday, August 16, 2007 8:32 AM ENGLISH Turning on the camera Setting the language, date/time Language: to change. 2 OK to accept. 1 Date/Time: 1 At the prompt, press OK. OK 2 2 to change. for previous/next field. OK to accept. www.kodak.
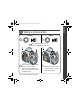
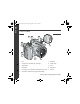
ENGLISH urg_00672.book Page 3 Thursday, August 16, 2007 8:32 AM Taking a picture/video Pictures 1 Videos 1 2 Press the EVF/LCD button to turn on LCD or EVF (electronic viewfinder). EVF LCD EVF LCD AF/AE indicator 3 Press the Shutter button halfway to focus and set exposure. When the AF/AE indicator turns green, press the Shutter button completely down. www.kodak.com/go/z712support 3 Press the Shutter button completely down and release. To stop recording, press the Shutter button again.
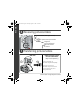
urg_00672.book Page 4 Thursday, August 16, 2007 8:32 AM ENGLISH Reviewing pictures/videos 1 Press Review. (Press again to exit.) 2 for previous/next picture/video. Videos: Play/pause 2X, 4X, 8X forward Adjust the volume 2X reverse Transferring pictures/videos USB cable 1 Kodak EasyShare printer dock or camera dock (May be sold separately.) 2 For dock compatibility, visit www.kodak.com/go/dockcompatibility. To purchase accessories, visit www.kodak.com/go/z712accessories.
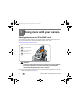
Keep learning about your camera! Congratulations! You have: • set up your camera • taken pictures • transferred pictures to your computer Keep learning! Finish reading this book, so you can take and share your best pictures! Visit www.kodak.com/go/z712support and www.kodak.com/go/easysharecenter for: • the extended user’s guide • interactive troubleshooting and repairs • interactive tutorials • FAQs • downloads • accessories • printing information • product registration www.kodak.
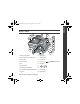
urg_00672.book Page 6 Thursday, August 16, 2007 8:32 AM ENGLISH Front view 7 8 9 6 10 5 11 4 3 2 1 1 Lens 7 Mode dial 2 Low-light assist, Self-timer light, Video light 8 On/Off switch 3 Shutter button 9 Flash 4 Flash button 10 Microphone 5 Focus button (Close-up/Macro, Landscape, Manual Focus) 11 Speaker 6 Drive button (Self-timer, Burst, Exposure Bracketing) 6 www.kodak.
ENGLISH urg_00672.book Page 7 Thursday, August 16, 2007 8:32 AM Back view 6 7 8 9 10 5 11 12 13 14 15 4 3 2 1 1 Battery compartment 10 Info button 2 Slot for optional SD or MMC card 11 Review button 3 Tripod socket 12 USB, A/V Out 4 Dock connector 13 DC-In (3V) 5 LCD 14 OK button 6 EVF/LCD button 15 7 EVF (Electronic viewfinder) 16 Share button 18 16 17 ,for optional AC adapter 8 Zoom (Wide Angle/Telephoto) button 17 Menu button 9 Jog dial 18 Delete button www.kodak.
urg_00672.book Page 8 Thursday, August 16, 2007 8:32 AM 1 Doing more with your camera Storing pictures on an SD or MMC card Your camera has internal memory. You can purchase SD or MMC cards to store more pictures and videos. We recommend Kodak SD or MMC cards. (Visit www.kodak.com/go/z712accessories.) 1 Turn off the camera. 2 Insert or remove the optional card. 3 Turn on the camera. CAUTION: A card can only be inserted one way; forcing it may cause damage.
urg_00672.book Page 9 Thursday, August 16, 2007 8:32 AM Doing more with your camera Using optical zoom Use optical zoom to get up to 12X closer to your subject. 1 Use the EVF or LCD to frame your subject. 2 Press Telephoto (T) to zoom in. Press Wide Angle (W) to zoom out. The zoom indicator shows zoom status. 3 Take the picture or video. NOTE: To get a focused picture every time, remember: ■Always use the auto focus framing marks.
urg_00672.book Page 10 Thursday, August 16, 2007 8:32 AM Doing more with your camera Using the Flash button Use the flash when you take pictures at night, indoors, or outdoors in heavy shadows. 1 Turn on the camera to open the flash. 2 Press the flash button repeatedly to scroll through flash modes. The current flash mode appears in the LCD/EVF status area. Flash Distance Wide angle: 1.6–25.6 ft (0.5–7.8 m) Telephoto: 4–14.4 ft (1.2–4.
urg_00672.book Page 11 Thursday, August 16, 2007 8:32 AM Doing more with your camera Using the Focus button Press the Focus button to have more control over camera focusing. 1 Turn the Mode dial to P, A, S, or M mode (page 18). Close-up/ Macro, Landscape, Manual Mode Icon Purpose 2 Press the Focus button repeatedly until the or MF icon appears in the status bar. , , 3 Take a picture. NOTE: After you take the picture, the camera stays in that focus setting.
urg_00672.book Page 12 Thursday, August 16, 2007 8:32 AM Doing more with your camera Using the Drive button Using the self-timer 1 Place camera on a tripod or flat surface. 2 In any Still mode, press the Drive button. • Once for a 10-sec. delay (so you have time to get into the scene) • Again for a 2-sec. delay (for a steady, shutter release on a tripod) • Again for 2 pictures (after a 10- and 18-second delay) 3 Compose the scene. 4 Press the Shutter button halfway, then completely down.
urg_00672.book Page 13 Thursday, August 16, 2007 8:32 AM Doing more with your camera Using burst Press the Drive button to choose a burst mode. Mode Description Purpose First Burst Icon Camera takes up to 6 pictures while the Shutter button is pressed. Capture an expected event. Example: A person swinging a golf club. Last Burst Camera takes up to 30 pictures while the Shutter button is pressed. When the Shutter button is released, only the last 6 pictures are saved.
urg_00672.book Page 14 Thursday, August 16, 2007 8:32 AM Doing more with your camera Using exposure bracketing Use exposure bracketing to determine the best exposure (light) level for your conditions. During exposure bracketing, the camera takes 3 pictures: ■ One at + (above normal) exposure ■ One at 0 (normal) exposure ■ One at - (below normal) exposure Evaluate the 3 pictures, and decide which exposure level is right for you. (Burst is not available in all modes.
urg_00672.book Page 15 Thursday, August 16, 2007 8:32 AM Doing more with your camera Capture modes Choose the mode that best suits your subjects and surroundings. Capture mode Smart Scene P, A, S, M Favorites Video Scene ISO High-ISO Sport For General picture taking—offers an excellent balance of image quality and ease of use. When the Shutter button is pressed halfway, faces are detected, the scene is analyzed, and the best settings are applied. More creative control. (See page 18.
urg_00672.book Page 16 Thursday, August 16, 2007 8:32 AM Doing more with your camera SCN (Scene) modes 1 Turn the Mode dial to . 2 Press to highlight a SCN mode and view its description. NOTE: If the SCN mode description turns off, press OK. 3 Press OK (or keep the SCN mode highlighted) to choose the SCN mode. To return to Smart Scene mode, turn the mode dial to Smart Scene . SCN mode For Portrait Full-frame portraits of people. Panorama Landscape Taking and stitching together 2 or 3 pictures.
urg_00672.book Page 17 Thursday, August 16, 2007 8:32 AM Doing more with your camera SCN mode For Sunset Subjects at dusk. Using the Menu button You can change settings to get the best results from your camera. NOTE: Some settings remain until you change them; others, until you change modes or turn off the camera. Some modes offer limited settings. 1 Press the Menu button. 2 Press to highlight a setting, then press OK. 3 Choose an option, then press OK.
urg_00672.book Page 18 Thursday, August 16, 2007 8:32 AM Doing more with your camera P, A, S, and M modes Use these modes when you want more control over your camera and pictures. Mode When to use Press Jog dial to control Program mode offers the ease of auto shooting with full access to all menu options. The camera Program automatically sets the shutter speed and aperture (f-stop) based on the scene lighting. Use Aperture priority mode to control depth of field (the range of sharpness).
urg_00672.book Page 19 Thursday, August 16, 2007 8:32 AM Doing more with your camera Changing P, A, S, or M mode settings PASM modes control the aperture (f-number, also known as f-stop), shutter speed, exposure compensation, flash compensation, and ISO. Use the Menu button to control all other settings. Jog dial (press, turn) 1 Turn the Mode dial to P, A, S, or M. The mode options are displayed. 2 Use the Jog dial to move between settings, open a setting, or change a setting.
urg_00672.book Page 20 Thursday, August 16, 2007 8:32 AM 2 Working with pictures/videos Press the Review button to view and work with your pictures and videos. Magnifying a picture 1 W/T Magnify 1X - 8X. 2 3 View other parts of the picture. W Return to 1X. Deleting pictures and videos 1 2 Press Review. View previous/next. 3 Press Delete. 4 Follow the screen prompts. If you accidentally delete a picture, you may be able to use Undo Delete to retrieve it.
urg_00672.book Page 21 Thursday, August 16, 2007 8:32 AM Working with pictures/videos What the review icons mean Print tag/number of prints Favorite tag Email tag Perfect Touch tech. Mode indicator Album Protected Picture number Image storage location Scroll arrows Video length Favorite tag Email tag Review mode Album Protected Video number Image storage location Battery level Video controls Scroll arrows www.kodak.
urg_00672.book Page 22 Thursday, August 16, 2007 8:32 AM 3 Solving camera problems Camera problems For step-by-step product support, visit www.kodak.com/go/z712support and select Interactive Troubleshooting & Repairs. If Try one or more of the following Camera does not turn on/off; controls do not function ■ Insert a new or charged battery. Battery life is short ■ Make sure the correct battery type is installed (page 1).
urg_00672.book Page 23 Thursday, August 16, 2007 8:32 AM 4 Appendix CAUTION: Do not disassemble this product; there are no user-serviceable parts inside. Refer servicing to qualified service personnel. Kodak AC adapters and battery chargers are intended for indoor use only. The use of controls, adjustments, or procedures other than those specified herein may result in exposure to shock and/or electrical or mechanical hazards. If the LCD breaks, do not touch the glass or liquid.
urg_00672.book Page 24 Thursday, August 16, 2007 8:32 AM Appendix Upgrading your software and firmware Download the latest versions of the software included on the Kodak EasyShare software CD and the camera firmware (the software that runs on the camera). See www.kodak.com/go/z712downloads.
urg_00672.book Page 25 Thursday, August 16, 2007 8:32 AM Appendix or incidental damages resulting from the sale, purchase, or use of this product regardless of the cause.
urg_00672.book Page 26 Thursday, August 16, 2007 8:32 AM Appendix Any changes or modifications not expressly approved by the party responsible for compliance could void the user’s authority to operate the equipment. Where shielded interface cables have been provided with the product or specified additional components or accessories elsewhere defined to be used with the installation of the product, they must be used in order to ensure compliance with FCC regulation.
urg_00672.book Page 27 Thursday, August 16, 2007 8:32 AM Appendix China RoHS Russian GOST-R Eastman Kodak Company Rochester, NY 14650 AIO-40 Eastman Kodak Company Rochester, New York 14650 © Eastman Kodak Company, 2007 Kodak and EasyShare are trademarks of Eastman Kodak Company. 4J6067_en www.kodak.