KODAK ESP 5200 Series All-in-One Printer Extended User Guide
Eastman Kodak Company Rochester, NY 14650 © Eastman Kodak Company, 2010 Kodak, EasyShare, ESP, and Perfect Touch are trademarks of Eastman Kodak Company. Specifications subject to change without notice.
Table of contents 1 Printer Overview Components.......................................................................................................................................................................1 Control panel.....................................................................................................................................................................2 Home Center Software ...............................................................................................
5 Copying Copying a document.................................................................................................................................................... 24 Using the default settings to copy a document.............................................................................................. 24 Adjusting the settings and copying a document.............................................................................................25 Changing the number of copies of a document ....
KODAK ESP 5200 Series All-in-One Printer 9 Product and Safety Specifications Specifications and features .........................................................................................................................................53 Print performance....................................................................................................................................................53 Photo printing features...........................................................................
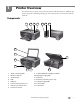
1 Printer Overview This printer lets you print, copy, and scan pictures and documents. In addition, this printer supports networking, letting you access the printer over a wireless (Wi-Fi) network.
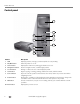
Printer Overview Control panel 1 2 10 3 9 4 5 8 7 6 Feature 1 LCD 2 On/Off button 3 Home button 4 Navigation buttons 5 Zoom buttons 6 Start button 7 Cancel button 8 Rotate button 9 OK button 10 Back button 2 Description Displays pictures, messages, and menus; lifts for easy viewing Turns the printer on or off Displays the main menu, and toggles between screens Used to navigate menus, scroll through pictures Enlarge or reduce the size of the displayed picture Begins copying, scanning, printing,
KODAK ESP 5200 Series All-in-One Printer Home Center Software KODAK Home Center Software is installed as part of the software installation on your computer. The Home Center icon is added to your desktop and, depending on your configuration, to the Start menu. Use this icon to start Home Center Software.
Printer Overview • Language – Press OK, press to select a language, then press OK. • Country/Region – Press OK, press to select a country or region, then press OK. • Reset All Settings (see Resetting factory defaults, page 49) NOTE: Resetting factory defaults does not change the date and time, language, country/region, or network settings. 4. Press Back to return to the Main Menu.
2 Networking Your Printer This section explains how to configure or change your network settings. Connecting to a wireless network To connect your printer to an 802.11b/g wireless (Wi-Fi) network, refer to the following information. Before you connect You need to: • Have a wireless router. • Determine whether your wireless router supports Wi-Fi Protected Setup (WPS). • Temporarily disable your firewall until the printer is successfully installed and communicating.
Networking Your Printer The Wi-Fi connectivity LED blinks as the printer searches for available wireless networks within range, then displays the list in order of signal strength. For example: If there are more networks than can be shown on the LCD, a (page down) symbol appears in the bottom right of the display. If you don’t see your network in the list, or if you want to change your network, select Rescan for Wireless Networks, then press OK. 4.
KODAK ESP 5200 Series All-in-One Printer Connecting to a WPS wireless router If your router supports Wi-Fi Protected Setup (WPS), you can use WPS Connect. WPS lets you configure your printer for a wireless network by pressing buttons or entering a PIN. To connect to a network using WPS: 1. Press Home. 2. Press to select Network Settings, then press OK. 3. With WiFi Setup Wizard selected, press OK. NOTE: The Wi-Fi radio turns on automatically when you select Wi-Fi Setup Wizard. 4.
Networking Your Printer Using the LCD keyboard When you need to enter letters or numbers, a keyboard appears on the LCD. There are two types of keyboards, depending on which printer model you have. • To change from uppercase to lowercase, select abc/123, then press OK. • To change from lowercase to uppercase, select ABC/123, then press OK. • To enter punctuation or symbols, select !@#, then press OK. Use the arrow keys to select the letters, numbers, and symbols, then press OK.
KODAK ESP 5200 Series All-in-One Printer To set up your IP address on the printer: Press Home. Press to select Network Settings, then press OK. Press to select Advanced IP Address Setup, then press OK. Press OK again to continue. Select one of the following, then press OK: • Dynamic (DHCP) • Automatic (Private) • Manual (Static) 6. If you selected Manual (Static), you are prompted to enter an IP address, a Subnet Mask, a Gateway Address, and a DNS Server address. Press OK after each entry.
Networking Your Printer Printing the network configuration To print the current network configuration: 1. 2. 3. 4. Load plain paper into the printer. (See Loading plain paper, page 14.) Press Home. Press to select Network Settings, then press OK. Press to select Print Network Configuration, then press OK. Installing your printer on additional computers on the network To add your printer to another computer(s) on your network, install the KODAK All-in-One Printer Software on each computer. Go to www.
KODAK ESP 5200 Series All-in-One Printer Adding a wireless network connection to a USB-connected computer You can change the way you connect to your printer at any time. Changing from USB to a wireless connection To change the printer connection type from USB to a wireless (Wi-Fi) network: If your printer is connected to a computer with WINDOWS OS: 1. 2. 3. 4. 5. 6. 7. 8. Unplug the USB cable from your printer and computer. On the printer control panel, press Home.
Networking Your Printer If your printer is connected to a computer with MAC OS: 1. 2. 3. 4. 5. 6. 7. 8. Unplug the USB cable from your printer and computer. On the printer control panel, press Home. Press to select Network Settings, then press OK. Press to select View Network Configuration, press OK, then confirm you have an IP address. Select Apple > System Preferences. Under Hardware, select Print & Fax. In the Print & Fax dialog box, click +. Select your printer from the list, then click Add.
3 Handling Paper For the best photo printing results, use KODAK Photo Papers, which are optimized to work with KODAK All-in-One Printers. For the best document printing results, use KODAK Document Papers or a paper with the COLORLOK Technology logo on the package. Use only paper that is designed for inkjet printers. When handling paper: • Hold the paper by the edges; avoid placing your fingerprints on it. • Do not touch the glossy side of photo paper. • Store paper flat, away from direct sunlight and heat.
Handling Paper Envelope sizes The printer accepts the following envelope sizes: • • • • • • C5 (6.7 x 9 in. / 16 x 23 cm) C6 (4.5 x 6.4 in. / 11 x 16 cm) DL (4.3 x 8.7 in. / 11 x 22 cm) US #7¾ (3.9 x 7.5 in. / 10 x 19 cm) US #9 (3.9 x 8.9 in. / 10 x 23 cm) US #10 (4.1 x 9.5 in. / 11 x 24 cm) IMPORTANT: Do not load envelopes with cutout or clear windows. Loading paper Loading plain paper The paper tray capacity is 100 sheets of plain paper. To load plain paper: 1. Open the paper tray. 2.
KODAK ESP 5200 Series All-in-One Printer 5. Fan and stack the paper, then insert it into the tray. 6. Move the paper forward until it stops. 7. Move the left paper-edge guide until it touches the paper. left paper-edge guide Loading photo paper The paper tray capacity is 20 sheets of photo paper. To load photo paper: 1. Remove any plain paper from the tray. 2. Fan and stack the photo paper, then insert the paper (short side first) into the tray with the logo side facing up and the glossy side down.
Handling Paper Loading envelopes The paper tray capacity is 20 envelopes. IMPORTANT: Do not load envelopes with cutout or clear windows. To load envelopes: 1. Remove all paper from the tray. 2. Make sure the left paper-edge guide is to the far left. 3. Insert the envelope(s) into the tray with the flap up and against the right side of the tray. 4. Move the envelopes forward until they stop. 5. Move the left paper-edge guide until it touches the envelope(s). left paper-edge guide 16 www.kodak.
4 Printing Print documents and lab-quality pictures on your printer. Printing documents To print a document: 1. 2. 3. 4. Open the document on your computer. Select File > Print. In the Print dialog box, select your KODAK Printer. Choose the pages to print, number of copies, etc, then click OK (on a computer with WINDOWS OS) or Print (on a computer with MAC OS). Printing two-sided documents You can print two-sided documents on any size paper that the printer accepts when you rotate the paper manually.
Printing 4. 5. 6. 7. 8. 9. 10. 11. 12. 13. 14. In the Copies & Pages drop-down list, select Paper Handling. In the Pages to Print drop-down list, select Odd Only. In the Page Order drop-down list, select Reverse. Click Print. When the odd pages have finished printing, remove them from the output tray. Rotate the printed pages 180 degrees, and place them into the paper tray (printed side up). Select File > Print. In the Copies & Pages drop-down list, select Paper Handling.
KODAK ESP 5200 Series All-in-One Printer Using default settings to print a picture To print a picture from a memory card using the factory default settings: 1. Load photo paper with the logo side facing up (see Loading photo paper, page 15), and move the left paper-edge guide until it touches the paper. 2. Insert the memory card into the memory card slot. memory card slot left paper-edge guide 3. Press or to select the picture you want to print. 4. Press Start to begin printing.
Printing 4. Repeat step 3 for each picture you want to print. 5. Press to select View and Print Photos, then press OK. 6. Press to select an option, then press or to change the setting. Print Photos Option 20 Settings Description View Photos -- Scroll through the pictures on the memory card. Transfer All to PC -- To transfer all the pictures on the memory card to your computer, press OK then Start. (Your printer and computer must be connected with a USB cable.
KODAK ESP 5200 Series All-in-One Printer Print Photos Option Save as Defaults Settings No / Yes Description To save the settings as the new default, press OK. With Yes selected, press OK. 7. When you have finished changing settings, press Start to begin printing. IMPORTANT: To prevent loss of data from your memory card, camera, or portable drive, do not remove it from the printer while printing.
Printing Zooming and cropping pictures Use the zoom buttons to select a portion of your picture for printing. To zoom and crop a picture: 1. Load photo paper with the logo side facing up (see Loading photo paper, page 15), and move the left paper-edge guide until it touches the paper. 2. Insert the memory card into the memory card slot. memory card slot left paper-edge guide 3. Press or to select the picture you want to crop, then press OK. 4. Press Zoom + to enlarge the picture on the LCD.
KODAK ESP 5200 Series All-in-One Printer Printing pictures or documents from a wireless device Wirelessly print pictures from an iPhone, iPod touch, or iPad* at the touch of a button. Download the KODAK Pic Flick App from the App Store, or go to www.kodak.com/go/picflick for more information. * Compatible with iPhone (with MAC OS 2.2 or later), iPod touch (2nd generation), and iPad. Transferring pictures to a computer You can transfer .jpg, .mov, and .
5 Copying You can copy documents and pictures with your all-in-one printer. The printer produces high–quality color or black-and-white copies on a variety of paper types (see Paper types, page 13). Copying a document You can copy a document using the default settings, or you can adjust the quantity, size, quality, and brightness of your copies.
KODAK ESP 5200 Series All-in-One Printer Adjusting the settings and copying a document To copy a document using settings other than the default settings: 1. Lift the scanner lid, and place the document face down in the right-front corner of the scanner glass. 2. 3. 4. 5. Close the lid. Press Home. Make sure Copy Document is selected, then press OK. Press to select an option, then press or to change the setting.
Copying Copy Document Option Plain Paper Quality Setting Description Normal (default) Good quality output; prints faster than Best. Best The highest quality, but the slowest print speed; eliminates the banding effect that sometimes occurs when printing Draft or Normal. Draft The fastest print speed, but the lowest quality. Photo Paper Quality Automatic (default) The printer detects photo paper in the paper tray and sets Best quality automatically.
KODAK ESP 5200 Series All-in-One Printer 3. Press Home. 4. Make sure Copy Document is selected, then press 5. Press Start to begin copying. or to select a number. Enlarging or reducing a document To enlarge or reduce the size of the copy: 1. Lift the scanner lid, and place the document face down in the right-front corner of the scanner glass. 2. 3. 4. 5. 6. 7. Close the lid. Press Home. Make sure Copy Document is selected, then press OK. Press to select Copy Size.
Copying Darkening or lightening a copy To darken or lighten the copy: 1. Lift the scanner lid, and place the document face down in the right-front corner of the scanner glass. 2. 3. 4. 5. 6. Close the lid. Press Home. With Copy Document selected, press OK. Press to select Brightness. Press to select a number below zero for a darker copy, or press number above zero for a lighter copy. 7. Press Start to begin copying. 28 www.kodak.
KODAK ESP 5200 Series All-in-One Printer Copying a photograph You can copy a photograph using the default settings, or you can adjust the quantity, size, quality, and brightness of your copies. Using the default settings to copy a photograph The default settings are either the factory default settings (see Resetting factory defaults, page 49), or defaults that you have set on the printer (see Save as Defaults, page 31). To copy a photograph using the current default settings: 1.
Copying Adjusting the settings and copying a photograph To copy a photograph using settings other than the default settings: 1. Lift the scanner lid, and place the photograph face down in the right-front corner of the scanner glass. 2. 3. 4. 5. Close the lid. Press Home. Press to select Copy Photo, then press OK. Press to select an option, then press or to change the setting. Copy Photo Option Description Quantity 1 (default) to 99 The number of copies that print.
KODAK ESP 5200 Series All-in-One Printer Copy Photo Option Plain Paper Quality Setting Description Normal (default) Good quality output; prints faster than Best. Best The highest quality, but the slowest print speed; eliminates the banding effect that sometimes occurs when printing Draft or Normal. Draft The fastest print speed, but the lowest quality. Photo Paper Quality Automatic (default) The printer detects when you load photo paper and sets Best quality automatically.
Copying 3. 4. 5. 6. 7. Press Home. Press to select Copy Photo, then press OK. Make sure Quantity is selected. Press or to select a number. Press Start to begin copying. Enlarging or reducing a photograph To enlarge or reduce the size of the copy: 1. Lift the scanner lid, and place the photograph face down in the right-front corner of the scanner glass. 2. 3. 4. 5. 6. 7. 32 Close the lid. Press Home. Press to select Copy Photo, then press OK. Press to select Copy Size. Press or to select the copy size.
KODAK ESP 5200 Series All-in-One Printer Darkening or lightening a copy of a photograph To darken or lighten the copy: 1. Lift the scanner lid, and place the photograph face down in the right-front corner of the scanner glass. 2. 3. 4. 5. 6. Close the lid. Press Home. Press to select Copy Photo, then press OK. Press to select Brightness. Press to select a number below zero for a darker copy, or press number above zero for a lighter copy. 7. Press Start to begin copying. www.kodak.
6 Scanning Scanning digitizes documents and pictures, and sends the digital files to your computer.
KODAK ESP 5200 Series All-in-One Printer Setting Options Resolution (dpi) 75 150 200 300 File Save Prompt for File Name and Location Automatically Save - specify: • Base name; by default, scanned files are names “scan1”, “scan2”, and so on. • Location (folder) where the scanned files will be saved To adjust settings for scanning pictures, select the Picture tab, then select an option for each setting: Setting Options Scan As Black and white Color Grayscale File format .jpg .bmp .
Scanning Setting Options Automatically When selected, multiple pictures placed on the scanner glass Detect Pictures are saved as separate files. (when connected to a computer with WINDOWS OS) or Auto Crop (when connected to a computer with MAC OS) File Save Prompt for File Name and Location Automatically Save - specify: • Base name; by default, scanned files are names “scan1”, “scan2”, and so on.
KODAK ESP 5200 Series All-in-One Printer Scanning multiple pictures when connected to a computer with WINDOWS OS To scan multiple pictures simultaneously, and save them as separate files: 1. Lift the scanner lid, and place the pictures face down on the glass, leaving space between the pictures. 2. Close the lid. 3. Open Home Center Software, then select Tools and Documentation. 4. Click Printer Scan Settings, then select the Picture tab. 5.
Scanning 4. Press to select an option, then press Scan Option Scan To Scan What Destination Save as Defaults Settings or to change the setting. Description USB-connected computer (default) The scanned file is sent to the USB-connected computer. Name of computer (only if a computer is connected by wireless network) The scanned file is sent to the computer on the wireless or Ethernet network.
7 Maintaining Your Printer Your printer requires little maintenance. However, Kodak recommends cleaning the scanner glass and lid regularly to remove dust and fingerprints, which affect the quality and accuracy of scanning. Except while cleaning the printer, keep the printer plugged into an AC power outlet. If you use a power strip, don't turn off the power strip. (The printer does not necessarily have to be turned on, but should be plugged in.
Maintaining Your Printer Cleaning the scanner glass and document backing The scanner glass can get smudged and minor debris can accumulate on the white document backing under the scanner lid. Periodically clean the scanner glass and document backing. CAUTION: Do not use harsh or abrasive cleaners on any part of the printer. Do not spray liquid directly on the glass. Do not use paper-based wipes on the document backing as they can scratch it.
KODAK ESP 5200 Series All-in-One Printer Replacing ink cartridges Your printer uses both black and color ink cartridges. You can check the approximate ink levels on the LCD (see Checking ink levels, page 49) or in Home Center Software. When an ink cartridge is out of ink, the printer LCD displays a message stating that the black or color ink cartridge needs replacing. IMPORTANT: Do not use non-Kodak brand or refilled ink cartridges. To replace an ink cartridge: 1. Make sure your printer is on. 2.
Maintaining Your Printer 3. Pinch the tab on the ink cartridge and lift it out of the printhead. 4. Remove the new ink cartridge from its bag. IMPORTANT: To prevent the printhead from drying out, insert the ink cartridge into the printhead immediately. 5. Remove the protective cap from the cartridge. 42 www.kodak.
KODAK ESP 5200 Series All-in-One Printer 6. Insert the ink cartridge into the printhead. 7. Press down on the ink cartridge tab until you hear a click. 8. Close the printer access door. www.kodak.
Maintaining Your Printer Replacing the printhead IMPORTANT: Replacing the printhead is not a regular maintenance procedure. Replace the printhead only if you receive a new printhead from Kodak. To replace the printhead: 1. Make sure your printer is on. 2. Lift the printer access door, and wait for the carriage to move to the access position. 3. Remove both ink cartridges and set them aside. 4. Unlatch the used printhead by lifting the button in the center of the carriage. 44 www.kodak.
KODAK ESP 5200 Series All-in-One Printer 5. Lift the used printhead out of the carriage. 6. Remove the new printhead from its bag. CAUTION: Do not touch the copper contacts on the printhead, as doing so may damage the printhead. 7. Remove the two plastic protective caps. www.kodak.
Maintaining Your Printer 8. Place the new printhead into the carriage. 9. Push firmly against the target label of the printhead until you hear a loud snap. 10. Insert the black ink cartridge into the printhead. 46 www.kodak.
KODAK ESP 5200 Series All-in-One Printer 11. Press down on the ink cartridge until you hear it click into position. 12. Repeat steps 10 - 11 for the color ink cartridge. 13. Close the printer access door. The printer detects the new printhead. Follow the instructions on the LCD to calibrate your printer. Updating the software and printer firmware Using the latest software and firmware helps ensure optimal performance of your printer. NOTE: Firmware is the software that runs on your printer.
Maintaining Your Printer To update the printer firmware: 1. Make sure that your computer is connected to the Internet. 2. Connect the printer to the computer with a USB cable or wirelessly (if not currently connected). 3. Open Home Center Software, and make sure that KODAK ESP 5200 Series AiO - Connected appears in the lower left corner of the Home Center Software window. 4. Click Tools and Documentation. 5. Under Web Links, click Check for Printer (Firmware) Updates. 6.
KODAK ESP 5200 Series All-in-One Printer Monitoring and adjusting printer performance From the control panel, you can perform tasks to help keep the printer functioning well. Checking ink levels To check the ink levels: 1. Press Home. 2. Press to select Maintenance, then press OK. 3. With Check Ink Levels selected, press OK. The LCD shows approximate levels of ink in the cartridges so you know when it’s time to order replacement cartridges.
8 Troubleshooting Basic troubleshooting Some problems can be resolved quickly by power cycling the printer: Turn off your printer. Wait five seconds. Turn on the printer. Use the following information to help troubleshoot problems with your printer. Problem Possible Solutions Printer does not power on • Make sure you are using the power cord that came with your printer.
KODAK ESP 5200 Series All-in-One Printer Problem Possible Solutions Print quality • For best results, use KODAK Paper or a paper with the COLORLOK Technology logo on the package. • Make sure the paper is loaded correctly. See Loading paper, page 14. For more help, go to www.kodak.com/go/stepbystep, select All-in-one printer, then Print Quality (missing colors, blank prints, etc). Ink cartridge • Check that KODAK Ink Cartridge(s) are installed. Do not use non-Kodak brand or refilled ink cartridges.
Troubleshooting Status lights The status lights indicate the condition of the printer. There are two status lights on the printer, one that indicates power, the other indicates Wi-Fi status. Power status light Power light What it means Off • The printer is turned off. – Press the on/off button to turn on power. • The printer does not have power. – Make sure that the power cord is plugged into the back of the printer and into an electrical outlet, and that the electrical outlet has power.
9 Product and Safety Specifications The following specifications are subject to change without notice.
Product and Safety Specifications Copy photo features Color Black-and-white or color Quantity 1 to 99 copies (may vary for different models of the 5200 series printers) Copy sizes 2 x 3 in. (5 x 7.6 cm) 3.5 x 5 in. (9 x 12.7 cm) 4 x 6 in. (10 x 15 cm) 4 x 7 in. (10 x 18 cm) (Panoramic) 4 x 12 in. (10 x 30 cm) 5 x 7 in. (13 x 18 cm) 8 x 10 in. (20 x 25 cm) US Letter - 8.5 x 11 in.
KODAK ESP 5200 Series All-in-One Printer Connectivity Protocols supported USB 2.0 High Speed; DPOF, MIPC Devices supported WINDOWS OS-based and MACINTOSH Computers, memory cards (SD, MS/Duo, MMC, SDHC) Image Formats supported Image printing supports JPEG (EXIF v2.2); does not support progressive JPEG format Number of USB ports One rear device port (high speed) Protocols supported USB 2.0 High Speed (for connection to computer only), DPOF (Tagged image printing), MIPC Wi-Fi Technology 802.
Product and Safety Specifications System requirements Computer with WINDOWS OS Minimum Operating system WINDOWS 7, VISTA, or XP (SP2 or later) CPU INTEL CELERON Processor Clock speed 1.2 GHz Memory 512 MB RAM Available hard disk space 500 MB available Interface USB 2.0 High Speed Removable drive CD-ROM Computer with MAC OS Minimum Operating system MAC OS X 10.4.8 or later CPU PowerPC G4, G5, or INTEL-based Mac Clock speed 1.
KODAK ESP 5200 Series All-in-One Printer Paper sizes supported Plain paper A4 (8.3 x 11.7 in. / 21 x 30 cm) A5 (5.8 x 8.3 in. / 15 x 21 cm) A6 (4.1 x 5.8 in. / 11 x 15 cm) B5 (6.9 x 9.8 in. / 18 x 25 cm) US Executive (7.3 x 10.5 in. / 18 x 27 cm) US Letter (8.5 x 11 in. / 22 x 28 cm) US Legal (8.5 x 14 in. / 22 x 36 cm)) Custom sizes from 4–8.5 in. / 10–22 cm wide and 6–14 in. / 15–36 cm long Labels A4 (8.3 x 11.7 in. / 21 x 30 cm) US Letter (8.5 x 11 in. / 22 x 28 cm) Index card stock 4 x 6 in.
Product and Safety Specifications Safety information KODAK ESP 5200 Series All-in-One Printers are Class 1 LED Products. • Always follow all warnings and instructions marked on the product. • Use only the power source indicated on the product regulatory label. • Use only the power cord that comes with the product (or an approved power cord greater or equal to H05W-F, 2G, 0.75mm2). Using another power cord may cause fire and/or shock. Do not use the included power cord with any other equipment.
KODAK ESP 5200 Series All-in-One Printer LCD screen safety • Use only a dry, soft cloth to clean the LCD screen. Do not use any liquid or chemical cleaners. • If the LCD screen is damaged, contact Kodak immediately. If any of the solution from the display gets on your hands, wash then thoroughly with soap and water. If the liquid crystal solution gets into your eyes, flush your eyes immediately with water. If any discomfort or change in vision persists after washing, seek medical attention immediately.
Product and Safety Specifications CAUTION: Pursuant to Part 15.21 of the FCC Rules, any changes or modifications to this product not expressly approved by Eastman Kodak Company might cause harmful interference and void the FCC authorization to operate this product. The radiated energy from this product is well below the FCC radio frequency exposure limits. Nevertheless, the product shall be used in such a manner that the potential for human contact during normal operation is minimized.
KODAK ESP 5200 Series All-in-One Printer CAUTION: Das Gerät ist nicht für die Benutzung im unmittelbaren Gesichtsfeld am Bildschirmarbeitsplatz vorgesehen. Um störende Reflexionen am Bildschirmarbeitsplatz zu vermeiden, darf dieses Produkt nicht im unmittelbaren Gesichtsfeld platziert verden. Noise emissions for this equipment do not exceed 70 dBa. This equipment is not intended for use in the work place in accordance with BildscharbV regulations.
Product and Safety Specifications Warranty Information Limited Warranty Kodak warrants Kodak consumer electronic products and accessories (“Products”), excluding batteries, to be free from malfunctions and defects in both materials and workmanship for one year from the date of purchase. Retain the original dated sales receipt. Proof of the date of purchase will be required with any request for warranty repair.
KODAK ESP 5200 Series All-in-One Printer Declaration of Conformity See www.kodak.com/go/declarationofconformity. www.kodak.
Index A access door, 1 B back button, 2 C cancel button, 2 cleaning document backing, 40 printer, 39 scanner glass, 40 cleanout area, rear access, 1 components, printer, 1 computer requirements, 56 configuring printer settings, 3 connecting to a wireless network, 5—10 additional printer, 10 from USB, 11—12 printer on additional computers, 10 control panel features and descriptions, 2 location, 1 copy document features, 53 copy photo features, 54 copying, 24—33 documents, 24—28 adjusting settings, 25—26 chan
Index I Image Capture software, 23 image formats supported, 55 index card stock sizes, 57 ink cartridges, replacing, 41—43 ink levels, 49 IP address setting up, 8 viewing, 9 iPhoto software, 23 iron-on transfers, 57 O OK button, 2 on/off button, 2 overview of printer, 1 K keyboard on LCD, using, 8 KODAK EASYSHARE Software, 18 KODAK Home Center Software, 3 KODAK Pic Flick App, 23 L label sizes, 57 language, setting, 4 LCD, 1, 2 left paper-edge guide, location, 1 lightening copies documents, 28 photos, 33
Index printing, 17—23 documents, 17 tagged image photos, 21 tagged pictures, 3 two-sided documents, 17—18 specifications, 53—57 start button, 2 supplies ordering, using Home Center Software, 3 recycling, 39 system requirements, 56 R rear-access cleanout area, 1 recycling printer or supplies, 39 red box around image on LCD, 22 reducing copies documents, 27 photos, 32 regulatory compliance European, 60 removing the printhead, 45 replacing ink cartridges, 41—43 resolution, scanning, 35 right paper-edge guid
Index wireless device, printing from, 23 wireless network configuration, viewing and printing, 9 connecting to, 5—10 additional KODAK All-in-One Printer(s), 10 from USB, 11 non-WPS router, 5 printer on additional computers, 10 using WiFi Setup wizard, 5 WPS router, 7 IP address, setting up, 8 settings, configuring, 5 WPA/WPA2 passphrase, 6 WPS router, 7 Z zoom buttons, 2 zooming and cropping pictures, 22 www.kodak.