Kodak ESP 7 All-in-One Printer 7 All-in-One Printer print copy scan User Guide User Guide
Eastman Kodak Company Rochester, NY 14650 © Eastman Kodak Company, 2010 Kodak is a trademark of Eastman Kodak Company. The Bluetooth® word mark and logos are owned by the Bluetooth SIG, Inc., and any use of such marks is under license. ©1989-2007 I.R.I.S.
Table of contents 1 Getting Help Help menu ..........................................................................................................................................................................1 Getting answers to frequently-asked questions......................................................................................................2 Contacting Kodak Customer Service & Support......................................................................................................
Table of contents Configuring basic wireless (Wi-Fi) settings.....................................................................................................23 Network Settings options..................................................................................................................................... 24 Wi-Fi setup wizard.................................................................................................................................................
Table of contents 7 Scanning Before you start ............................................................................................................................................................. 50 Simple scanning ............................................................................................................................................................. 51 Simple document scans .........................................................................................................
Table of contents Picture will not print................................................................................................................................................76 Poor print quality .....................................................................................................................................................77 Print skewed or slanted .................................................................................................................................
Table of contents IC Radiation Exposure Statement....................................................................................................................... 99 Canadian DOC Statement.................................................................................................................................... 99 European Compliance Statement....................................................................................................................... 99 German Compliance Statement .
1 Getting Help This user guide helps you learn to operate your all-in-one printer from the control panel. Kodak also provides online help in the Home Center Software installed when you set up your printer, and helpful information about common tasks from the LCD screen on the printer control panel. NOTE: Home Center Software must be open on your computer to access its help. NOTE: The “Start Here” booklet that came in the printer box provides instructions for setting up and configuring your printer.
Getting Help Getting answers to frequently-asked questions See Chapter 9 , Troubleshooting for help resolving a number of issues about printing, copying, scanning, and configuring the wireless service on your printer. Contacting Kodak Customer Service & Support Kodak provides several resources to help you answer questions about your printer. Support at Kodak.com Support All-in-one printer support Support Center home page Internet Address www.kodak.
2 Printer Overview The KODAK ESP 7 All-in-One Printer allows you to print, copy, and scan images and documents. Although many functions can be operated directly from the control panel, you may also print, store, and manage digital images from a Windows or Macintosh computer connected to the printer via Kodak’s Home Center Software, which installs during the printer setup process.
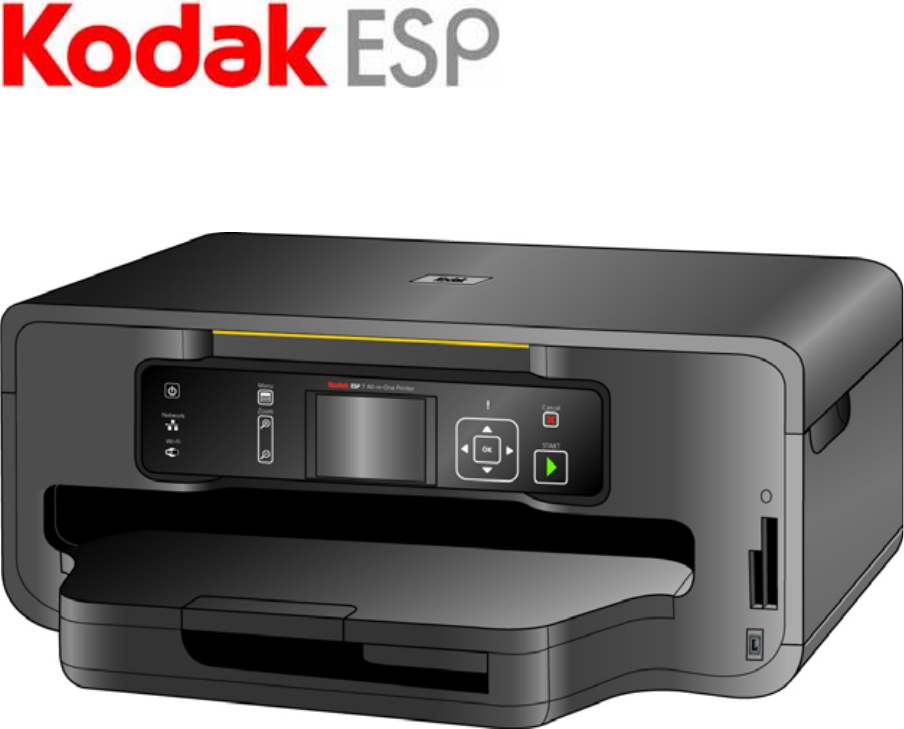
Printer Overview Major components of the ESP 7 all-in-one printer The graphics below show the main components of the printer.
KODAK ESP 7 All-in-One Printer Support for connecting digital memory devices to the printer Your printer allows you to connect both digital camera memory cards and USB-connected devices for previewing and printing. You can also transfer photos and document files to your connected computer. CAUTION: Connect only one external memory device to your printer at a time.
Printer Overview Additionally, the printer supports the following memory cards used with Memory Stick and SD/MMC card slot adapters, which you will need to purchase separately: • Memory Stick Duo and Memory Stick Duo Pro • miniSD • MicroSD (TransFlash) USB host port This printer works with most digital cameras.
KODAK ESP 7 All-in-One Printer Number Name Description 1 On/Off button Powers the printer ON or OFF. 2 Menu button Displays the menu, and toggles between parameters screens and preview screens. 3 Screen Displays photos, messages, status, and menus. 4 Attention light Blinks or flashes when an error occurs. 5 Cancel button Cancels the current operation and control panel navigation, and returns you to the menu.
Printer Overview The first time you use your printer and press the Menu button (described on Using the control panel, page 8) on the control panel, the Main menu displays on the LCD screen. The contents displayed in the Main menu include: • • • • • • • • Copy Document Copy Photo View and Print Photos Scan Network Settings Printer Settings Maintenance Help To review the tasks you perform when you use the options available on the Main menu, see Using the printer menus, page 12.
KODAK ESP 7 All-in-One Printer Using the 4-way navigation buttons NOTE: The OK button is located in the center of the 4-way navigation buttons on the control panel. Its use is described in Using the OK button, page 10. • Pressing highlights the next row down in the visible menu. When the last row in a menu is highlighted, pressing causes the visible page to be replaced with the following page in a multi-page menu, with the top row highlighted; in a one-page menu, this action highlights the top item.
Printer Overview Using the OK button Press OK to: • Accept the setting displayed in the selected row in the current menu. • Accept the preview on the LCD screen of something that you want to print, copy, or scan. • Select a photo for printing. Tip: When previewing a group of images from a digital camera, portable USB drive, or memory card connected to the printer, press and hold OK to select all images not previously selected for printing in the default quantity stored in your printer.
KODAK ESP 7 All-in-One Printer Using the Start button Press Start to initiate the print, copy, or scan task you are working on with the current settings. Using the Cancel button Press Cancel when: • You want to interrupt an operation that has already started. • You are viewing a menu that you opened by selecting an option on a different menu, and then decide that you want to view the previous one.
Printer Overview Using the printer menus Use the menus on the LCD screen to select stand-alone tasks (that is, tasks that can be performed without your computer), such as copying documents or photos; or printing photos stored on memory cards, USB drives, Kodak Bluetooth adapter (“dongle”), or digital cameras plugged into the printer; or sending a fax.
KODAK ESP 7 All-in-One Printer Number Description 1 The Menu Title displays at the top of the menu. It names the category of available options. For example: Copy Document Options, Print Photo Options, etc. 2 The text displayed in the Quick instruction section, when displayed below the Menu Title, describes how to activate the selected menu option. For example: Press OK to continue, etc. 3 Any option in a row with a white background has not been selected.
Printer Overview Status lights The tables below describe the meaning of each light and condition, and offer tips on what action to take. On/Off Lights Light Status Off Cause Action/Solution The printer is turned off. Press On/Off to turn the printer on. The printer does not have power applied. Ensure that the printer power cord is properly plugged into the back of the printer. Verify that the power supply and/or power cord LED is lit.
KODAK ESP 7 All-in-One Printer Attention Light Light Status Error Off None. Blinks (slow) The LCD screen describes the error. Paper jam. Paper tray empty. Paper carriage stall. Paper size or type mismatch. Change ink cartridge. Ink cartridge not readable. Printhead not calibrated. Unit open, scanner lid open, rear access door open. Too many image sources. Printhead not installed. Unable to read memory card or USB host device. Blinks (slow) Ink cartridge(s) inserted incorrectly.
Printer Overview Wi-Fi Status Light Light Status Cause Action/Solution Off This indicates that the Wi-Fi radio is turned off and the printer is not connected to a wireless network. None. Blinks continuously The Wi-Fi radio is turned on and the printer is searching for available wireless networks within range. None, unless you want to stop the connection process. If so, turn the Wi-Fi radio off.
KODAK ESP 7 All-in-One Printer Home Center Software Home Center Software is installed on your computer during the setup process. The software functionality for Windows or Macintosh users is described below. Home Center for Windows Once installed, Home Center Software allows you to print, copy, scan, and configure your printer from your Windows XP or Vista computer. To open the Home Center Software window on your computer, use the Home Center icon on the Desktop or in the Start Menu.
Printer Overview Home Center for Macintosh After installing the software on your Macintosh OS X computer, you can select the Home Center from the System Preference's Print & Fax pane by selecting your printer in the Printer List, clicking the Print Queue button, and clicking the Utility icon. Or, you can use the Home Center icon displayed in your Dock. The Home Center window displays three tabs: Select, Setup, and Maintenance.
3 Setting Up Your Printer Use this chapter to set up and start using your all-in-one printer. Selecting a printer location Place your printer on a clean, flat surface in a dry, well-ventilated location, away from direct sunlight. Avoid areas with high levels of dust and debris. Do not expose the printer and paper to ventilation ducts, open doors, or high traffic, as airborne particles can affect picture quality.
Setting Up Your Printer Printer Settings options Menu Options Date and Time a Tagged Image Printing Options Settings Year 2007 - 2099 Month January - December Day 1 - 31 Hour 0 - 12 or 0 - 23 Minute 00 - 59 On Off Control Panel Settings Button Sounds On Off Time to Low Power Language 1-4 hours, in .5 hour increments English (U.S.
KODAK ESP 7 All-in-One Printer For Windows Vista 1. Click Start, and then click Control Panel. 2. Click Hardware and Sound, and then click Printers. 3. Right-click the icon for the KODAK ESP 7 All-in-One Printer, and then select Set as the Default Printer on the shortcut menu. For Macintosh Whenever a new printer is installed on the Macintosh operating system, it becomes the default printer.
Setting Up Your Printer Ethernet setup 1. Plug one end of the Ethernet cable into the Ethernet port located on the back of the printer and the other end into an available port on your Ethernet router or hub. 2. 3. 4. 5. 6. Turn on the printer, if necessary. From the control panel, press Menu. Press until Network Settings is selected. Press OK. Verify the connection. Configuring a wireless network connection You can connect your printer to a 802.11 wireless (Wi-Fi) network from the printer control panel.
KODAK ESP 7 All-in-One Printer What you need to know before you connect To connect your printer to a wireless network, you will need the following: • A laptop or desktop computer equipped with a network interface card or wireless networking support, and the Kodak software installed • A working 802.11 wireless network.
Setting Up Your Printer Network Settings options If the printer has not been configured to connect to the Wi-Fi network or the printer Wi-Fi radio is turned off, the LCD screen displays the options below: Menu Options Settings / Action Wi-Fi Setup Wizard Press OK to start the Wizard. Turn Wi-Fi Radio On / Off Press OK to toggle between the Wi-Fi radio on or off states. View Network Configuration Press OK to view the configuration on the LCD screen.
KODAK ESP 7 All-in-One Printer NOTE: In your setup, instead of as shown in the illustration above, the LCD will show the actual network name (SSID), without the brackets, and the signal strength, displayed as a percentage, of each available Wi-Fi network within range. 4. With the desired network selected, press OK. You may need network identification information, such as a security string, in order to authenticate your connection.
Setting Up Your Printer 8. After completing your entry, select the DONE key, and then press OK. LED Status Description Fully lit When lit, signals that a wireless (Wi-Fi) network connection has authenticated to the router, but your connection may not be active. You can verify the connection through the Network Settings menu.
KODAK ESP 7 All-in-One Printer Setting up an IP address If you have discovered that you are connected to the access point but you are not connected to the network, you may need to set up your IP address on the printer. 1. From the Network Settings menu, select Manual IP Address and press OK. 2. Select one of the options displayed: • Dynamic (DHCP) • Automatic (Private) • Manual (Static) 3. Then press OK to continue. 4.
Setting Up Your Printer 3. Press until the second page appears. 4. Look for the text Connected Network SSID. Your network name should be listed. Printing network configuration When you select this option, a print of your current network configuration settings is generated. Settings with no values will be displayed as zeros. 1. Press 2. Press until Network Settings is selected, and then press OK. until Print Network Configuration is selected, and then press OK.
KODAK ESP 7 All-in-One Printer Changing the printer connection type You can change the way you connect to your printer at any time. For Windows USB to Wi-Fi To convert the USB connection from a PC to a wireless network connection: 1. Disconnect the printer from the computer. 2. Use the Windows Control Panel to delete the printer from you computer. 3. Configure the wireless network from the printer front panel. See Configuring a wireless network connection, page 22. 4. Press Menu. 5.
Setting Up Your Printer Wi-Fi to Ethernet To convert the Wi-Fi connection from a PC to an Ethernet connection: 1. Connect the printer to the network (LAN port on the Router) with an Ethernet cable. Ethernet to Wi-Fi To convert the Ethernet connection from a PC to a Wi-Fi connection: 1. Disconnect the Ethernet cable from the printer. 2. Configure the wireless network from the printer front panel. See Configuring a wireless network connection, page 22. 3. Press Menu. 4.
KODAK ESP 7 All-in-One Printer 5. Select your printer and click Add. Wi-Fi to Ethernet To convert the Wi-Fi connection from a Macintosh to an Ethernet connection, connect the printer to the network (LAN port on the Router) with an Ethernet cable. Ethernet to Wi-Fi To convert the Ethernet connection from a Macintosh to a Wi-Fi connection: 1. Disconnect the Ethernet cable from the printer. 2. Configure the wireless network from the printer front panel.
4 Handling Paper Your printer accepts print stock of various types and sizes, including letter-and legal-size plain paper, photo paper, transparencies, T-shirt transfers, envelopes, cards, and labels. It automatically detects the size and whether or not photo paper is loaded into the paper tray. Kodak photo paper contains bar codes that allow your printer to detect the paper type that optimizes your photo prints.
KODAK ESP 7 All-in-One Printer • If the paper you use is longer than A4 size, including Legal and panoramic photo paper, make sure that the hinged end of the paper stop lays flat and is NOT pulled up. The longer paper should balance on the paper output tray without sliding off. CAUTION: This is crucially important when you are printing two or more sheets of long paper. Long paper that cannot extend straight to its full length when output from the printer can fold behind the object ahead of it.
Handling Paper 3. Insert the media into the paper tray, print side down with its near edge against the paper stop. 4. As needed, squeeze and slide the paper edge guide to align it to the left edge of the media. 5. Lower the paper output tray. 6. Gently push the tray forward until it is aligned with the edge of the paper output tray. Loading photo paper NOTE: Review Things to keep in mind, page 32. 1. Remove all other paper from the paper tray you plan to use. 2.
KODAK ESP 7 All-in-One Printer Loading envelopes CAUTION: Do not load envelopes with cutouts or cellophane windows in this printer. NOTE: Review Things to keep in mind, page 32. 1. Remove all other paper from the paper tray you plan to use. 2. Place one or more envelopes along the right edge of the paper tray, with the front side down and the envelope flaps pointing toward the left side of the tray. 3. Squeeze the paper edge guide and move it to the right until it just touches the loaded envelope(s). 4.
Handling Paper 8. Press the bottom paper extender tab on the front left edge of the tray while pushing the paper tray in towards the printer. Loading originals Loading an original for copying or scanning To copy or scan a document or photo, place your original directly on the scanner glass, print side-down, against the silver arrow on the right-front corner. 36 www.kodak.
5 Viewing and Printing Photos You can print JPEG (.jpg) photo images directly from PictBridge cameras connected to the front panel of your printer. You can print virtually any file type from digital cameras, USB flash (“thumb”) drives, and memory cards connected to the front panel on your printer. You can also print files from a PC or MACINTOSH computer connected to your printer.
Viewing and Printing Photos Most memory cards will work with this printer. When you insert a memory card, or connect a camera or portable flash drive to the printer, the last photo taken is displayed first. CAUTION: Do not insert more than one device, such as a USB thumb drive or memory card, into the printer at a time, or you will get an error message. Also, never remove or disconnect a memory card from its slot unless the blue light near the slot is not blinking.
KODAK ESP 7 All-in-One Printer Print Photos options Menu Options View Settings / Select View Photos OK Transfer All to PC OK Rotate This Photo OK Settings Quantity or 1- 99 Tray Selection or Top Tray Bottom Tray Print Size or 3.5x5 4x6 4x7 (High Def) 4x12 (Panoramic) 5x7 8x10 8.
Viewing and Printing Photos Printing photos Printing photos from a PictBridge camera You can print photos directly from a PictBridge camera, which controls photo selection and printing. 1. Load the desired paper tray with photo paper, print side down. 2. Connect a PictBridge camera to the USB port located on the front panel of your printer. 3. Use your PictBridge camera to select and print the photos.
KODAK ESP 7 All-in-One Printer 1. Connect a digital camera or portable USB drive to the front panel USB port, or insert a memory card to the appropriate card reader on the front panel. The printer displays the photos on the LCD screen, last photo first. 2. Load the paper tray with photo paper, print side down. 3. On the control panel, press or until a photo you want to print is displayed on the LCD screen. 4. Press OK to select the photo. A check mark displays on the LCD screen to indicate your action.
Viewing and Printing Photos Printing tagged images The Digital Print Order Format (DPOF) is an industry-standard file that can be created by some digital cameras. Camera selected photos are photos you tag for printing with your digital camera. When you select photos with your camera, the camera creates a DPOF file that identifies which photos have been tagged for printing. Your printer can read the DPOF file from the memory card so you do not have to re-select the photos to print.
KODAK ESP 7 All-in-One Printer NOTE: Before you can transmit photos to your printer from a Bluetooth–enabled device, you must first “pair” the printer and the device so that they can communicate. This “pairing” is performed from your device’s interface. Review the instructions for pairing that came with you Bluetooth–enabled device, as needed.
Viewing and Printing Photos Zooming and cropping photos Your printer enables you to zoom in or out on a specific area of a photo. When you print the photo, the photo is cropped so only the area bounded by the crop boundaries is printed. CAUTION: You cannot use the zoom or crop functions of this printer on photos located on a PictBridge camera connected to the printer. All changes made to photos stored on a PictBridge camera are conducted on the camera.
KODAK ESP 7 All-in-One Printer 6. If you are satisfied with the image shown, press Start to print the area displayed in the crop box. If you want to specify additional print parameters for the photo, press Menu to display the Print Photos Options menu. A sample of the menu is shown in the illustration below. 7. Here you can press until the parameter you want to adjust is selected. If a value is displayed between the and symbols in the row, press or to select the value you want.
Viewing and Printing Photos 4. Press Start. 5. Follow the prompt on the computer. Transferring images to a Macintosh computer 1. Connect the device to the appropriate slot on the front panel of your printer. 2. From the control panel, press Menu to display the options on the computer monitor (for a PictBridge camera) or the printer LCD screen (all other devices). 3. Press until Transfer All to PC is highlighted. 4. Press OK. 5. Press Start. 6. Use iPhoto or Image Capture to complete the transfer.
6 Copying You can copy both images and documents directly from the control panel of your printer. The printer produces high–quality color or black and–white copies on a variety of paper types, including transparencies. NOTE: Before using your printer to copy a document or photo for the first time, review the procedures for loading paper and originals in Chapter 4 , Handling Paper. Simple copying Copy Document is the first setting on your printer.
Copying Copy Document options Menu Options View Settings / Select Settings Quantity or 1- 99 Copy Sizea or Same size 20%–500% Photo Paper Quality Automatic Plain Paper Qualityb or Normal Best Draft Color or Color Black & White Brightness or Save as Defaults -3 to +3 OK a Scaling is anchored to the upper left corner of the original. Same Size The copy is the same size as the original. Cropping occurs if the original is larger than the paper size.
KODAK ESP 7 All-in-One Printer Copy Photo options Menu Options View Settings / Select Settings Quantity or 1- 99 Copy Size or 4x6 4x7 (High Def) 4x12 (Panoramic) 5x7 8x10 8.5x11 (Wallet) 2x3 a Photo Paper Quality Plain Paper Quality a Automatic or Normal Best Draft Color or Color Black & White Brightness or -3 to +3 Preview or No Yes Save as Defaults OK a You need to specify a quality only for plain paper.
7 Scanning Scanning converts text and images from documents and pictures placed on the scanner glass into electronic data, and then sends the data to your computer. To scan using the ESP 7 All-in-One printer, the printer must be connected to a computer.
KODAK ESP 7 All-in-One Printer • Color or black-and-white (Windows only). • Print quality for scanning documents. Before initiating a scan, you can also preview the scan in Home Center, and crop the output as desired. When you are satisfied with the intended results, you can initiate the scan directly from Home Center. See Home Center Help for instructions. To review how to access Home Center help, see Home Center Software, page 17.
Scanning Scanning multiple originals simultaneously When the Scan What option is set to Photo in the Home Center software, your All-in-One printer can detect multiple photos placed on the scanner glass. Allow some space on the scanner glass between each item, and use the Home Center software to save each photo as a separate file. Any images on the scanner glass that overlap are interpreted by the software as a single image file.
KODAK ESP 7 All-in-One Printer Scan options The available scan settings are in the following table: Menu Options Scan Whata View Settings / Select or Settings Document Photo Scan Tob or Computer Memory Card Scan Destinationc or File [Application Name] Save As Default OK a If you select Document and save the scan to a File, the scan is saved as a document (.pdf or .rtf) file, even if the original is a photo.
8 Maintaining Your Printer Your printer requires little maintenance. However, Kodak recommends cleaning the scanner glass and lid backing regularly to remove dust and fingerprints. Fingerprints and other debris on the glass or lid backing could slow down the printer’s performance, and affect the quality and accuracy of scanning. Service agreements are available in some countries. Contact dealers for Kodak products for more information.
KODAK ESP 7 All-in-One Printer Cleaning the scanner glass For good copies and scans, ensure the printer's scanner glass and lid backing are clean; dust the exterior as needed. WARNING: Do not use abrasives, acetone, benzene, or carbon tetrachloride on the glass, as they can damage it. Do not place or spray liquid directly on the glass. The liquid might seep under the glass and damage the device. 1. Unplug the printer and raise the lid. 2.
Maintaining Your Printer 1. Unplug the printer and raise the lid. 2. Clean the underside with a soft cloth or sponge, slightly moistened with a mild soap and warm water. 3. Wipe the underside gently to loosen debris. Do not scrub. 4. Dry the underside with a chamois or soft cloth. 5. If further cleaning is needed, repeat the previous steps using isopropyl (rubbing) alcohol, and wipe the underside thoroughly with a damp cloth to remove any residual alcohol. 6. When finished cleaning, plug in the printer.
KODAK ESP 7 All-in-One Printer Maintenance options Menu Options Select Check Ink Levels OK Check Paper Levels OK Nozzle Check OK Printhead Alignment OK Clean Printhead OK Print Test Page OK Format Memory Card OK WARNING: Formatting will erase all the data on a memory card. TIP: A printhead alignment and a check of the inkjet nozzle can also be initiated from the Home Center software. Windows: Open the Home Center Help panel by clicking Help on the Home Center window, as needed.
Maintaining Your Printer The printhead moves to an accessible position for handling the ink cartridges. The ink cartridges are seated in the printhead. 1 Printhead 2 Color ink cartridge 3 Black ink cartridge 3. Wait until the printhead stops moving, then pinch the latch on the old ink cartridge with your thumb and forefinger and lift it out of the printhead. NOTE: You can take your used ink cartridges to most office supply or electronics stores for safe disposal. 4.
KODAK ESP 7 All-in-One Printer CAUTION: Insert the ink cartridge immediately to prevent any drying of the ink. 6. Remove the orange cap from the cartridge by grasping the top edge and pulling/rotating it off the ink cartridge. Discard the orange cap. 7. Insert the ink cartridge into the printhead. 8. Press down on the tab until you hear a click and feel the latch snap into position. www.kodak.
Maintaining Your Printer NOTE: Listen carefully during this step; make sure you hear the ink cartridges click into place in the printhead. This seats the cartridges properly, and prevents ink from being dispensed incompletely during your print or copy jobs. 9. Close the printer access door. The printhead moves to its ready position and prepares the new ink cartridge for use (this could take up to a minute). Replacing the printhead If your printhead is damaged or broken, you may replace it yourself. 1.
KODAK ESP 7 All-in-One Printer 1 Printhead 2 Color ink cartridge 3 Black ink cartridge 3. Pinch the latch on the ink cartridge with your thumb and forefinger and lift it out of the print head. Remove both ink cartridges. CAUTION: Insert the ink cartridges into the newly installed printhead as soon as possible to prevent any drying of the ink. 4. Unlatch the printhead by lifting the rectangular latch on the top of the printhead. 5. Remove the old printhead from the carriage. www.kodak.
Maintaining Your Printer 6. Remove the new printhead from its bag. CAUTION: Do not touch copper contacts on the printhead, as this may damage it. 62 www.kodak.
KODAK ESP 7 All-in-One Printer 7. Remove and discard the black plastic casing and the orange protective cap. 8. Place the new printhead into the carriage. www.kodak.
Maintaining Your Printer 9. Push firmly against the target label on the printhead until you hear it click into place. 10. Reinstall the ink cartridges. As needed, see Replacing ink cartridges, page 57. Listen carefully during this step; make sure you hear the ink cartridges click into place in the printhead. This seats the cartridges properly, and prevents ink from being dispensed incompletely on your print or copy jobs. 11. Close the printer access door.
KODAK ESP 7 All-in-One Printer Upgrading the printer software - for Windows You can upgrade the software and firmware for in your printer with the most recent release available. This requires an Internet connection. NOTE: The firmware cannot be upgraded when your printer is connected via a network or Wi-Fi. Your printer must be connected to the computer with a USB cable in order to perform a firmware upgrade. 1. If your connection is via Ethernet, disconnect the Ethernet cable.
Maintaining Your Printer Upgrading the printer software - for Macintosh You can upgrade the software and firmware for in your printer with the most recent release available. This requires an Internet connection. NOTE: The firmware cannot be upgraded when your printer is connected via a network or Wi-Fi. Your All-in-One printer must be connected to the computer with a USB cable in order to perform a firmware upgrade. 1. If your connection is via Ethernet, disconnect the Ethernet cable.
9 Troubleshooting Troubleshooting “quick start” Kodak provides several methods to help you troubleshoot your All-in-One printer issues. Here are some quick tips: • Turn off your printer and then unplug it. Wait five seconds, and then plug the power cord back into the printer. Finally, turn the printer back on. • Confirm that you are using a 2.0 USB cable to connect the printer to your computer. If you need to buy one, they are available online at www.kodak.
Troubleshooting Probable Cause 2 The USB cable was unplugged from the printer and then reconnected; or, power to the printer is interrupted. Corrective Action Restart the computer. Probable Cause 3 The USB cable is not 2.0 compliant. Corrective Action • Replace the USB cable with a USB 2.0 compliant cable. NOTE: For optimal quality and performance, use a good-quality high speed USB 2.0 cable. When connecting to the Kodak All-in-One printer, use the USB ports located in the back of the computer.
KODAK ESP 7 All-in-One Printer Ink cartridge not recognized Probable Cause 1 The color or black ink cartridge installed was not recognized. WARNING: Generic or non-Kodak ink cartridges may not function with the All-in-One printer. Kodak recommends using genuine Kodak ink cartridges. Corrective Action Install a genuine Kodak ink cartridge. Probable Cause 2 One of the ink cartridges needs to be replaced. Corrective Action Replace the ink cartridge.
Troubleshooting Probable Cause 2 The scanner glass is dirty. Corrective Action Make sure the scanner glass is completely clean or the photos might not scan properly (see Cleaning the scanner glass, page 55). Probable Cause 3 The scanner lid is dirty. Corrective Action Clean the scanner lid (see Cleaning the scanner lid, page 55). Probable Cause 4 The Scan What the Scan What Document option on the Scan menu was selected, instead of Photo option.
KODAK ESP 7 All-in-One Printer No paper feed Probable Cause The paper tray may be empty, or there may be a problem with the paper in the tray. CAUTION: Kodak Inkjet paper is recommended for your Kodak All-in-One printer. Corrective Action If the tray is empty, load paper into the paper tray, then resume printing. Check for a message from the printer status monitor (Windows) or the printer queue window (Macintosh) on your computer. Check for a problem with the paper in the tray. To check the paper 1.
Troubleshooting Paper jam Probable Cause The paper did not advance, was not picked up properly from the paper tray, or is lodged inside the printer. CAUTION: Kodak Inkjet paper is recommended for your Kodak All-in-One printer. Corrective Action 1. Remove the paper from the tray you used when the jam occurred. 2. Turn off the printer. 3. Open the rear access area and pull the paper out from the rollers without tearing it.
KODAK ESP 7 All-in-One Printer • Close any unnecessary software applications, and minimize any remaining application windows. Follow any messages on the screen that may have been hidden by other windows. • Disconnect, then reconnect the USB cable from the printer to the computer. • Make sure you are using a high-quality USB cable which is communicating with the computer. (See No communication with computer, page 70.
Troubleshooting Windows Vista troubleshooting WIA (Windows Image Acquisition) error: service has stopped working This results in the inability to connect a camera and transfer pictures from the camera. Neither the camera nor the printer is visible through the Transfer All to My PC option on the Print Photo Options menu. Probable Cause 1 The USB cable is unplugged and reconnected to the printer. Probable Cause 2 A printer-terminated error occurs. Probable Cause 3 Power is interrupted.
KODAK ESP 7 All-in-One Printer Multiple-page document not printing in reverse order (Windows only) NOTE: On a Macintosh, Reverse Page Order printing is the default setting. See To set a Macintosh to print the first page of a document first: below. Probable Cause The print settings on your computer are set to print the first page of your document first. Corrective Action Configure the printer to print the document in reverse order, so the pages are in the correct order when printing is complete.
Troubleshooting • Make sure the connected camera is PictBridge-compatible. See your camera or device user’s guide for details. • Check the camera batteries. Picture cropped • Change the picture quality setting (or resolution) on your digital camera to 3:2. See your camera user’s guide for details. • Adjust cropped photos using the Kodak Home Center software (Windows only) or other image editing software on your computer.
KODAK ESP 7 All-in-One Printer Poor print quality Probable Cause Low resolution image file or the printer may need maintenance. Corrective Action • Align the printhead (see Monitoring and adjusting the printer's performance, page 56). • Perform a nozzle check with the Home Center software. • Clean the printhead from Home Center, or from the Maintenance menu on the printer control panel. If the printhead is clogged, the printouts should begin to improve with two or three cleanings.
Troubleshooting Print too dark • Try taking the picture again with the flash on, or move within the flash range of the camera. Refer to your camera user’s guide for details. • Adjust the exposure compensation on your camera, and try taking the picture again. Refer to your camera user’s guide for details. • Edit the picture using Kodak Home Center (Windows only) or other image editing software. • Make sure the printer is not placed in direct sunlight or is not operating in a high-temperature environment.
KODAK ESP 7 All-in-One Printer 3. Carefully “fan” the paper to keep the sheets from sticking together. 4. Reload the paper tray. Do not overload. 5. Press Start to continue. White edges on borderless prints Probable Cause 1 White edges can appear when there are slight misalignments between the printer and paper. Some software applications are able to “hide” these small misalignments so that the prints look borderless. Corrective Action • Realign the paper in the tray.
Troubleshooting Probable Cause 2 Your Kodak printer is not connected to your computer. Corrective Action Connect your Kodak printer to your computer with a standard USB cable. Probable Cause 3 The Kodak Home Center software is not installed. Corrective Action Insert the Kodak printer installation CD and install the software. Probable Cause 4 Your computer system resources may be low. Corrective Action • Turn off your computer and the printer, and then turn them back on.
KODAK ESP 7 All-in-One Printer Network troubleshooting Wired network troubleshooting Computer unable to detect the All-in-One printer Probable Cause 1 Cables are not connected properly. Corrective Action Check the following cables to ensure they are properly connected.
Troubleshooting To see if you have an active network connection Check the two Ethernet indicator lights on the top and bottom of the RJ-45 Ethernet jack on the back of the printer. The lights indicate the following: Top light If this light is a solid green, the device is properly connected to the network, and communications have been established. If the top light is off, there is no network connection.
KODAK ESP 7 All-in-One Printer To make sure your network connection is active 1. If the connections are secure, turn off the power on the All-in-One printer, and then turn it on again. Press the On/Off button on the control panel to turn the printer off, and press it again to turn it back on. Also, turn off the power on your router or hub, and then turn it on again. 2. Check the cable connections from the printer to your gateway, router, or hub to ensure connections are secure. 3.
Troubleshooting More advanced network users may also choose to allow inbound and outbound port permission through their firewall for the following ports associated with the wireless printer: Port 5353 (UDP) Port 9322 (TCP) Probable Cause 5 A Virtual Private Network (VPN) is preventing the printer from accessing your computer. Corrective Action Try temporarily disabling the VPN before proceeding with the installation. NOTE: The All-in-One printer functionality will be limited during VPN sessions.
KODAK ESP 7 All-in-One Printer No IP address with cable modem (without a router) Probable Cause If you have a computer with a cable modem, a separate Local Area Network (LAN) for your other computers, and no DHCP or router, you must use AutoIP to assign IP addresses to the other computers and to the printer.
Troubleshooting Repositioning your computer away from these sources of signal interference can improve your computer network performance. For example: • Do place the AP/router in a central room. • Do not place wireless entertainment devices between the AP/router and wireless computer. • Do not place wireless entertainment devices between the AP/router and Wi-Fi All-in-One printer. Probable Cause 3 The SSID is not visible because it is at the bottom of the list.
KODAK ESP 7 All-in-One Printer Weak signal Probable Cause The access point is too far away or there is interference. Corrective Action • If there is a long distance between your computer or access point and the printer, move them closer together. • If there are metal objects (such as a metal bookcase or refrigerator) in the transmission path, clear the path between the printer and the computer or access point.
Troubleshooting Corrective Action Print a network configuration page to compare the wireless settings of the printer with the wireless settings for your access point. Change either the device or access point settings so that both the printer and the access point have matching wireless settings. Probable Cause 6 You entered the wrong mode (ad hoc or infrastructure) or security type. Corrective Action Enter the correct mode or security type.
KODAK ESP 7 All-in-One Printer The WEP key index setting of your access point does not match the WEP key index setting of the All-in-One printer. Corrective Action The printer is looking for a WEP key index of 1. If the WEP key index setting was changed on the access point, open the Embedded Web Server for the printer and update the index setting to match the index setting of your access point. Once you've updated the index setting on the printer, repeat the setup procedure.
10 Product Safety Specifications Specifications for your all-in-one printer are described in the tables below.
KODAK ESP 7 All-in-One Printer Copy Document Features Copy Document Features Color Black & White or Color Quantity 1 to 99 copies Copy size Same Size, 20% to 500% Quality Normal, Best, and Draft Brightness – 3 to + 3 Copy Photo Features Copy Photo Features Color Black & White or Color Quantity 1 to 99 copies Copy size 2 x 3 inch (5 x 7.6 cm) 4 × 6 inch (10 × 15 cm) 4 × 7 inch (10 × 18 cm) Panoramic (4 × 12 inch) (10 × 30 cm) 5 × 7 inch (13 × 18 cm) 8 × 10 inch (20 × 25 cm) US Letter (8.
Product Safety Specifications Paper Tray Features Paper Tray Paper capacity: 100 sheets of 20 lb plain paper or 30 sheets of 10 mil photo paper Tray size: top tray 4 x 6 in. to 8.5 × 14 in. (10 x 15 cm to 21.6 × 36 cm) Tray size: bottom tray 4 x 6 in., 4 x 7 in., 5 x 7 in. Ink Tanks Ink Tanks Ink handling 2-cartridge, 6-ink system Ink life 1-year warranty from date of purchase. Connectivity Connectivity Protocols supported USB 2.0, USB PTP, Bluetooth® 2.
KODAK ESP 7 All-in-One Printer Physical Specifications Physical Specifications Power US: 110–120 VAC, 60 Hz WW: 110–240 VAC, 50–60 Hz Output: 36 VDC 24V AC adapter (100-240 VAC 50/60 Hz) Dimensions 16.6 x 7.0 x 11.8 in (422 x 178 x 299 mm) [W × H x D] 445mm x 189mm x 427mm [W × H x D] (17.52 inches x 7.44 inches x 16.81 inches) Weight 13.1 lbs (5.9 kg) 8.2kg (18.
Product Safety Specifications Macintosh Macintosh Minimum Recommended Operating System Macintosh OS X 10.4.8 10.4.9 or greater Computer PowerMac or Powerbook G3, G4; Intel Mac iMac; eMac; or iBook Clock Speed 2 GHz 2 GHz Memory 512 MB RAM 1024 MB RAM Available Disk Space 200 MB available 200 MB available Interface USB 2.0 USB 2.
KODAK ESP 7 All-in-One Printer Paper Sizes for PC and Macintosh computers Paper Sizes Supported Usage Size Document page sizes Labels A4 (210 x 297 mm) A5 (148 x 210 mm) A6 (105 x 148 mm) B5 (176 x 250 mm) US Executive (7.25 x 10.5 in.) (184 x 266 mm) US Letter (8.5 x 11 in.) (216 x 280 mm) US Legal (8.5 x 14 in.) (216 x 356 mm) Custom sizes from 4–8.5 in. wide and 6–14 in. long Index card stock 4 x 6 in. index cards (101 x 152 mm) 5 x 7 in.
Product Safety Specifications Safety Specifications • Read and follow these cautions and warnings before using Kodak products. • Always follow basic safety procedures. • Follow all warnings and instructions marked on the Kodak All-in-One printer. Parts CAUTION: Do not disassemble this product; there are no user-serviceable part(s) inside. Refer servicing to Kodak’s qualified service personnel. WARNING: Keep out of reach of children. Ink may be harmful if swallowed.
KODAK ESP 7 All-in-One Printer Location CAUTION: To prevent your printer from overheating, do not block or cover the slots and openings in the equipment, place it near a heat register, or install it in a cabinet without proper ventilation. CAUTION: Do not use your printer near water, or spill liquid on it. WARNING: Do not place your printer on an unstable cart, stand, bracket, or table; this risks damaging the equipment and injuring people.
Product Safety Specifications Regulatory Compliance FCC Compliance and Advisory This equipment has been tested and found to comply with the limits for a Class B digital device, pursuant to Part 15 of the FCC Rules. These limits are designed to provide reasonable protection against harmful interference in a residential installation.
KODAK ESP 7 All-in-One Printer This device has been designed to operate with an antenna having a maximum gain of 1.8dB. Antenna having a higher gain is strictly prohibited per regulations of Industry Canada. The required antenna impedance is 50 ohms. To reduce potential radio interference to other users, the antenna type and its gain should be so chosen that the EIRP is not more than required for successful communication.
Product Safety Specifications Caution: There is a risk of explosion if the battery is replaced by an incorrect type. Dispose of used batteries according to the instructions. Contact your local Kodak representative or refer to www.kodak.com/go/recycle for additional information on the collection and recovery programs for batteries. Achtung Explosionsrisiko wenn die Batterie durch einen inkorrekten Typen ersetzt wird. Entsorgung der Batterie gemäss der Gebrauchsanweisung.
KODAK ESP 7 All-in-One Printer Declaration of Conformity See www.kodak.com/go/declarationofconformity. www.kodak.
Glossary A Ad hoc The Kodak All-in-One printer communicates directly with each device on the network. No wireless access point is used. This is also called a peer-to-peer network. On an Apple Macintosh, ad hoc is called computer-to-computer. AiO All-in-One. B Bluetooth An industrial specification for wireless personal area networks (PANs).
KODAK ESP 7 All-in-One Printer G Gateway Address A node on a network that serves as an entrance to another network. A node in this instance can be a computer or some other device.The address of the default gateway is assigned by the installation software, unless you have already set a manual IP address. H Hex Hexidecimal. A numeric system that uses sixteen distinct characters that are a combination of the numbers 0 - 9 (represent values zero to nine) and letters A - F (represent values ten to fifteen).
N Network Configuration The protocol used to assign the IP Address to the device. For this Kodak All-in-One printer, the network configuration is: AutoIP: The installation software automatically determines the configuration parameters. DHCP: The configuration parameters are supplied by a dynamic host configuration protocol (DHCP) server on the network. On small networks, this could be a router. Manual: The configuration parameters are set manually, such as a static IP address.
KODAK ESP 7 All-in-One Printer Speed The speed at which data is transmitted over a network. Speeds include 10TX-Full, 10TX-Half, 100TX-Full, and 100TX-Half. Subnet Mask A subnet is an IP Address assigned by the installation software to make an additional network available as part of a larger network. Subnets are specified by a subnet mask. This mask determines which of the Kodak All-in-One printer IP address bits identify the network and subnet, and which bits identify the device itself.
Appendix A: If You Need to Call Customer Support When you contact Kodak Customer Support for All-in-One printer assistance, the service representative may ask you for some background information, as well as information about your specific issue. If you can have ready access to it, it may save you time.
Index Symbols .jpg, 50 .pdf files, 50 .rtf files, 50 Numerics 1111 See Personal identification number, 43 2.
Index E EasyShare software, 2 Electrical and Electronic equipment labeling, 100 Energy See Power Envelope sizes, 95 Envelopes, 35 Envelopes, loading, 35 Environmental hazards, 97 ESP, definition, 102 Español (Latin-American Spanish), 20 Ethernet network status light, 7 Ethernet network, configuring, 21 Ethernet, definition, 102 European Union recycling, 100 EXIF, definition, 102 F FCC compliance, 98 File transfer support, 92 Flash drive See Portable storage device Formatting a memory card in the printer, 5
Index M MAC Address, definition, 103 Mac OS Standard format (HFS), 40 Macintosh Formatted USB drives not recognized by the printer, 68 Help, 67 Home Center software, 18 Print the first page of a document first, 75 Software, 46 System requirements, 94 Troubleshooting, black screen or screen freeze, 73 Main menu, 13 Maintenance, 54 Maintenance Settings, 57 Manual IP Address, definition, 104 Media Access Control address See MAC Address Media supported, 94 Memory card slots, 4 Memory cards, 5 Compatible, 37 Fo
Index Picture Transfer Protocol See PTP PIN.
Index Scaling copy size, 48 Scaling destination, 53 Scan settings, adjusting, 52 Scanned image is blank, troubleshooting, 80 Scanner glass, 4 Cleaning, 55 Damage, avoiding, 55 Scanner lid, 4 Cleaning, 55 Scanning, 50 Multiple originals, 52 Problem troubleshooting, 79 Using Home Center software, 50 Scene Balance, 39 Screen, 7 Select and print all photos, 41 Selecting printer setup location, 19 Self-powered USB hub, 70 Service agreements, 54 Set up a network connection to the printer, 21, 22 Settings Etherne
Index Port, 4, 6 USB 2.