9 All-in-One Printer print copy scan fax User Guide
Eastman Kodak Company Rochester, New York 14650 © Eastman Kodak Company, 2008 Kodak is a trademark of Eastman Kodak Company. The Bluetooth® word mark and logos are owned by the Bluetooth SIG, Inc., and any use of such marks is under license. ©1989-2007 I.R.I.S.
Table of Contents 1. Getting Help 1 Help Menu . . . . . . . . . . . . . . . . . . . . . . . . . . . . . . . . . . . . . . . . . . . . . . . . . . . . . . . . . . . . . . . . . . .1 Getting answers to frequently-asked questions . . . . . . . . . . . . . . . . . . . . . . . . . . . . 2 Contacting Kodak Customer Service & Support . . . . . . . . . . . . . . . . . . . . . . . . . . . . 2 Support at Kodak.com . . . . . . . . . . . . . . . . . . . . . . . . . . . . . . . . . . . . . . . . . . . . . . . . . .
Table of Contents 3. Setting Up Your Printer 23 Selecting a printer location . . . . . . . . . . . . . . . . . . . . . . . . . . . . . . . . . . . . . . . . . . . . . . . . . 23 Configuring printer settings . . . . . . . . . . . . . . . . . . . . . . . . . . . . . . . . . . . . . . . . . . . . . . . . 23 Configuring basic settings . . . . . . . . . . . . . . . . . . . . . . . . . . . . . . . . . . . . . . . . . . . . . . 23 Printer settings options . . . . . . . . . . . . . . . . . . . . . . . . . . . .
Table of Contents 5. Viewing and Printing Photos 45 Viewing photos . . . . . . . . . . . . . . . . . . . . . . . . . . . . . . . . . . . . . . . . . . . . . . . . . . . . . . . . . . . . . 46 Configuring photo print settings . . . . . . . . . . . . . . . . . . . . . . . . . . . . . . . . . . . . . . . . . . . 46 Print Photos Options . . . . . . . . . . . . . . . . . . . . . . . . . . . . . . . . . . . . . . . . . . . . . . . . . . . 47 Printing photos . . . . . . . . . . . . . . . . . . . . . . . . . . .
Table of Contents Fax Phonebook entries . . . . . . . . . . . . . . . . . . . . . . . . . . . . . . . . . . . . . . . . . . . . . . . . . . . . . 67 Adding a new Fax Phonebook entry . . . . . . . . . . . . . . . . . . . . . . . . . . . . . . . . . . . . 68 Editing an existing Fax Phonebook entry . . . . . . . . . . . . . . . . . . . . . . . . . . . . . . . 68 Deleting an existing Fax Phonebook entry . . . . . . . . . . . . . . . . . . . . . . . . . . . . . 69 Preparing a fax for transmission . . . . . . .
Table of Contents Multiple-page document not printing in first-page first order (Macintosh only) . . . . . . . . . . . . . . . . . . . . . . . . . . . . . . . . . . . . . . . . . . . . . . . . . . . 91 PictBridge camera not detected . . . . . . . . . . . . . . . . . . . . . . . . . . . . . . . . . . . . . . . . 92 Picture cropped . . . . . . . . . . . . . . . . . . . . . . . . . . . . . . . . . . . . . . . . . . . . . . . . . . . . . . . . 92 Picture print smudged . . . . . . . . . . . . . . . . . . . . .
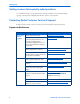
Table of Contents System Requirements . . . . . . . . . . . . . . . . . . . . . . . . . . . . . . . . . . . . . . . . . . . . . . . . . . . . . 110 Windows PC . . . . . . . . . . . . . . . . . . . . . . . . . . . . . . . . . . . . . . . . . . . . . . . . . . . . . . . . . . . 111 Macintosh . . . . . . . . . . . . . . . . . . . . . . . . . . . . . . . . . . . . . . . . . . . . . . . . . . . . . . . . . . . . . . 111 Papers Supported . . . . . . . . . . . . . . . . . . . . . . . . . . . . . . . . . . . . . .
1 Getting Help This user guide helps you learn to operate your All-in-One printer from the control panel. Kodak also provides online help in the Home Center software installed when you set up your printer, and helpful information about common tasks from the LCD display on the printer control panel. Note: Home Center software must be open on your computer to access its help.
Getting Help Getting answers to frequently-asked questions See “Troubleshooting” on page 83 for help resolving a number of issues about printing, copying, scanning, and configuring the wireless service on your printer. Contacting Kodak Customer Service & Support Kodak provides several resources to help you answer questions about your printer. Support at Kodak.com Support All-in-One printer support Software Other 2 Description Internet Address Support Center home page www.kodak.
Chapter 1 Telephone Customer Support Location Phone Number Argentina 0800 6663736 Australia 1800-793895 Austria 017 956 7357 Belgium 02 713 1445 Brazil 0800-15-0001 Canada 1 800-421-6699 Chile 800 646175 Colombia 01800 9120574 Denmark 3 848 71 30 Finland 0800 1 17056 France 01-55-1740-77 Germany 069-5007-0035 Greece 00-800-44140775 Ireland 01 407 3054 Italy 02-696-334-52 Mexico 001-888-575-4134 Netherlands 020-3469372 New Zealand 0800-8801755 Norway 23 16 21 33 Peru
Getting Help 4 Kodak ESP 9 Printer User Guide
2 Printer Overview The Kodak ESP 9 All-in-One printer allows you to print, copy, scan, and fax images and documents. Although many functions can be operated directly from the control panel, you may also print, store, and manage digital images from a Windows or Macintosh computer connected to the printer via Kodak’s All-in-One printer Home Center software, which installs during the printer setup process.
Printer Overview • One network (Ethernet) port • A low-fidelity speaker • A Fax modem • A telephone jack Major components of the ESP 9 All-in-One printer The graphics below show the main components of the printer.The legend describing the parts shown in the images is in the table below.
Chapter 2 Number Component name 9 Memory card slots 10 Control panel 11 Automatic document feeder (ADF) 12 Power cord connection port 13 USB device ports for connecting printer to the computer or Ethernet 14 Automated two-sided printing accessory 15 Scanner glass 16 Paper output tray extender 17 Rear-access clean-cut area 18 Printer lid 19 Printer lid lifting hand-hold 20 Printhead Support for connecting digital memory devices to the printer Your All-in-One printer allows you to c
Printer Overview A blue light, located above the memory card slots, blinks while the card is being accessed and stays lit while the card remains in the slot and the printer is on.
Chapter 2 Control panel layout The legend describing the numbered parts of the control panel illustration is in the table below. 2 3 4 5 6 1 7 8 Number Name 9 10 11 12 Description 1 On/Off button Powers the printer ON or OFF. 2 LCD display Displays photos, messages, status, on-screen keyboard, and menus. 3 Attention light Blinks or flashes when an error occurs. 4 Menu button Displays the menu, and toggles between parameters screens and preview screens.
Printer Overview Note: See “Adjusting the control panel position” on page 11 for instructions on raising and lowering the control panel so that it is easier to use. LCD display The LCD screen displays photos, messages, instructions, and menu items. Menu navigation is accomplished with the 4-way Navigation buttons on the control panel. The LCD Start-Up screen displays whenever the printer is ready for operation but is not performing a task.
Chapter 2 Using the control panel Adjusting the control panel position The position of the control panel can be adjusted from its default position (flush against the front of the printer) to lifted upward at an angle. To adjust the control panel position: 1 On the rear side of the control panel, locate the release tab. 2 Press the front of the control panel and the release tab toward each other with your thumb and fingers; maintain this position and pull the control panel toward you gently.
Printer Overview Using the 4-way navigation buttons Note: The OK button is located in the center of the 4-way navigation buttons on the control panel. Its use is described on page 13. The 4-way navigation buttons allow you to update the content displayed on the LCD display. • Pressing highlights the next row down in the visible menu.
Chapter 2 • When you are viewing a group of photos stored on a portable memory storage device such as a USB drive, pressing the images. or the button allows you to scroll through the • Continuing to press any of the 4-way navigation buttons causes them to repeat the action until you release it. Using the OK button Press OK to • Accept the setting displayed in the selected row in the current menu.
Printer Overview Once you have activated zoom for the selected item, you can then use both the Zoom+ (zoom in) and the Zoom– (zoom out) buttons. Zoom in Zoom out Using the Start button Press Start to initiate the task you are working on with the current settings. Using the Cancel button Press Cancel when: • You want to interrupt an operation that has already started.
Chapter 2 • Enter the Quick Dial number for an entry in the Fax Phonebook • Enter the fax telephone number for an entry in the Fax Phonebook • Enter a quantity for making copies of a document or photo As on a telephone dial pad, which the number keypad resembles, each key on the ESP 9 number keypad (except for the 1 key and the zero key) is associated with both a numerical value and with either three or four alphabetic characters, with typographic symbols, or with symbols and a space (used to separate two
Printer Overview Using the All-in-One printer menus Use the menus on the LCD display to select stand-alone tasks (that is, tasks that can be performed without your computer), such as copying documents or photos;, printing photos stored on memory cards, USB drives, Kodak Bluetooth adapter (“dongle”), or digital cameras plugged into the printer; or sending a fax.
Chapter 2 Number Description 4 The Current Value content displays between and symbols indicates the active setting only when you have more than one setting available. For example, On/Off; Yes/No; a number representing a quantity; etc.. 5 The option in the row with the golden background is the selected option. Its functionality is enabled when you press the appropriate control panel button. When or are pressed, the selected menu option changes according to the direction used.
Printer Overview Status lights The tables below describe the meaning of each light and condition, and offer tips on what action to take. On/Off Light Light Status Off Cause Action/Solution The printer is turned off. Press On/Off to turn the printer on. The printer does not have power applied. Ensure that the printer power cord is properly plugged into the back of the printer. Verify that the power supply and or power cord LED is lit.
Chapter 2 Memory Card Slot Light Light Status Cause Action/Solution Off Either the memory card is not inserted or is improperly inserted in the card slot. Remove and reinsert the memory card. Blinks The internal card reader is initializing or communicating with a memory card. None. On A memory card is properly inserted in the card slot. None. Attention Light Light Status Error Off None. Blinks (slow) The LCD display describes the error. Paper jam. Paper tray empty. Paper carriage stall.
Printer Overview WiFi Status Light Light Status Cause Action/Solution Off This indicates that the WiFi radio is turned off and the printer is not connected to a wireless network. None. Blinks continuously The WiFi radio is turned on and the printer is searching for available wireless networks within range. None, unless you want to stop the connection process. If so, turn the WiFi radio off.
Chapter 2 • Enhance and copy pictures • Enhance and print images • Configure settings for printing, copying, and scanning from the control panel • Access the Kodak Tips and Projects Center Web site. • Order supplies from the Kodak Web site. The functions of the three small icons located in the upper-right corner of the Home Center window are shown below: Returns you to the main Home Center window Displays the Status Monitor Displays a Help panel for the Home Center software.
Printer Overview From the Maintenance tab, you can: • Print a test page • Align the printhead • Run a printhead nozzle correction • Clean the printhead • Click About this Printer to view the printer model number, its Kodak Service Number, and the version of printer firmware used to operate the printer From both the Setup and Maintenance and tabs you can: • Order Supplies: This option allows you to order supplies online from the Kodak web site.
3 Setting Up Your Printer Use this chapter to set up and start using your Kodak All-in-One printer. Selecting a printer location Place your printer on a clean, flat surface in a dry, well-ventilated location, away from direct sunlight. Avoid areas with high levels of dust and debris. Do not expose the printer and paper to ventilation ducts, open doors, or high traffic, as airborne particles can affect picture quality.
Setting Up Your Printer 5 Press or as needed to change the default value. The default value is displayed at the right margin of the setting. When the setting is highlighted, the current value is bracketed between the and symbols. 6 Press OK to save the setting(s).
Chapter 3 Menu Options Country/Region Options Settings United States Canada Mexico France Germany Italy Netherlands Portugal Spain United Kingdom Europe Australia New Zealand Austria Belgium Denmark Finland Norway South Africa Sweden Switzerland United Arab Emirates Reset All Settings OK Restoring the factory defaults from the Reset All Settings option will not change the settings for any of the following: Fax Phonebook; Country/Region; Language; Date and Time Note: Setting the date and time via the
Setting Up Your Printer Configuring network settings You can connect your ESP All-in-One printer to a wired (Ethernet) network or to a wireless (WiFi) network. You may refer to the “Start Here” booklet that came with your printer, or review the following sections as needed.
Chapter 3 Configuring basic wireless (WiFi) settings Note: You will need to know the network name (SSID) of the WiFi network, and its security string to connect your printer to the network successfully. Caution: If there is an Ethernet cable plugged in to the Ethernet port on the back of the printer, unplug it before starting this task. 1 From the control panel, press Menu. 2 Press 3 If you see the setting displaying the message: Turn WiFi Radio On, press OK now.
Setting Up Your Printer As appropriate, press want to use. or on the control panel until you locate the network you The last two options displayed are Unlisted network and Rescan for wireless networks. Note: In your setup, instead of as shown in the illustration above, the LCD will show the actual network name (SSID), without the brackets, and the signal strength, displayed as a percentage, of each available WiFi network within range. 4 With the desired network selected, press OK.
Chapter 3 5 Enter the security information required using the LCD display keyboard. • Press , , or to select a key. Select
Setting Up Your Printer Telephone service delivery systems and All–in–One fax features Before setting up your ESP 9 All–in–One printer for faxing, determine which type of telephone service you use.
Chapter 3 Digital subscriber line (DSL) telephone systems A DSL telephone system is a dedicated telephone service that, like multipurpose digital systems, transmits packets of digital data over cables. Unlike multipurpose systems, DSL networks use the wires of a local telephone network to transmit its signals.
Setting Up Your Printer If neither of these configurations is available to you, you cannot accept faxes on your printer in the Fax Auto–Answer mode. You can accept them manually, though. See “Manually receiving fax” on page 36. Using an answering machine with the ESP 9 All–in–One fax If you use an answering machine to retrieve and record messages from telephone callers when you are not available to pick up the handset, you can set up your telephone to work with both the answering machine and the printer.
Chapter 3 Note: Check with your cable television provider to make sure you can send and receive faxes over your digital telephone service. Connecting the printer to a standard telephone line If you have a dedicated phone line that does not receive any voice calls, connect your printer to the Line-In on the printer as described below. 1 Connect one end of the phone cord supplied with your printer to your telephone wall jack and the other end to the port labeled Line-In.
Setting Up Your Printer port on your printer. Do not connect the answering machine to the EXT-Out port on your printer. . If you have a separate fax line on that does not receive any voice calls, connect your printer to the phone line as described below. Connecting the printer to a digital subscriber (DSL) telephone line If you use a digital subscriber line (DSL), you must connect a DSL filter between the telephone wall jack and your Kodak All–in–One printer.
Chapter 3 4 Connect the DSL filter cord to the telephone wall jack. Specifying Rings to Answer You can specify how many rings should occur before the All–in–One printer automatically answers an incoming call. This setting applies only if the Fax Auto–Answer feature is set to On. The Rings–to–Answer setting is critically important for you if an answering machine shares the same phone line as your All-in-One printer, because the answering machine must answer the phone first.
Setting Up Your Printer Setting Fax Auto–Answer When set to On, the All–in–One printer accepts incoming fax transmissions automatically, based on the number set in Rings–to–Answer (discussed on page 35). If your fax phone line is configured to work through a computer modem, disable Fax AutoAnswer) Note: Some phone system features may not be available with pulse dialing, which is slower than tone dialing. Contact your telephone company if you are unsure as to which setting to use .
Chapter 3 You can adjust fax settings on the control panel. Windows users can also create a list of frequently used Fax telephone numbers using Home Center software (see Home Center Help for more details, discussed in this guide on page 20). Both Windows and Macintosh users can set up a list of fax telephone numbers on the control panel by selecting Send a Fax from the Main menu. Windows users can also set up and maintain their Fax Phonebooks using Home Center software.
Setting Up Your Printer When the Error Correction mode is enabled, the printer detects errors during transmission. Using this feature, the All-in-One printer will automatically re-transmit the fax. Although the Error Correction mode increases send time on poor phone lines, the fax is transmitted much more reliably. Note: Error Correction is only applied to black-and-white faxes sent from the Allin-One printer. This feature does not affect the reliable transmission of faxes being received.
4 Handling Paper Your Kodak All-in-One printer accepts print stock of various types and sizes, including letter-and legal-size plain paper, photo paper, transparencies, T-shirt transfers, envelopes, cards, and labels. It automatically detects the size and whether or not photo paper is loaded into the paper tray. Kodak photo paper contains barcodes that allow your All-in-One printer to detect the paper type that optimize your photo prints.
Handling Paper Loading the paper trays Things to keep in mind • Before you start loading any type of media into the printer, lift the paper output tray. Lower the paper output tray and gently close the loaded paper tray. • Pull the paper stop (at the edge of paper output tray) until it is fully extended. • If the paper you are going to use is less than A4 size, lift the hinged end of the paper stop toward you until it perpendicular to the paper stop.
Chapter 4 Loading plain paper Note: Review “Things to keep in mind” above. Caution: The automatic document feeder (ADF) on the ESP 9 only accepts plain paper. 1 Pull the bottom paper tray toward you Note: To load media that is more than A4 size, such as 4X12 inch panoramic photo paper or Legal plain paper, you must first extend the lower paper tray to its full length. To do so: a Remove all paper from the tray, as needed.
Handling Paper Loading photo paper Note: Review “Things to keep in mind” on page 40. Caution: The automatic document feeder (ADF on the ESP 9 only accepts plain paper. If you try to run photo paper through it, the printer displays an error message on the LCD, and the printer will not complete the job. 1 Remove all other paper from the paper tray you plan to use. 2 Insert photo paper into the paper tray print-side down, with the short edge forward. Do not overload the tray.
Chapter 4 . Loading originals Loading an original for copying or scanning To copy or scan a document or photo, place your original directly on the scanner glass, print side-down, against the silver arrow on the right-front corner.or in the automatic document feeder (ADF). Loading an original for faxing Warning: If photo paper is loaded into the automatic document feeder for copying or faxing, a paper jam results. Do NOT use the automatic document feeder for scanning.
Handling Paper 1 Place the original (plain paper only) print side up into the ADF. Note: If you are faxing only one page or if you are Faxing anything printed on photo paper, you can place the original on the scanner glass. See “Loading an original for copying or scanning” on page 43. 2 44 Align the paper-width guides with the edges of the paper to center the original in the ADF tray.
5 Viewing and Printing Photos You can print .jpeg (.jpg) photo images directly from PictBridge cameras connected to the front panel of your All-in-One printer. You can print virtually any file type from digital cameras, USB flash (“thumb”) drives, and memory cards connected to the front panel on your All-in-One printer. You can also print files from a PC or Mac computer connected to your All-in-One printer computer.
Viewing and Printing Photos Viewing photos Insert one of the following devices into the appropriate opening: Note: Always use the USB host port, on the front of the printer. To avoid an error, use only one slot or port at a time.
Chapter 5 6 To save the setting as the default value, select Save as Default and press OK. 7 or until View Photos is selected in the Print Photos menu, and As needed, press then press OK to return to viewing and selecting photos for printing. Or, press Start to print the selected photo(s) with the selected settings. Print Photos Options .
Viewing and Printing Photos This printer is capable of automatically adjusting scene balance improvements (or the brightness) of photos printed from camera cards and USB connected devices. The default is On. The default setting does not print the date on the photo print. Printing photos Printing photos from a PictBridge camera You can print photos directly from a PictBridge camera, which controls photo selection and printing. 1 Load the desired paper tray with photo paper, print side down.
Chapter 5 Tip: If you would like your printer to print photos stored on a non–FAT formatted device, or stored as non–.jpeg files, you must first send the files to your computer to be read.
Viewing and Printing Photos 8 Press Start to print the selected photo, or press 9 Press or until View Photos is selected. until you view another photo you want to print 10 Repeat this process as needed. Note: Each photo is automatically deselected after it has been printed Printing tagged images The Digital Print Order Format (DPOF) is an industry-standard file that can be created by some digital cameras. Camera selected photos are photos you tag for printing with your digital camera.
Chapter 5 To enable Bluetooth wireless connectivity, plug the Kodak Bluetooth adapter into the USB port located on the front panel of your printer. Note: Before you can transmit photos to your printer from a Bluetooth–enabled device, you must first “pair” the printer and the device so that they can communicate. This “pairing” is performed from your device’s interface. Review the instructions for pairing that came with you Bluetooth–enabled device, as needed.
Viewing and Printing Photos Zooming and cropping photos Your printer enables you to zoom in or out on a specific area of a photo. When you print the photo, the photo is cropped so only the area bounded by the crop boundaries is printed. Caution: You cannot use the zoom or crop functions of this printer on photos located on a PictBridge camera connected to the printer. All changes made to photos stored on PictBridge camera are conducted on the camera.
Chapter 5 7 Here you can press until the parameter you want to adjust is selected. If a value is displayed between the and symbols in the row, press or to select the value you want 8 Press Start to print the selected photo, or press until View Photos is selected. Press OK. 9 Press or until you view another photo you want to print. 10 Repeat this process as needed. Note: If you want to print multiple copies of a photo displayed on the LCD, you can press until the number you want is shown.
Viewing and Printing Photos 5 Follow the prompt on the computer. Transferring images to a Macintosh computer 1 Connect the device to the appropriate slot on the front panel of your printer. 2 From the control panel, press Menu to display the options on the computer monitor (for a PictBridge camera) or the printer LCD display (all other devices). 3 Press until Transfer All to PC is highlighted. 4 Press OK. 5 When a transfer or connection message appears on the monitor, click Yes. 6 Press Start.
6 Copying You can copy both images and documents directly from the control panel of your Kodak ESP All-in-One printer. The printer produces high–quality color or black and–white copies on a variety of paper types, including transparencies. Note: Before using your All-in-One printer to copy a document or photo for the first time, review the procedures for loading paper and originals in Chapter 4 on page 39. Simple copying Note: Copy Document is the first setting on your Kodak All–in–One printer.
Copying 3 Press OK to display the Copy Document Options (or Copy Photo Options) menu. A sample view from the Copy Photo Options menu is shown in the illustration below. .. 4 You can press until the option you want to adjust is selected. If a value is displayed between the and symbols in the row, press or to select the value you want. 5 Any changes you make to the copy settings apply only to the current copy operation unless you save them as your default settings.
Chapter 6 Scaling Press the or to set the scaling for your image. The choices are Same Size, which is 100%, Fit to Page to enlarge or reduce the image to fit on the page. Plain paper quality output: Draft Produces the fastest print speed, but the lowest quality. Normal Delivers high-quality output and is the default setting. Normal prints faster than Best. Best Produces the highest quality for all paper and eliminates the banding (striping) effect that sometimes occurs in Draft and Normal modes.
Copying 58 Kodak ESP 9 Printer User Guide
7 Scanning Scanning converts text and images from documents and pictures placed on the scanner glass into electronic data, and then sends the data to your computer. To scan using the ESP 9 All-in-One printer, the printer must be connected to a computer.
Scanning • The default setting for image files is .jpeg (Joint Photographic Experts Group) format. This standard file type can be opened and edited in standard image editing software applications, and can be view on Web pages. • File storage location for saved scans. • Windows: Document scans are saved by default in the My Documents folder, and images are saved in the My Pictures folder.
Chapter 7 Simple image scans 1 Complete Steps 1–4 from “Simple document scans” on page 60. 2 Press until Scan What is selected. Press to specify Photo. Caution: Although you can scan a document using the Photo option and save it as an image (.jpeg) file, you will not be able to edit the text later in your computer. If you want to edit a scanned document later, make sure that you scan it as a Document, not as a Photo. 3 Complete Steps 6–8 from “Simple document scans” on page 60.
Scanning 5 Any changes you make to the scan settings apply only to the current scan operation. To keep the settings as permanent, press until Save as Defaults is selected, and then press OK. 6 Press Start to initiate the scan.
8 Faxing Introduction Your Kodak ESP 9 All-in-One printer allows you to send and receive faxes (including color faxes), assign and use quick dial settings for frequently used fax recipients, and select a number of fax options from the control panel. Note: On a Windows PC connected to the All-in-One printer, you can create and manage the Fax Phonebook using Home Center software. See Home Center Help for more information. Home Center software is discussed on page 20.
Faxing Tip: To hear sounds as your printer dials the recipient’s fax number and transmits fax tones to the recipient’s fax machine, make sure that Fax Speaker is set to ON in the Fax Settings menu. For more information about available settings, see “If two or more phone numbers are shared, set the Distinctive Ring feature to answer one of the lines and set Fax Auto–Answer to On. See “Specifying Rings to Answer” on page 35 to review how to use Fax Auto–Answer with an answering machine.” .
Chapter 8 4 To use the last fax number used, press Start now. Otherwise, press recipient is selected, and then press OK. until the desired The Fax phone number of the selected entry displays in the menu header, replacing any previous number. See the illustration below. 5 Press Start to send the fax.
Faxing The Send Fax menu displays the Fax phone number of the Quick Dial entry on the LCD. The Quick Dial entry is highlighted (selected) on the LCD. See the illustration below. 5 Press Start to send the fax. Specifying a Quick Dial recipient from the Send Fax menu 1 Load the original. As appropriate review “Preparing a fax for transmission” on page 69. 2 From the control panel, press Menu. 3 Press to select Send Fax, and then press OK.
Chapter 8 The Fax number of the recipient display on the LCD, and the row representing the entered Quick Dial entry is selected in the display, as shown in the illustration below. Canceling faxes To abort a fax after dialing the number, press Cancel from the control panel. Receiving faxes If you use your All-in-One printer to receive faxes, remember to load the bottom paper tray with paper beforehand. If you set Fax Auto-Answer Off, you will need to receive faxes manually. See below.
Faxing Adding a new Fax Phonebook entry 1 From the control panel, press Menu. 2 Press to select Send Fax and press OK. Note: This option is also accessible by selecting Edit Phonebook from the Fax Settings menu. 3 Select Fax Options and press OK. 4 Select Edit Phonebook and press OK. The Edit Phonebook menu displays on the LCD. 5 Press to select Add New Entry and press OK.
Chapter 8 5 Press 6 Press 7 to select Edit Entry and press OK. to select the desired Phonebook entry and press OK. Select the field you want to edit, and press OK. 8 Using the LCD display keyboard or the control panel keypad, edit the entry as needed. Select Done on the LCD display keyboard to indicate that you are finished using it. 9 Select Done when the entry is complete, and press OK. 10 Select another item to edit; or, press Cancel to display the Edit Phonebook menu.
Faxing 4 Load 8.5x11 or A4 paper as needed, and then and press Start. The printer produces a Fax cover sheet, which provides space for entering the following: • • • • 5 Information about the recipient (company, Fax number, recipient name) Information about the sender (company, Fax number, phone number, sender name) Number of pages in the Fax, including the cover page Message to the recipient Complete the items on the cover sheet as appropriate.
Chapter 8 Send Fax Options The available fax settings are shown below: Menu Options View Settings / Select Edit Phonebook OK Settings Add New Entry Edit Entry Delete Entry Resolution or Standard Fine Photo Color or Color Black & White Brightness or Save As Defaults -3 to +3 OK Fax reports The following reports are available from the Fax Settings menu: Fax report name Print Fax Confirmation Page Contains: Details about faxes, one fax at a time, based on the menu setting.
Faxing Printing a fax report 1 Load 8.5x11 or A4 paper into the bottom paper tray, as needed. 2 From the control panel, press Menu. 3 Press 4 Press 5 to select Fax Settings and press OK. to select Print Fax Confirmation Page and press OK As appropriate, press or to change the Print Fax Confirmation Page setting. Note: This report cannot be run from the control panel; the ESP 9 will output this report only after you send a fax, and only based on the setting.
9 Maintaining Your Printer Your Kodak ESP 9 All-in-One printer requires little maintenance. However, Kodak recommends cleaning the scanner glass and lid backing regularly to remove dust and fingerprints. Fingerprints and other debris on the glass or lid backing could slow down the printer’s performance, and affect the quality and accuracy of scanning. Service agreements are available in some countries. Contact dealers for Kodak products for more information.
Maintaining Your Printer Cleaning the scanner glass For good copies and scans, ensure the printer's scanner glass and lid backing are clean; dust the exterior as needed. Warning: Do not use abrasives, acetone, benzene, or carbon tetrachloride on the glass, as they can damage it. Do not place or spray liquid directly on the glass. The liquid might seep under the glass and damage the device. 1 Unplug the printer and raise the lid.
Chapter 9 1 Unplug the printer and raise the lid. 2 Clean the underside with a soft cloth or sponge, slightly moistened with a mild soap and warm water. 3 Wipe the underside gently to loosen debris. Do not scrub. 4 Dry the underside with a chamois or soft cloth. 5 If further cleaning is needed, repeat the previous steps using isopropyl (rubbing) alcohol, and wipe the underside thoroughly with a damp cloth to remove any residual alcohol. 6 When finished cleaning, plug in the printer.
Maintaining Your Printer Maintenance Options Menu Options Select Check Ink Levels OK Check Paper Levels OK Nozzle Check OK Printhead Alignment OK Clean Printhead OK Print Test Page OK Format Memory Card OK Warning: Formatting will erase all the data on a memory card. Tip: A printhead alignment and a check of the inkjet nozzle can also be initiated from the Home Center software. Windows: Open the Home Center Help panel by clicking Help on the Home Center window, as needed.
Chapter 9 2 Open the printer access door by lifting from the recessed hand-holds on the sides of the unit The printhead moves to an accessible position for handling the ink cartridges. The ink cartridges are seated in the printhead. 1 Printhead 2 Color ink cartridge 3 Black ink cartridge 3 Wait until the printhead stops moving, and then pinch the latch on the old ink cartridge with your thumb and forefinger and lift it out of the printhead.
Maintaining Your Printer 5 Remove the bagged ink cartridge from the box, tear open the bag at the notch, and remove the ink cartridge. . Caution: Insert the ink cartridge immediately to prevent any drying of the ink. 6 Remove the orange cap from the cartridge by grasping the top edge and pulling/ rotating it off the ink cartridge. Discard the orange cap. 7 78 Insert the ink cartridge into the printhead.
Chapter 9 8 Press down on the tab until you hear a click and feel the latch snap into position. Note: Listen carefully during this step; make sure you hear the ink cartridges click into place in the printhead. This seats the cartridges properly, and prevents ink from being dispensed incompletely during your print or copy jobs. 9 Close the printer access door. The printhead moves to its ready position and prepares the new ink cartridge for use (this could take up to a minute).
Maintaining Your Printer The printhead moves to an accessible position for handling the ink cartridges. The ink cartridges are seated in the printhead. 1 Printhead 2 Color ink cartridge 3 Black ink cartridge 3 Pinch the latch on the ink cartridge with your thumb and forefinger and lift it out of the print head. Remove both ink cartridges. Caution: Insert the ink cartridges into the newly installed printhead as soon as possible to prevent any drying of the ink.
Chapter 9 5 Remove the old printhead from the carriage. 6 Remove the new printhead from its bag. Caution: Do not touch copper contacts on the printhead, as this may damage it. 7 Remove and discard the black plastic casing and the orange protective cap.
Maintaining Your Printer 8 Place the new printhead into the carriage. 9 Push firmly against the target label on the printhead until you hear it click into place. 10 Reinstall the ink cartridges. As needed, see “Replacing ink cartridges” on page 76. Listen carefully during this step; make sure you hear the ink cartridges click into place in the printhead. This seats the cartridges properly, and prevents ink from being dispensed incompletely on your print or copy jobs. 11 Close the printer access door.
10 Troubleshooting Troubleshooting “quick start” Kodak provides several methods to help you troubleshoot your All-in-One printer issues. Here are some quick tips: • Turn off your printer and then unplug it. Wait five seconds, and then plug the power cord back into the printer. Finally, turn the printer back on. • Confirm that you are using a 2.0 USB cable to connect the printer to your computer. If you need to buy one, they are available online at www.kodak.
Troubleshooting Corrective Action • Make sure the electrical power cord is connected to the alternating current power adapter, and is plugged into a grounded power outlet or power strip. • If using a power strip, make sure it is turned on. • If using a switched power outlet, make sure the switch is on. • Make sure the power outlet is supplying power. • Verify the light on the Kodak printer power cord plug is lit.
Chapter 10 Corrective Action • Correct any connection problems and try again. • If the file system is corrupt, reformat it. • Disconnect the unsupported device. Note: If the USB drive uses an NTFS or HFS formatting system, the printer may not be able to read it. Macintosh users may need to transfer these files directly to their computer, and then printing to the printer from there. Ink cartridge not recognized Probable Cause 1 The color or black ink cartridge installed was not recognized.
Troubleshooting Multiple pictures not scanned properly When scanning or copying, the Kodak printer can detect multiple images on the scanner glass, straighten them, and create individual files. If you are having trouble with this feature, check the following: Probable Cause 1 Your photos are not placed optimally on the scanner glass. Corrective Action • Make sure that your photos do not overlap. • Place photos away from the edges of the scanner glass. • Some images do not scan well.
Chapter 10 • Make sure you are using the proper USB cable (USB 2.0). • If you are using a USB hub to connect the USB cable to the computer, make sure that it has power. Use a self-powered (connected to an electrical outlet) USB hub instead of one that uses the computer’s internal power. • Check the connection from your computer to your printer. Ensure that the square end of the USB cable is plugged in to the USB port on the back of your printer, and the flat end into a USB port on your computer.
Troubleshooting Corrective Action If the printhead has come loose: 1 Open the printer access door, and then remove the black and color ink cartridges. 2 Press the printhead release button. 3 Lift the printhead out. 4 Reinsert the printhead and ink cartridges. Note: See “Replacing the printhead” on page 79 for illustrated instructions for performing this procedure. If this does not resolve your printing issue, contact Kodak Service and Support.
Chapter 10 Transfer pictures failure Problem Nothing happens when you try to transfer photos to the computer. Corrective Action • Remove the memory card or USB device and reinsert it. • Check the power connection to the computer. • If you are trying to transfer photos from a memory card and a PictBridge camera is connected, disconnect the camera. • Close any unnecessary software applications, and minimize any remaining application windows.
Troubleshooting Macintosh OS X troubleshooting Non-intel Mac only: black screen or screen freeze occurs when applying printer settings via the Home Center software Probable Cause This error only occurs with non-Intel Macintosh computers running Leopard OS version 10.5. Apple has confirmed that there are problems running the latest version (Leopard) on G5 processors. Corrective Action • Upgrade to Macintosh OS 10.5.2.
Chapter 10 Print troubleshooting Use this section to resolve print problems. Envelope printing incorrect Probable Cause The envelopes are not loaded correctly. Corrective Action 1 Remove the envelopes from the paper tray. 2 Straighten the stack of envelopes against a flat surface. Reload the stack into the paper tray print side down, with the envelope flap aligned to the left. 3 Squeeze the paper guide and slide it to the right until it touches the edge of the envelopes.
Troubleshooting To set a Macintosh to print the first page of a document first: 1 On the File menu, select Print. 2 On the Print dialog, select Paper Handling. 3 Select the Normal Page Order option. PictBridge camera not detected Probable Cause The camera is not communicating with the printer. Corrective Action • Make sure the camera is turned on. • Check the USB connections from the PictBridge camera to the printer.
Chapter 10 Probable Cause 1 • The image file may be corrupt. Corrective Action • Review the picture on the camera or computer and delete it if necessary. Probable Cause 2 • The image file may not be in JPEG format. Corrective Action • The Kodak printer can print only JPEG files in stand-alone mode. Connect the printer to a computer and use software to print other image formats. Poor print quality Probable Cause • Low resolution image file or the printer may need maintenance.
Troubleshooting Probable Cause 2 More than one type or size of paper is loaded. Corrective Action Load only one type or size of paper at a time. Print spotted Probable Cause Paper may be dirty. Corrective Action Use a dry, lint-free cloth to wipe clean. For excessive dirt or debris, thoroughly clean the paper tray, and load new paper. Note: When you are not using the printer, keep paper tray covers closed to keep dust and debris from collecting on the paper or inside the printer.
Chapter 10 Printing slow Note: When printing a large number of prints, printing may slow down to prevent the printhead from overheating.. • Make sure the printer is not placed in direct sunlight or is not operating in a hightemperature environment (higher than 95° Fahrenheit or 35° Celsius). • Close any unnecessary software applications. • Make sure your computer meets the minimum system requirements. Upgrade your system if necessary. Printing stops Printing stops during mid-print.
Troubleshooting Corrective Action 2 Crop the image so it is compatible with the selected paper size. Copy troubleshooting Copy cut off Probable Cause The original is larger than the paper loaded. Corrective Action When the original is larger than the paper loaded, use the Fit to Page feature to reduce copy size to fit the size of the paper loaded. Scan troubleshooting Scan fails Probable Cause 1 Your computer is not turned ON. Corrective Action Turn on your computer.
Chapter 10 Probable cause 5 The memory card you are scanning to does not have enough free space to save the scanned photo. Corrective action Remove some files from the memory card to free up some space. Scanned image blank Probable Cause Your original is not placed correctly on the scanner glass. Corrective Action Place your original face down in the proper corner of the scanner glass.
Troubleshooting 5 Make sure your card shows up under Network Adapters. 6 Refer to the documentation that came with your card. To check your LAN card (Macintosh) 1 Click the Apple icon on the Menu bar. 2 Select About This Mac and then click More Info. The System Profiler is displayed. 3 In the System Profiler, click Network. 4 Make sure your LAN card appears in the list. Probable Cause 3 You do not have an active network connection.
Chapter 10 Printer not found Probable Cause 1 The All-in-One printer is not turned on. Corrective Action Turn on the printer. Probable Cause 2 You do not have an active network connection. Corrective Action Make sure you have an active network connection. To make sure your network connection is active 1 If the connections are secure, turn off the power on the All-in-One printer, and then turn it on again.
Troubleshooting Probable Cause 5 A Virtual Private Network (VPN) is preventing the printer from accessing your computer. Corrective Action Try temporarily disabling the VPN before proceeding with the installation. Note: The All-in-One printer functionality will be limited during VPN sessions. Probable Cause 6 The Ethernet cable is not plugged in to the router, switch, or hub. The cable may also be defective. Corrective Action Try reinserting the cables. Or, if necessary, try a different cable.
Chapter 10 No IP address with cable modem (without a router) Probable Cause If you have a computer with a cable modem, a separate Local Area Network (LAN) for your other computers, and no DHCP or router, you must use AutoIP to assign IP addresses to the other computers and to the printer. Corrective Action To obtain an IP address for the computer with the cable modem Your Internet Service Provider (ISP) assigns either a static or dynamic IP address to the computer with the cable modem.
Troubleshooting Note: Devices like wireless speakers or wireless gaming accessories can emit radio interference at 2.4 GHz. You can verify this on your wireless desktop or laptop computer by viewing sporadic signal bars in your WiFi status utility. Repositioning your computer away from these sources of signal interference can improve your computer network performance. For example: • Do place the AP/router in a central room.
Chapter 10 Corrective Action Unplug the Ethernet cable. Weak signal Probable Cause The access point is too far away or there is interference. Corrective Action • If there is a long distance between your computer or access point and the printer, move them closer together. • If there are metal objects (such as a metal bookcase or refrigerator) in the transmission path, clear the path between the printer and the computer or access point.
Troubleshooting Probable Cause 5 The wireless settings on the printer do not match the wireless settings of your access point. Corrective Action Print a network configuration page to compare the wireless settings of the printer with the wireless settings for your access point. Change either the device or access point settings so that both the printer and the access point have matching wireless settings. Probable Cause 6 You entered the wrong mode (ad hoc or infrastructure) or security type.
Chapter 10 Corrective Action If you do not know the WEP key, see the documentation that came with your access point/ router. The WEP key is stored within the access point. Usually you can find the WEP key by logging on to the Embedded Web Server of your access point through your computer. Probable Cause 2 The WEP key index setting of your access point does not match the WEP key index setting of the All-in-One printer. Corrective Action The printer is looking for a WEP key index of 1.
Troubleshooting 106 Kodak ESP 9 Printer User Guide
11 Product and Safety 11 Specifications Specifications for this Kodak ESP All-in-One printer are described in the tables below.
Product and Safety Specifications Photo Printing Features Image enhancement Kodak Perfect Touch Technology with Home Center software Add Dates to Prints Yes, No Color Color, Black-and-White Scene Balance On, Off Copy Document Features Copy Document Features Color Black & white or color Quantity 1 to 99 copies Copy size Same Size, 20% to 500% Quality Normal, Best, and Draft Brightness – 3 to + 3 Copy Photo Features Copy Photo Features Color Black & white or color Quantity 1 to 99 copies
Chapter 11 Scanning Features Maximum scan size 8.5 × 11.7 in. (21.6 × 29.7 cm) Functions Segmentation scanning Auto-destination OCR Paper Tray Features Paper Tray Paper capacity: 100 sheets of 20 lb plain paper or 30 sheets of 10 mil photo paper Tray size: top tray 4 x 6 in. to 8.5 × 14 in. (10 x 15 cm to 21.6 × 36 cm) Tray size: bottom tray 4 x 6 in., 4 x 7 in., 5 x 7 in. Ink Tanks Ink Tanks Ink handling 2-cartridge, 6-ink system Ink life 1-year warranty from date of purchase.
Product and Safety Specifications Software Support Software Support Application support Third-party image management applications or Kodak EasyShare Software for photos; optical character reader (OCR) support for documents Media support Plain paper, photo paper, envelopes, greeting cards, transparencies, labels, t-shirt transfers Scanner support TWAIN and WIA import, including EasyShare Software, segmentation scanning File transfer support Automatic color, contrast, sharpness improvements upon trans
Chapter 11 Windows PC Windows PC Minimum Recommended Operating System Microsoft Windows XP SP2 Microsoft Windows Vista CPU Celeron 32- or 64-bit processor Clock Speed 1.2 GHz 2 GHz Memory 512 MB RAM 1024 MB RAM Available Disk Space 500 MB available 500 MB available Interface USB 2.0 USB 2.0 Removable Drive CD-ROM CD-ROM Other Internet access capability Internet access capability Macintosh Macintosh Minimum Recommended Operating System Macintosh OS X 10.4.8 10.4.
Product and Safety Specifications Paper Types Supported Labels All commercially available inkjet varieties on 8.5 x 11 and A4 size sheets Iron-on transfers All commercially available inkjet varieties on 8.5 x 11 and A4 size sheets Paper Sizes for PC and Macintosh computers Paper Sizes Supported Usage Size Document page sizes Labels A4 (210 x 297 mm) A5 (148 x 210 mm) A6 (105 x 148 mm) B5 (176 x 250 mm) US Executive (7.25 x 10.5 in.) (184 x 266 mm) US Letter (8.5 x 11 in.) (216 x 280 mm) US Legal (8.
Chapter 11 Parts Caution: Do not disassemble this product; there are no user-serviceable part(s) inside. Refer servicing to Kodak’s qualified service personnel. Warning: Keep out of reach of children. Ink may be harmful if swallowed.
Product and Safety Specifications Warning: Do not place your printer on an unstable cart, stand, bracket, or table; this risks damaging the equipment and injuring people. Environment Caution: Excessive dust levels may damage internal parts. Caution: Unplug the equipment from the electrical outlet before cleaning. Caution: Dropping your printer may damage the housing and result in extensive damage that will require replacement or repair by a qualified technician to restore normal operation.
Chapter 11 If this equipment does cause harmful interference to radio or television reception, which can be determined by turning the equipment off and on, you are encouraged to try to correct the interference by one or more of the following measures: 1) reorient or relocate the receiving antenna; 2) increase the separation between the equipment and the receiver; 3) connect the equipment to a different outlet (on a circuit) than the one the receiver is connected to; 4) consult the dealer or an experienced
Product and Safety Specifications Observation des normes-Class B—Cet appareil numérique de la classe B est conforme à la norme NMB-003 du Canada. German Compliance Statement Noise emissions for this equipment do not exceed 70 dBa. This equipment is not intended for use in the work place in accordance with BildscharbV regulations. “Das Gerät ist nicht für die Benutzung am Bildschirmarbeitsplatz gemäß BildscharbV vorgesehen.
A Glossary A Ad hoc The Kodak All-in-One printer communicates directly with each device on the network. No wireless access point is used. This is also called a peer-to-peer network. On an Apple Macintosh, ad hoc is called computer-to-computer. All-in-One printer All-in-One printer B Bluetooth An industrial specification for wireless personal area networks (PANs).
Glossary EXIF Exchangeable Image File Format. A standard for storing interchange information in image files, especially those using JPEG compression. Most digital cameras now use the EXIF format. Gateway Address A node on a network that serves as an entrance to another network. A node in this instance can be a computer or some other device.The address of the default gateway is assigned by the installation software, unless you have already set a manual IP address.
Chapter A N Network Configuration The protocol used to assign the IP address to the device. For this Kodak All-in-One printer, the network configuration is: • AutoIP: The installation software automatically determines the configuration parameters. • DHCP: The configuration parameters are supplied by a dynamic host configuration protocol (DHCP) server on the network. On small networks, this could be a router. • Manual: The configuration parameters are set manually, such as a static IP address.
Glossary eye. The image of the illuminated retina is then focused by the lens of the eye back to the camera, resulting in a red appearance of the eye on the picture. S SSID Service Set Identifier: A unique identifier (up to 32 characters) that differentiates one wireless local area network (WLAN) from another. The SSID is also known as the network name. The name of the network to which the Kodak All-in-One printer is connected is called its SSID.
Chapter A WPS Wireless Provisioning Services. A standards-based and integrated platform to provide secure WiFi hotspots. WPS enables enterprises to easily provide guest access with enhanced security to private wireless Internet and corporate networks.
Glossary 122 Kodak ESP 9 Printer User Guide
B If you need to call Customer Support When you contact Kodak Customer Support for All-in-One printer assistance, the service representative may ask you for some background information, as well as information about your specific issue. If you can have ready access to it, it may save you time.
If you need to call Customer Support 124 Kodak ESP 9 Printer User Guide
Index Symbols B .jpg . . . . . . . . . . . . . . . . . . . . . . . . . . . . . . . . . . . 62 .pdf files . . . . . . . . . . . . . . . . . . . . . . . . . . .61, 64 .rtf files . . . . . . . . . . . . . . . . . . . . . . . . . . . .61, 64 *70. See Call-Waiting Disable Code Battery recycling . . . . . . . . . . . . . . . . . . . . . 120 Black ink cartridge . . . . . . . . . . . . . . . . . 79, 82 Black print speed . . . . . . . . . . . . . . . . . . . . . . 111 Blinking green light . . . . . . . . . . . .
Check ink levels . . . . . . . . . . . . . . . . . . . . . . . 78 Chemicals to avoid coming in contact with the printer . . . . . . . . . . . . . . . . . . . . . . . . . . 75 Clean the printhead . . . . . . . . . . . . . . . . . . . 78 Cleaning the printer . . . . . . . . . . . . . . . . . . . 75 Cleaning supplies to avoid . . . . . . . . . 77 Client port . . . . . . . . . . . . . . . . . . . . . . . . . . . . . 5 Color ink cartridge . . . . . . . . . . . . . . . . 79, 82 Color print speed . . . . . . . . .
Fax confirmation . . . . . . . . . . . . . . . . . . . . . . 73 Fax Confirmation Page . . . . . . . . . . . . . . . . 39 Fax Cover Page . . . . . . . . . . . . . . . . . . . . . . . 39 Fax cover page . . . . . . . . . . . . . . . . . . . . . . . . .71 Fax cover sheet. See also Fax cover page 72 Fax dial keypad . . . . . . . . . . . . . . . . . . . . . . . . 9 Fax Lost Job report . . . . . . . . . . . . . . . . . . . . 73 Fax recipients, selecting . . . . . . . . . . . . . . . 66 Fax reports . . . . . . . .
L Label sizes . . . . . . . . . . . . . . . . . . . . . . . . . . . . 116 Labeling, Waste Electrical and Electronic Equipment in European Union . . . . . . 120 Last page first, printing . . . . . . . . . . . . . . . . 95 LCD Display . . . . . . . . . . . . . . . . . . . . . . . . . . 10 LCD display . . . . . . . . . . . . . . . . . . . . . . . . . . . . 6 Light print, troubleshooting . . . . . . . . . . . . 98 Lights, interpreting signals from the printer 9 Loading the paper tray . . . . . . . . . . . . . .
Paper tray . . . . . . . . . . . . . . . . . . . . . . . . . . . . . 6 Bottom . . . . . . . . . . . . . . . . . . . . . . . . . . . . 6 Extender . . . . . . . . . . . . . . . . . . . . . . . . . . . 6 Loading . . . . . . . . . . . . . . . . . . . . . . . . . . . 42 Top . . . . . . . . . . . . . . . . . . . . . . . . . . . . . . . . 6 Paper tray extension-release . . . . . . . . . . . 43 Paper-width guide . . . . . . . . . . . . . . . . . . . . . . 6 Parts hazards . . . . . . . . . . . . . . . . . . . . . .
PictBridge camera . . . . . . . . . . . . . 50 Portable storage device . . . . . . . . 50 PTP camera . . . . . . . . . . . . . . . . . . . 50 Tagged image photos . . . . . . . . . . . . . . 52 Troubleshooting . . . . . . . . . . . . . . . . . . . 95 Printing stops, troubleshooting . . . . . . . . . 99 Printing too slow, troubleshooting . . . . . . 99 Protecting the printer . . . . . . . . . . . . . . . . . . 75 PTP camera, printing photos from . . . . . . 50 PTP, definition . . . . . . . . . . . . . . . . .
Status check, performing . . . . . . . . . . . . . . 77 Status lights . . . . . . . . . . . . . . . . . . . . . . . . . . . 9 Status Monitor . . . . . . . . . . . . . . . . . . . . . . . . 22 Storing ink cartridges . . . . . . . . . . . . . . . . . . 78 Subnet, definition . . . . . . . . . . . . . . . . . . . . 124 Supplies, ordering . . . . . . . . . . . . . . . . . . . . . 22 Support . . . . . . . . . . . . . . . . . . . . . . . . . . . . . 1, 87 at Kodak.com . . . . . . . . . . . . . . . . . . . . . .
White edges on borderless prints, troubleshooting . . . . . . . . . . . . . . . . . . . . . 99 WIA error, troubleshooting . . . . . . . . . . . . 94 WiFi Radio . . . . . . . . . . . . . . . . . . . . . . . . . . . . 29 WiFi Setup Wizard . . . . . . . . . . . . . . . . 29, 30 WiFi, definition . . . . . . . . . . . . . . . . . . . . . . 124 Windows Help . . . . . . . . . . . . . . . . . . . . . . . . . . . . . . 87 Home Center software System requirements . . . . . . . . . . . . . .
*1K3289 *1K3289 1K3289 B