User Guide • Guide d'utilisation 9200 Series All-in-One Printers • Imprimantes tout-en-un
KODAK ESP 9250 All-in-One Printer Your KODAK All-in-One Printer combines ease-of-use and affordable inks to provide high-quality pictures and documents. Resources Support is available! Go to www.kodak.com/go/aiosupport, and select your printer model for: • • • • Frequently Asked Questions (FAQs) software or firmware upgrades Extended User Guide and more! If you prefer, you can chat online, send us an e-mail, or call for technical support. Go to www.kodak.com/go/contact.
Table of contents 1 Printer Overview Components............................................................................................................................................1 Control panel..........................................................................................................................................2 Home Center Software .......................................................................................................................3 Paper ......................
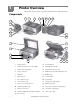
1 Printer Overview This printer lets you print, copy, scan, and fax pictures and documents.
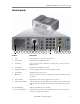
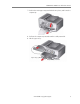
KODAK ESP 9200 Series All-in-One Printer Control panel 1 2 3 4 5 6 7 8 9 10 11 12 13 14 15 16 17 18 Feature Description 1 LCD Displays pictures, messages, and menus 2 Copy button Displays the Copy Options menu 3 Fax button Lets you enter a phone number for sending a fax, or choose the Fax Options menu 4 Scan button Displays the Scan Options menu 5 Navigation buttons Used to navigate menus and scroll through pictures 6 Back button Displays the previous screen 7 OK but
Printer Overview Feature Description 12 Numeric keypad Used to dial a phone number or a Quick Dial number for faxing; to enter information and Quick Dial settings into the fax phonebook; to specify a quantity for making copies; and to enter information for authenticating access to a network 13 Cancel button Stops the current operation and returns to the menu 14 Start Color button Starts the selected operation in color 15 Starts the selected operation in black and white Start Black button 16 On
KODAK ESP 9200 Series All-in-One Printer Paper types You can use: • • • • • • Plain paper — 20 to 24 lb / 75 to 90 gsm Photo paper — 6.5 to 12 mils (up to 290 gsm) Card stock — 110 lb / 200 gsm, max Envelopes — 20 to 24 lb / 75 to 90 gsm Transparencies — inkjet variety with white stripe Labels — all commercially available inkjet varieties on 8.5 x 11-in. or A4 sheets Paper sizes In the main paper tray: 4 x 6 in. / 10 x 15 cm to 8.5 x 14 in. / 22 x 36 cm In the photo paper tray: 4 x 6 in.
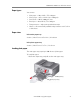
Printer Overview 2. Make sure the left paper-edge guide is to the far left. 3. Move the front paper-edge guide forward. Left paperedge guide Paper tray extender Front paper-edge guide NOTE: For paper longer than 11 in. / 28 cm, press and pull out the paper tray extender. 4. Fan and stack the paper, then insert it into the tray. 5. Move the paper forward until it stops. 6. Move both the left and front paper-edge guides until they touch the paper. 5 www.kodak.
KODAK ESP 9200 Series All-in-One Printer 7. Push in the main paper tray until it clicks into place, and lower the output tray. 8. Pull out the output tray extender until it is fully extended. 9. Lift the paper stop. Paper stop Output tray extender www.kodak.
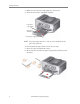
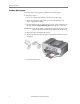
Printer Overview Loading photo paper The photo paper tray capacity is 40 sheets of photo paper. To load photo paper: 1. Raise the output tray, and pull out the photo paper tray. 2. Move the left paper-edge guide to the far left and the front paper-edge guide forward. 3. Fan and stack the photo paper, then insert it (short side first) into the tray with the logo side facing up and the glossy side down.
2 Basic Functions This chapter describes how to print, copy, scan, and fax using the factory default settings on your printer. NOTE: To reset your printer to the factory default settings: 1. 2. 3. 4. Press Home. Press to select Printer Settings, then press OK. Press to select Reset All Settings, then press OK. Press OK to reset the settings, then press OK to continue. Loading originals You can place originals for copying, scanning, or faxing on the scanner glass or in the automatic document feeder (ADF).
Basic Functions Using the ADF You can load up to 30 originals (20 to 24 lb / 75 to 90 gsm plain paper) in the automatic document feeder (ADF). The ADF accepts originals from 6.9 x 9.8 in. / 18 x 25 cm to 8.5 x 14 in. / 22 x 36 cm. IMPORTANT: Do not load photographs in the ADF. 1. Move the ADF paper-edge guides outward. 2. Fan and stack the originals, then insert them face up in the ADF. 3. Move the ADF paper-edge guides until they touch the paper.
KODAK ESP 9200 Series All-in-One Printer 4. Choose the pages to print, number of copies, etc, then click OK (on a computer with WINDOWS OS) or Print (on a computer with MAC OS). Printing pictures You can print pictures with your all-in-one printer from: • A memory card inserted into a memory card slot • A storage device (such as a flash drive) or camera connected to the front USB port with a USB cable • A BLUETOOTH Technology enabled device (with the optional KODAK Wireless 2.
Basic Functions To print a picture from a memory card or USB-connected device: 1. Insert the memory card into the appropriate slot, or connect the digital camera or portable drive to the front USB port. IMPORTANT: Use only one slot or port at a time. Front USB port 2. Press or to select the picture you want to print. 3. Press Start to begin printing. The printer prints a single 4 x 6 in. / 10 x 15 cm picture. For more information about printing, see the Extended User Guide at www.kodak.
KODAK ESP 9200 Series All-in-One Printer Copying To make a copy: 1. Place the original(s) in the automatic document feeder or on the scanner glass. 2. Press Home. 3. Press or to select Copy Document or Copy Photo. 4. Press Start Black to make a black-and-white copy, or press Start Color to make a color copy. Scanning Before scanning from the control panel, set up the scan settings (file format, resolution, etc) from the Home Center Software (see the Extended User Guide at www.kodak.
Basic Functions Faxing Before sending or receiving faxes, make sure that a wall phone line is plugged into the Line in port on the back of the printer. Sending faxes To send a fax: 1. Press Fax. 2. Enter a fax number using the numeric keypad. 3. Place the original(s) in the automatic document feeder or on the scanner glass. 4. Press Start Black to send a black-and-white fax, or press Start Color to send a color fax. Receiving faxes To receive a fax: 1. Load plain paper into the printer. 2.
3 Troubleshooting Basic troubleshooting Some problems can be resolved quickly by power cycling the printer: Turn off your printer. Wait five seconds. Turn on the printer. Use the following information to help troubleshoot problems with your printer. Problem Possible Solutions Printer does not power on • Make sure you are using the power cord that came with your printer. • Make sure the power cord is connected to the AC adapter and is plugged into an outlet or power strip.
Troubleshooting Problem Possible Solutions Ink cartridge • Check that KODAK Ink Cartridge(s) are installed. Do not use non-Kodak brand or refilled ink cartridges. • Remove, then install the cartridges again. Make sure the cartridges click into place. Paper jam • Press down on the center latch, open the duplexer cover, and gently remove any paper from inside the duplexer; close the duplexer cover.
4 Safety and Warranty Information Safety information • Always follow all warnings and instructions marked on the product. • Use only the power source indicated on the product regulatory label. • Use only the power cord that comes with the product. Using another power cord may cause fires and or shock. Do not use the included power cord with any other equipment. • If you do not use this product for a long period of time, unplug it from the electrical outlet.
Safety and Warranty Information Warranty Information Limited Warranty Kodak warrants Kodak consumer electronic products and accessories (“Products”), excluding batteries, to be free from malfunctions and defects in both materials and workmanship for one year from the date of purchase. Retain the original dated sales receipt. Proof of the date of purchase will be required with any request for warranty repair.
KODAK ESP 9200 Series All-in-One Printer Your Rights Some states or jurisdictions do not allow exclusion or limitation of incidental or consequential damages, so the above limitation or exclusion may not apply to you. Some states or jurisdictions do not allow limitations on how long an implied warranty lasts, so the above limitation may not apply to you. This warranty gives you specific rights, and you may have other rights which vary from state to state or by jurisdiction.
© Eastman Kodak Company, 2010 Rochester, NY 14650 MC/MR/TM: Kodak, ESP, and EasyShare. Eastman Kodak Company is an authorized licensee of the CompactFlash trademark.