Kodak EasyShare wireless digital picture frame User’s guide for EX811, EX1011 www.kodak.com For help with your picture frame, www.kodak.
Eastman Kodak Company Rochester, New York 14650 © Eastman Kodak Company, 2007 All screen images are simulated. Kodak and EasyShare are trademarks of Eastman Kodak Company. Eastman Kodak Company is an authorized licensee of the CompactFlash trademark.
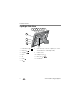
Product features Front View 1 LCD screen 1 2 Faceplate 2 3 3 Remote control sensor Back/Left Side View 2 1 1 2 3 Slide the holder 7 into slots. 4 5 6 1 Speakers 5 Memory card slot - SD, MS, xD, MMC 2 Wall mount hangers 6 On/Off switch 3 Frame stand 7 Remote control holder (removable) 4 Memory card slot - CF, MD www.kodak.
Product features Top/Right Side View 1 2 3 4 5 6 7 8 9 10 11 12 1 Picture/music toggle 2 Play/Pause 8 USB connector (to connect to computer; also connect camera/USB device - with adapter cable.) 3 Stop/Back 9 Volume control 4 Menu 10 Headphone jack 5 OK 11 DC-In (12 V) 6 Down 12 Reset button 7 Up ii www.kodak.
Table of contents 1 1 Getting started ......................................................................................1 Installing the software................................................................................... 1 Using the remote control............................................................................... 1 Setting up your picture frame ........................................................................ 4 2 Viewing pictures and videos .................................
Table of contents Viewing pictures from the KODAK Gallery.................................................... 26 Automatically receiving My Friends’ Albums................................................. 27 Picture transfer software—copying wirelessly .............................................. 29 Glossary of common wireless network terms................................................ 31 6 Troubleshooting and support ..............................................................
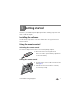
1 Getting started Welcome to your Kodak EasyShare digital picture frame. Viewing your pictures and videos couldn’t be simpler! Installing the software See the Wireless Setup Guide to install the software and to set up your frame and wireless network. Using the remote control Activating the remote control An activation tab protects the remote control’s battery during shipment. ■ Remove the tab to start using the remote. There is no need to open the battery compartment or remove the battery.
Getting started Replacing the remote control battery NOTE: Replace with a CR2025, 3V lithium cell battery. release tab 1 Push and hold the release tab while pulling the battery holder out of the remote. Follow the graphic on the back of the remote control. 2 Place the new battery in the holder with the plus sign (+) facing up as shown. 3 Slide the battery and holder into the remote until it clicks into place. 2 www.kodak.
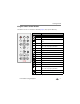
Getting started Using the remote control buttons Some buttons are also on the back of the frame (page ii). They operate identically. Button power* back menu OK Press to: turn on/off the picture frame. home return to the home screen. music/pics toggle between viewing pictures and selecting music. menu display the menu choices. back return to the previous screen. stop a slide show, display thumbnails. OK accept the current selection. 4-way navigate through pictures or menus.
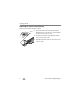
Getting started Setting up your picture frame Buttons and controls back menu All buttons and controls described in this guide (for example: press ) are on the remote control unless otherwise noted. OK Connecting the power cable 1 Pull out and extend the stand on the frame back and place the frame on a flat, stable surface. 2 Plug in the power cable. Your power cable (included with the frame) may be different from the one pictured. Use the plug that accommodates your type of power outlet. 4 www.
Getting started Inserting a card or camera CompactFlash MicroDrive Secure Digital Memory Stick xD MultiMedia Card Connecting a digital camera or other USB device b) a) USB cable included with your USB device. b) USB adapter cable included with your EX model picture frame. www.kodak.
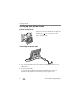
Getting started Turning on the frame Press the power switch to On. NOTE: You can leave the power switch On, and use the remote control to turn the frame off and on. ■ Setting your language The language screen appears the first time you turn on your frame. ■ Press to select your language, then press OK. ■ A slide show starts from sample pictures pre-loaded in internal memory. To change the language at a later time, press Home , Settings 6 →Language. See page 20. www.kodak.
Getting started Viewing your first slide show! ■ To play a slide show, insert a memory card or USB device (see page 5). The pictures/videos are displayed in the order they appear on the card or other device. – If a slide show is already playing (for example, from the pre-loaded sample pictures), your pictures begin playing automatically. – If you are at the Home screen, press to highlight your picture source, then press to start the slide show.
2 Viewing pictures and videos Home screen—picture sources and settings Go to the Home screen to access pictures from all connected sources and to change frame settings. 1 On the remote control, press Home . All connected sources and the Settings icon are displayed. 2 Press to highlight a picture source, then: ■ Press to start a slide show. ■ Press OK to display thumbnails, folders, albums. Possible picture sources: My Frame—the frame’s internal memory.
Viewing pictures and videos Settings—customize and configure your frame. See Changing frame settings, page 18. Running a slide show There are three ways to start a slide show on your frame: ■ Insert a memory card or connect a USB device, then turn on the frame. ■ Turn on your frame, then insert a card or connect a USB device—a new slide show starts automatically, replacing a currently running slide show or single view picture.
Viewing pictures and videos Viewing a single picture ■ To view a single, full-screen picture, highlight it in thumbnails view and press OK. ■ To magnify a picture up to 8X, press repeatedly. To view other parts of the picture, press . Press repeatedly to return. ■ To rotate a picture, press . Playing a video ■ To play a video from thumbnails view, highlight it and press OK. ■ Videos in thumbnail view: – MOV videos are indicated with . – AVI, MPEG, and MPG videos display the first frame.
Viewing pictures and videos Viewing pictures by date or filename By default, the pictures and videos on your frame are arranged and played by date, starting with the oldest. You can change the arrangement, or sort order, by date or alphabetically by filename. To change the sort order: 1 Press , then select Sort by. 2 Press OK. 3 Select a sort order: – Date, oldest to newest (default) – Date, newest to oldest – Filename, A to Z – Filename, Z to A 4 Press OK. www.kodak.
3 Doing more with your frame Playing music Play your MP3 files from any connected source (see page 8). 1 Press . Your picture or slide show is paused. 2 Press OK. to highlight your music source, then press 3 Press to locate your music files, then press OK. 4 Press to go to the next or previous song, or select Play all songs. Then press OK. Your music starts playing. 5 Press to return to your picture or slide show. Your selected music continues to play as the slide show resumes.
Doing more with your frame Printing pictures Your frame is compatible with PictBridge technology, so you can print directly to PictBridge enabled printers. NOTE: Printing from the Gallery (page 26) is not currently supported. Preparing the frame and printer for printing 1 Make sure your frame is disconnected from the printer. 2 On the frame, change your connection mode from computer to printer. See Manually changing USB connection mode, page 14. 3 Turn off the frame and printer.
Doing more with your frame Manually changing USB connection mode The connection mode must match the device you connect the frame to (computer or printer) before you make the connection. The default is Connect to computer. 1 Disconnect the printer or computer from the frame. 2 On the remote control, press 3 Select Settings . → Device configuration → USB connection mode. 4 Select the mode you need, printer or computer. See page 20. 5 Reconnect the printer or computer.
Doing more with your frame Copying between your frame and computer Copy pictures, videos, and music via the included USB cable. For wireless copying, see page 29. Connecting to your computer (USB cable included with frame) Copying pictures to/from your computer Copy pictures, videos, and music between your frame and computer, using your computer’s normal file copying tools. See page 41 for applicable file formats. 1 Connect the USB cable from the frame to your computer (see page 15).
Doing more with your frame Copying pictures from EasyShare software It’s easy to copy pictures/videos from My Collection to your frame. 1 Install EasyShare software from the CD included with your frame (see page 1). 2 Connect the USB cable (see page 15). 3 On your computer, open EasyShare software. Select the pictures in My Collection and drag them into the Picture tray. 4 In the menu bar, select File → Copy to.
Doing more with your frame Selecting multiple pictures/videos Use the multi-select feature to copy, delete, or print two or more pictures; or to play a slide show of selected pictures/videos. Selecting one at a time 1 In thumbnails view, press to highlight a picture/video, then press . 2 Continue selecting pictures/videos. A check mark appears on the selected pictures. Press again to remove a check mark. You can now view a slide show, copy, print, delete, etc. all selected pictures.
4 Changing frame settings The options in the Settings menu let you customize and configure your frame. 1 Press Home 2 Press . to highlight Settings , then press OK. 3 Press to select a setting. Follow the screen directions. Press OK to accept your selections. 4 Press to exit. Settings menus Setting Options Upgrade firmware This option is only displayed if the upgrade file (.img) is available on the frame (memory card, flash drive, internal memory, etc.).
Changing frame settings Setting Options Viewing options Slide duration—specify how long each picture is displayed in a slide show, from 3 seconds (default) to 1 hour. Frame orientation—specify whether you wish to display your frame in landscape (default) or portrait orientation. Transitions—specify the transition style between pictures in a slide show. See screen for options. The default is Random. Screen Fit or Fill—Fit entire image (default). Show the entire picture.
Changing frame settings Setting Options KODAK Gallery Set up your Kodak Gallery account on the frame. See the Wireless Setup Guide. Network Set up your frame for wireless operation. See the Wireless Setup Guide. Device configuration Frame name—Assign a name to your frame. This name is referenced when connecting to your wireless network. USB connection mode—Before you connect a USB computer or printer, choose Connect to computer (default) or Connect to printer. See page 14.
Changing frame settings Setting the clock automatically from the Internet 1 Press Home , then select Settings and press OK. 2 Select Clock and timer and press OK. 3 Select Get time from Internet and press OK. 4 Press to highlight Enable, then press OK. 5 Press to highlight your time zone, then press OK. Press Home to return to the Home screen. The frame clock is automatically set whenever you are connected to the Internet through your wireless network.
Changing frame settings Upgrading your firmware Firmware is the software that runs on your frame. Upgrade the firmware so you always have the newest features and improvements. To check for the latest version, visit www.kodak.com/go/digitalframedownloads. NOTE: Upgrading the firmware returns the frame settings to factory defaults. Manually upgrade firmware Download the firmware to your computer, then upgrade your frame: 1 On your computer, go to www.kodak.com/go/digitalframedownloads.
Changing frame settings Automatically upgrade firmware from the Internet When the frame is connected to your wireless network, you can automatically upgrade the firmware from the Internet whenever a new version is available. A message appears on your frame when a new firmware version is detected from the Internet. Upgrade right away Install now—Select, then press OK to start the upgrade. When the upgrade is complete, your frame automatically restarts.
5 Using wireless mode For more information on wireless setup, operation, and networks, see the Wireless Setup Guide (included with EX model frames only) or visit www.kodak.com/go/wifisupport or www.wi-fi.org. What are the wireless features of my frame? Connect to your home wireless network and: ■ Display pictures on your frame directly from your computer hard drive (see page 25). ■ Display pictures from your Kodak Gallery account (see page 26).
Using wireless mode Viewing pictures over your wireless network Pictures are accessed from your computer via Windows Media player 11. See the Wireless Setup Guide for details about installing or upgrading to Windows Media player 11. 1 Turn on your computer and your picture frame. Then press Home remote control. on the 2 Press to highlight Network Computer , then press OK. It may take up to 10 seconds for your Network Computer to appear on the Home screen.
Using wireless mode 4 Press to highlight the category of pictures you want to view, then press OK. All Pictures displays every picture that your computer is sharing, without showing folders. The categories are established by Windows Media player 11; you designate pictures to include in the categories (in Windows Media player). 5 Pictures are displayed as thumbnails. See Chapter 2, Viewing pictures and videos for all the ways you can enjoy your pictures, videos, and music on your frame.
Using wireless mode Automatically receiving My Friends’ Albums Your wireless frame automatically notifies you when a friend shares pictures with you at the Gallery. Play a slide show of the new pictures, right on your frame, even before you see the email on your computer! To turn off the auto-notification, see page 28. NOTE: The email icon means you have new pictures that you haven’t viewed yet. To see the pictures right away: 1 When the notice appears on the frame screen, press to highlight View.
Using wireless mode Turning off auto-receive and notification You can turn off auto-receive and/or notification from your friends’ albums at the Gallery. 1 Press Home , then select Settings and press OK. 2 Select KODAK Gallery and press OK. 3 Press to highlight Auto-receive My Friends’ Albums, then press OK. 4 Choose from these options: Auto-receive with notification ON—(default) you automatically receive your friends’ albums and the notice appears on the frame.
Using wireless mode Picture transfer software—copying wirelessly Kodak picture transfer software (included on the software CD packaged with your EX model frame) lets you wirelessly copy pictures and videos from the frame to your computer. Make sure you install the software before you proceed (see the Wireless Setup Guide). Copying to your computer 1 On the frame, display a picture in single view (see page 10), then press . To copy multiple pictures/videos, see page 17.
Using wireless mode Changing copy settings in picture transfer software 1 Right-click the Kodak picture transfer software icon in the lower right corner of your computer screen. 2 Select Configure to open the Kodak picture transfer software window. Use this window to: ■ Enable/Disable picture transfer software. Select/deselect the check box. ■ “Allow” the frame on your computer. See below. ■ Manage your device. Click the Deny, Remove, or Customize buttons.
Using wireless mode Glossary of common wireless network terms Access point—(Also called AP.) A wireless network transceiver or “base station” hub, often used to connect a local area network to one or more wireless devices. An access point can also provide a communication link to a wired local area network. Ad Hoc—A client setting for a wireless local area network that allows devices connected to the network to communicate with one another directly, independent of an access point or router.
Using wireless mode Domain name— The portion of a URL or Web address that identifies a specific Web site. For example, the domain name portion of the URL http://www.kodak.com is kodak.com. All domain names have a suffix that indicates the top level domain (TLD) it belongs to.
Using wireless mode Encryption key—An alphanumeric (letters and/or numbers) series that enables data to be encrypted then decrypted so it can be safely shared among members of a network. WEP uses an encryption key that automatically encrypts outgoing wireless data. On the receiving side, the same encryption key enables the computer to automatically decrypt the information so it can be read.
Using wireless mode the unique SSID. An SSID can be broadcast by the network router, allowing devices to detect it as an available network. An SSID does not supply security to the network. SSL—Secure Sockets Layer: a commonly used encryption scheme used by many online retail and banking sites to protect the financial integrity of transactions. TCP/IP—Transmission Control Protocol/Internet Protocol: the underlying technology behind the Internet and communications between computers in a network.
6 Troubleshooting and support For step-by-step product support, visit www.kodak.com/go/digitalframesupport and select Interactive Troubleshooting & Repairs. Picture frame problems If... Try one or more of the following Frame does not turn on. ■ Make sure the power cable is securely connected (page 4). ■ Make sure you are using the power cable that was included with your frame. ■ Make sure the power switch on the frame is On (page 6). Remote control does not function.
Troubleshooting and support If... Try one or more of the following Cannot copy pictures from Kodak EasyShare software. ■ Make sure your frame and computer are on. ■ Make sure the USB cable is securely connected (page 15). ■ Make sure you have installed the latest version of EasyShare software (page 1). ■ From My Collection in EasyShare software, make sure the pictures are in the Picture Tray. Wireless network connection For software installation and wireless frame setup, see the Wireless Setup Guide.
Troubleshooting and support Problem Possible causes and/or solutions (Continued from previous ■ Make sure the network profile settings on your frame match those of the network. In an Infrastructure network, you can table) usually view the network settings with the software program Frame cannot connect to included with the router or through the interface of a the wireless network — connected device. See the router or device documentation for details. “Wireless network not found” appears.
Troubleshooting and support Problem Possible causes and/or solutions (Continued) The wireless router did not assign a valid network IP address to the frame. Check and change the router settings, as indicated below. You can usually view the network settings with the software program included with the router. ■ Enable DHCP on the router. ■ Change the setting on the router to allow both 802.11b and 802.11g Wi-Fi protocols.
Troubleshooting and support Screen messages Screen message Try one or more of the following Create file failed. The device (memory card, USB drive, camera, etc.) you are trying to copy to is protected. ■ See your device documentation to remove write protection. ■ Insert or connect a different device. Error attempting to open file or directory. ■ Turn off the frame, then turn it back on. If the problem persists, contact customer support help, at www.kodak.com/go/digitalframesupport.
Troubleshooting and support Screen message Try one or more of the following Printing error. ■ Make sure your printer is on and the USB cable is securely connected (page 13). ■ Check your printer for more info. Time out occurred while printing. ■ Check cables and printer supplies. Print again. Unable to create file. Device write The frame was unable to copy the picture. protected or full. ■ Insert a different card or device (page 5), or change the picture location setting (page 8). Disk full.
7 Appendix Digital frame specifications For more specifications, visit www.kodak.com/go/digitalframesupport. Kodak EasyShare wireless digital picture frame Wi-Fi wireless network compatibility Wi-Fi 802.11b protocol—compatible with Wi-Fi wireless 802.11b and 802.11g networks. Color display EX811 20.3 cm (8 in.) diagonal digital LCD, 800 x 480 pixels, 4:3 or 16:9 aspect ratio, 17.6 x 10 cm (6.9 x 3.9 in.) viewable area EX1011 25.4 cm (10 in.
Appendix Kodak EasyShare wireless digital picture frame Video formats MOV, AVI, MPG, MPEG (Video formats created with digital cameras are certified for Kodak digital picture frames. Videos created with or copied from other sources may not play on the frame.) Music format MP3 Memory cards CompactFlash, MicroDrive, Secure Digital, Memory Stick, xD, MultiMedia Card Tripod mount 1/4 inch Temperature Operating: -4 to 140°F (-20 to 60°C) Storage: -22 to 185°F (-30 to 85°C) Size 42 EX811: 28.5 cm (11.
Appendix Important safety instructions CAUTION: Do not disassemble this product; there are no user-serviceable parts inside. Refer servicing to qualified service personnel. Do not expose this product to liquid, moisture, or extreme temperatures. The use of controls, adjustments, or procedures other than those specified herein may result in exposure to shock and/or electrical or mechanical hazards. If the LCD breaks, do not touch the glass or liquid. Contact Kodak customer support.
Appendix www.kodak.com/go/kes. ■ Do not charge non-rechargeable batteries. For more information on batteries, visit www.kodak.com/go/batterytypes. ■ Digital picture frame and remote control battery may include perchlorate material. Special handling may apply in California. ■ Read and follow all warnings and instructions supplied by the battery manufacturer. CAUTION: EX models only: When using this product, it should be installed and operated with a minimum distance of 7.9 in. (20 cm) for 2.
Appendix Limited warranty Kodak warrants Kodak consumer electronic products and accessories (“Products”), excluding batteries, to be free from malfunctions and defects in both materials and workmanship for one year from the date of purchase. Retain the original dated sales receipt. Proof of the date of purchase will be required with any request for warranty repair. Limited warranty coverage Warranty service is only available from within the country where the Products were originally purchased.
Appendix disclaims the implied warranties of merchantability and fitness for a particular purpose. In the event that the exclusion of any implied warranty is ineffective under the law, the duration of the implied warranty will be one year from the purchase date or such longer period as required by law. The option of repair, replacement, or refund is Kodak's only obligation.
Appendix FCC compliance and advisory Kodak EasyShare wireless digital picture frame This equipment has been tested and found to comply with the limits for a Class B digital device, pursuant to Part 15 of the FCC Rules. These limits are designed to provide reasonable protection against harmful interference in a residential installation.
Appendix CE Hereby, Eastman Kodak Company declares that this Kodak product is in compliance with the essential requirements and other relevant provisions of Directive 1999/5/EC. This digital picture frame EX-811 and EX-1011 transmits in 12dBm. In France, the power level is limited to 10dBm in outdoor environments, per regulations. When in France, use the wireless functions of this device indoors only.
Appendix Australian C-Tick N137 MPEG-4 Use of this product in any manner that complies with the MPEG-4 visual standard is prohibited, except for use by a consumer engaging in personal and non-commercial activities.
Appendix China RoHS 50 www.kodak.
1 Index A about, frame, 20 allow the frame, 30 appendix, 41 arrow buttons on remote, 3 automatic on/off, 19, 21 connectors on frame, ii copying from EasyShare software, 16 on frame, 14 to/from computer, USB, 15 wireless, 29 B back button on remote, 3 battery remote control, 41 replacing, 2 safety, 43 brightness, screen, 19 buttons on back of frame, ii on remote control, 3 D DC-in, ii deleting pictures and videos, 16 device configuration, 20 displaying slide show, 9 disposal, recycling, 44 doing more wi
Index checking model, firmware, 20 product views, i setup, 4 setup wireless network, 20 specifications, 41 troubleshooting, 35 turning on/off, 6 G glossary, wireless terms, 31 H headphone jack, ii help communicating with computer, 35 connecting to gallery, 38 frame, 35 troubleshooting problems, 35 holder, remote control, i home button on remote, 3 changing picture locations, 8 screen, 8 I installing software, 1 internal memory capacity, 41 My Frame, 8 internet requirements for wireless, 24 set clock from,
Index O OK button on remote, 3 on/off switch, i on/off, setting auto, 19, 21 orientation setting, 7, 19 P PictBridge enabled printer, 13 picture transfer software allow the frame, 30 copy settings, 30 copying wirelessly, 29 pictures copying connected, 15 copying from EasyShare software, 16 copying on frame, 14 copying wireless, 29 deleting, 16 location, changing, 8 printing, 13 selecting more than one, 17 viewing, 8 play/pause, video, 10 button on remote, 3 playing music, 12 video, 10 portrait, set orienta
Index time, 19 viewing options, 19 wireless operation, 24 settings, changing, 18 setup picture frame, 4 wireless network, 20, 24 slide duration, setting, 19 slide show button on remote, 3 running, 9 viewing first, 7 slide transitions, setting, 19 software installing, 1 upgrading, 44 source, picture location, 8 speakers, i specifications, frame, 41 stand, frame, i stop button on remote, 3 video, 10 storage capacity, internal memory, 41 switch, on/off, i T thumb drive. See flash drive.