f Manual of Instructions fo r Gun Camera Mark 1 MADE BY EASTMAN K ODAK COMPANY ROCHESTER, NY., U. S. A.
Gun Camera-Mark I GENERAL: Gun Camera Mark I. has been developed for the purpose of i~creasing the efficiency of aerial gunnery By its use a graphic record of the manner in which the student-aviator handles his machine gun in offensive and defensive combat is obtained, his faults discovered and corrections made possible.
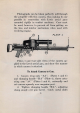
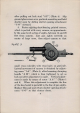
Photographs can be taken perfectly well through the propeller with this camera, thus making its use possible in connection with Lewis aerial guns mounted rigidly in combat machines. Care must be used, however, to prevent oil from getting on the lens and interior ·mechanism when used with revolving engine. PLATE 1. Plates 1 and 2 are side views of the camera applied to the Lewis-aerial gun, and show the manner in which camera is attached. To Attach Camera to Gun. 1.
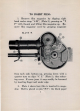
of wing nuts "AA" under adjacent shoulders and tighten wing nuts. Swing actuating arm "A C" inward, pulling it back far enough to allow lock plate to slip around trigger, thus locking "A C" in position. S. The lock plate may need a small amount of adjustment at screw" P" the first time apparatus is mounted on gun, that it may fit closely to trigger, without binding at any point. PLATE 2.. TO CALm RATE THE SIGHTS: 1.
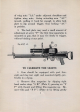
after pulling out lock stud "S P", (Plate 4) Slip ground glass screen over graticule mounting and hold shutter open by sliding shutter opening attachment "S 0" outward. S. Fasten sighting chart bearing printed crosses, which is packed with every camera, on approximately the same level as line of sights, between 15 and 20 feet from camera. Line gun sights correctly on center of large cross , then adjust camera so that PLATE 3 small cross coincides with cross hairs on graticule.
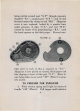
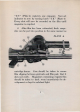
TO INSERT FILM: 1. Remove film magazine by slipping right hand under strap "8 R ", (Plate 3), pressing on "T P" with thumb and lifting film magazine up. Remove film magazine cover by grasping magazine PLATE 4-, from each side, bottom up, pressing down with a quarter turn on clips "C L" (Plate 5), thus releasing cover If cover jams it may readily be loosened by inserting finger nail under edge. 2. Plate 5 shows how film is inserted in magazme.
being carried around post "G P" through exposure chamber "E C", around post "G P I " and its end fastened under film cla mp on reel "R E " Magazine cover is now replaced, locked by a quarter turn, under pressure, of dips "C L", and reel "R E" turned by means of its projecting lugs "R L" until the hand appears on the black paper. Proceed carePLATE S.
"I N" (Plate 4) registers one exposure. Now set indicator to zero by turning knob "I K" (Plate 4) Every shot will now be recorded on the film until magazine is emptied. 2. After film has been exhausted, fresh magazine can be put into position in the same manner as PLATE 6. cartridge drums. Care should be taken to assure film slipping between graticule and film pad, that it does not catch. Magazines containing exposed fim should be taken to dark room immediately for development or kept in subdued light.