MDV 300 Progressive Scan DVD-Video Player Owner’s manual DVD Player
SAFETY INFORMATION TO REDUCE THE RISK OF FIRE AND ELECTRIC SHOCK, DO NOT EXPOSE THIS UNIT TO RAIN OR MOISTURE. : To reduce the CAUTION risk of fire and electric shock, do not remove the cover (or back) of the unit. Refer s ervicing only t o qualified service personnel.
FEATURES CONTENTS Page DVD, CD, VCD, SVCDMP3, WMA, Picture CD compatible CD-R, CD-RW capable DVD-R, DVD+R capable TV format: PAL / NTSC color system 4:3 / 16:9 screen format select Video output: Composite Video output S-Video output Y Pb Pr (component) interlaced scan output Y Pb Pr progressive scan output Audio output: Down-mix stereo output Dolby Digital 5.
ESSENTIAL SETUP Video outputs The player is equipped with the following video output ports: Interlaced scan output: Composite video (CVBS), S-Video, Y Pb Pr, SCART Progressive scan output: Y P b Pr The factory default video output setting is S-Video (interlaced scan) In this mode the active video output ports are: Composite video (CVBS) and S-Video. DEFAULT IMPORTANT NOTE 1 The composite video (CVBS) output is active in all three video output settings.
ESSENTIAL SETUP Audio outputs (analogue) The player can provide either stereo (Left and Right) output or 5.1 channel decoded output (from Dolby Digital Sources). DEFAULT ......... ......... ......... ......... ......... ......... ......... ......... ......... ......... ......... ......... ......... ......... ......... ......... ......... ......... ......... ......... ......... ......... ......... ......... ......... ......... ......... .........
INTRODUCTION Introduction Loading batteries into the remote control The Myryad MDV 300DVD-Video Player has been designed to offer a combination of high quality Remove the battery compartment cover. sound reproduction and elegant styling in keeping with otherMyryad products. The MDV 300 is a Load two AAA (UM-4 or R03) batteries into the full-function remote controlled DVD-Video player. battery compartment.
INTRODUCTION Select a DVD disc About DVD DVD Region Code DVD (Digital Versatile Disc) is a digital video medium using the MPEG II format and featuring a variety of revolutionary entertainment capabilities. The MPEG II video compression technology provides capacity for an excellent picture of at least 500 lines of resolution on screen, up to 8 language soundtracks, up to 9 views from different camera angles and up to 32 language subtitles (provided the DVD disc itself supports these features).
INTRODUCTION Discs that cannot be played This player is compatible with the following disc types: DVD The following discs cannot be played in theDVDplayer: single sided / double sided single layered / double layered DVDs with region codes that do not m a t c h t h e player's region code (Check the region code printed on the disc’s packing. Region code "ALL" will be acceptable by all players.) CD-DA CD-MP3 VCD/SVCD Photo CD CD-R / CD-RW* DVD-R/DVD+R* Some DVDs purchased from abroad.
INTRODUCTION About the player Front panel Open/Close button Skip Forward Remote sensor Display panel Standby button Pause/Step Button Disc tray OPEN/CLOSE PLAY PAUSE SKIP STOP DVDPlayer Skip Backward Stop button Play button Rear panel Down Mix Audio 2 Channel L/R Composite (CVBS) Video Power Switch Coaxial Digital Audio STEREO ANALOGUE CVBS R DIGITAL COAX CLASS1 LASERPRODUCT 5.
INTRODUCTION Remote control Some features of the player can only be performed by the remote control. Some features described in this owner'smanual are related to the disc's encoding. Some features m a y n o t be available, if the disc encoding does not support the feature.
SYSTEM CONNECTION Do NOT connect theACpower socket to the w all outlet before the system connection is completed Connecting to a TV (Interlaced) DIGITAL STEREO ANALOGUE CVBS R 5.
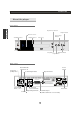
SYSTEM CONNECTION Connecting to progressive scan TV Red White STEREO ANALOGUE CVBS R DIGITAL 5.1CHANNELSURROUND COAX L FRONT LEFT SURR LEFT FRONT RIGHT SURR RIGHT CENTRE OPTICAL Y/G Pb/B Pr/R COMPONENT S-VIDEO Green Blue SUB AUDIOOUTPUTS VIDEO OUTPUTS Red Video Y Pb Pr to TV v ideo Y Pb Pr input Audio L/R to TV audio L/R input ......... ......... ......... ......... ......... ......... ......... ......... ......... ......... ......... ......... ......... ......... ......... ......
SYSTEM CONNECTION Connecting to digital amplifier L STEREO ANALOGUE CVBS R DIGITAL R C Center Front Left 5.1CHANNELSURROUND FrontRight Subwoofer COAX FRONT LEFT L SURR LEFT SurroundLeft CENTRE SW SurroundRight SL OPTICAL SR 5.1 decoded output speakers c onnection Y/G Pb/B Pr/R COMPONENT FRONT RIGHT S-VIDEO VIDEO OUTPUTS SURR RIGHT SUB AUDIOOUTPUTS Digital decoding amplifier Digital audio t o digital amplifier digital input Set t he amplifier to the c orresponding output mode.
GETTING STARTED Unpack the unit. Read through thisowner's manual before installation and use. Load batteries into the remote control unit. Connect the system. Connect the power cable to the p layer and then to the A C power outlet. Set the POWER switch on the rear panel to the ON position. Play a disc Switch on the player If a DVD Disc Menu appears on screen Press the Standby button to turn on the DVD unit. Turn on the TV set and the amplifier i f connected.
GETTING STARTED Press OSD button. An On Screen Display (OSD) indicator will appear in the upper part of the T V screen w ith the d isc information and o perating status. The OSD i s a user friendly interface designed for displaying the status o f the playing d isc. When a different disc is loaded (DVD, CD or MP3), the OSD indicator will change. The first press o f the OSD button will bring up just t h e Playback time/remain time display.
GETTING STARTED MP3 mode Playback time ......... ......... ......... ......... ......... ......... ......... ......... ......... ......... ......... ......... ......... ......... ......... ......... ......... ......... ......... ......... ......... ......... ......... ......... ......... ......... ......... ......... Brow Disc / Program Icon Disc Track Disc type current track / total tracks MP3 1 2 3 4 5 Play Track 2/133 Track 01 Track 02 Track 03 Track 04 Track 05 6 7 8 9 10 Now Play: Track 02.
GETTING STARTED Kodak picture CD mode ......... ......... ......... ......... ......... ......... ......... ......... ......... ......... ......... ......... ......... 1 2 3 4 5 Picture01.jpg Picture02.jpg Picture03.jpg Picture04.jpg Picture05.jpg 6 7 8 9 10 Picture06.jpg Picture07.jpg Picture08.jpg Picture09.jpg Picture10.jpg ......... ......... ......... ......... ......... ......... ......... ......... ......... ......... ......... ......... .........
BUTTON FUNCTIONS Standby ON / OFF To switch the player into or out of standby mode: STANDBY Press STANDBY button on the remote or STANDBY button on the front panel (Always switch the player into standby mode after use) Open / Close disc tray To open and close the disc tray: Press OPEN/CLOSE button OPEN on the remote or OPEN/CLOSE button on the front panel Progressive/Interlaced ScanMode The player is equipped with two video output modes: 1) Interlaced scan video output (CVBS, S-Video, Y Pb Pr), and 2
BUTTON FUNCTIONS Video EQ The player has a built in video equalizer, to allow the picture to be adjusted a s necessary: VIDEO E Q button, Video Equalizer menu appears: Video Equalizer Brightness Sharpness Color Contrast Press 1 Use the UP/DOWN ARROW buttons to highlight the desired icon. Use Left/Right ARROW buttons to adjust the level. Press VIDEO E Q button again to store the adjusted levels and exit the menu. Volume level / Mute To adjust the audio volume output level.
BUTTON FUNCTIONS Skip Forward / Backward 1 1 Press to skip to the next chapter 2 Press to skip to the previous chapter 2 Player will not advance o r reverse during "WARNING" section of any disc. Scan Forward / Backward 1 Press X2 1 to scan forward Press the button repeatedly to change scan speed X4 X8 X20 X60 X100 2 2 Press to scan backward Press the button repeatedly to change scan speed X2 X4 X8 X20 X60 X100 The unit is m uted i n SCAN mode.
BUTTON FUNCTIONS Select an item in a menu 3 In the disc menu or setupmenu 4 1 press ARROW button to m o v e between menu items. 2 1 Press ENTER to confirm a selection. 2 3 Press to cancel an entry. 4 Press to return to the previous menu. On Screen Display Menu 1 1 Press OSD button to switch the OSD indicator on o r off. There are different OSD indicators for different types of disc: DVD, CD and MP3. See "GETTING STARTED" in this manual for more details.
BUTTON FUNCTIONS GOTO a specific point To start playback at a particular point (Time, Title o r Chapter) Press the GOTO button Search menu appears o n screen. In DVD mode: 00:12:33 01:36:25 Search Time --:--:-Title -Chapter 18 1 In CD mode: Track Search Time --:--:-Track -In the Search Menu, highlight the desired search icon and input the desired data using the number keys. Press ENTER button to execute the search. NOTE Some DVD discs do not allow the GOTOfunction.
BUTTON FUNCTIONS Numeric Key Pad / Direct Program access Direct Program access 1 During DVD or CD playback, enter the desired Chapter o r track number using the number buttons. The player will skip directly to the Chapter (DVD) o r Track ( CD) chosen. If a CD has 10 tracks or more press ENTER after selecting track 1, if 20 tracks or more, press ENTER after selecting tracks 1 or 2 and so on.