User guide S M A RT. V E RY S M A RT.
General Information Environmental Information Laser safety All unnecessary packaging has been omitted. The packaging has been made easy to separate into three materials: cardboard (box), polystyrene foam (buffer) and polyethylene (bags, protective foam sheet). This unit employs a laser. Due to possible eye injury, only a qualified service person should remove the cover or attempt to service this device.
The apparatus shall not be exposed to dripping or splashing and that no objects filled with liquids, such as vases, shall be placed on apparatus. Due to the inconsistency of disc formats provided by various disc manufacturers, your DVD system may require a playability enhancement or upgrade. As DVD technology advances, these enhancements will become common and will be easy to complete.
Contents English Introduction Disc Operations Supplied accessories ....................................... 6 Care and safety information .......................... 6 Playable Discs ................................................. 16 Region Codes ................................................. 16 Playing discs ..................................................... 16 Basic playback controls ................................. 17 Selecting various repeat/shuffle functions 17 Repeat play mode .............
Contents English DVD Menu Options General Setup menu ............................... 24-25 Locking/Unlocking the disc for viewing ... 24 Dimming system’s display screen .............. 24 Programming disc tracks ....................... 24-25 OSD Language ............................................... 25 Screen Saver - turning on/off ..................... 25 Sleep ................................................................ 25 Audio Setup Menu ................................... 26-28 Analogue output ..
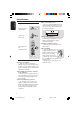
Introduction ● Do not block the vents – Do not operate the DVD Player in an enclosed cabinet, allow about 10 cm (4 inch) of free space all around the player for adequate ventilation. English Supplied accessories Composite video cable (yellow) 10 cm (4 inches) 10 cm (4 inches) Audio cable (white, red) Remote Control and two AA batteries Care and safety information ● Power consumption – When the system is switched to Standby mode, it is still consuming power.
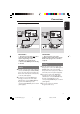
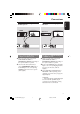
Connections English Connecting TV COMPONENT VIDEO IN S-VIDEO IN V (Pr/Cr) COMPONENT VIDEO IN AUDIO IN S-VIDEO IN V (Pr/Cr) U (Pb/Cb) AUDIO IN VIDEO IN U (Pb/Cb) V (Pr/Cr) VIDEO IN Y COMPONENT VIDEO IN S-VIDEO IN AUDIO OUT U (Pb/Cb) Y VIDEO IN COMPONENT VIDEO IN Y S-VIDEO IN V (Pr/Cr) AUDIO OUT U (Pb/Cb) VIDEO IN Y 1 2 IMPORTANT! – You only need to make one video connection from the following options, depending on the capabilities of your TV system.
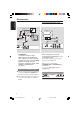
Connections English Connecting the power cord RF coaxial cable to TV 2 Back of RF Modulator (example only) INT IN TO TV VIDEO IN AUDIO IN R L CH3 CH4 COMPONENT VIDEO IN AUDIO OUT S-VIDEO IN V (Pr/Cr) ~ AC MAINS U (Pb/Cb) VIDEO IN Y Antenna or Cable TV signal 1 IMPORTANT! – If your TV only has a single Antenna In jack (or labeled as 75 ohm or RF In,) you will need an RF modulator in order to view the DVD playback on the TV.
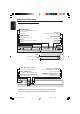
Connections Optional: Connecting to an Audio System English Optional: Connecting Digital AV Receiver STEREO AV Receiver AUDIO IN AUDIO IN DIGITAL DIGITAL Stereo system has Dolby Pro Logic or Right / Left Audio In jack 1 Select one of the video connections (CVBS VIDEO IN, SCART or COMPONENT VIDEO IN) depending on the options available on your TV.
Functional Overview English Front and Rear Panels STANDBY-ON B – To switch the DVD Player to Standby mode or ON IR Sensor – Point the remote control towards this sensor Disc tray OPEN/CLOSE / – 2; PLAY/PAUSE Open/Close the disc tray – To start or interrupt playback Display – 9 STOP Shows the current status of the DVD Player – To stop playback OPEN/CLOSE STOP PLAY/PAUSE PLAY/ PAUSE STANDBY TANDBY-ON ON LEVEL – Microphone volume control MIC LEVEL MIC – For connecting microphone Mains (AC Po
Functional Overview POWER B PREVIEW – To switch the DVD player to standby mode or ON – 0-9 numerical key pad OPEN – Selects numbered items in a menu RETURN/TITLE – To go back to previous menu/show title menu S – To search or select previous chapter or track PLAY ( B ) – To start playback STOP ( 9 ) – To stop playback English Remote Control – To search chapter/track during playback Open the disc tray DISPLAY – Displays information on TV screen during playback T – To search or select next ch
Getting Started English Step 1: Inserting batteries into the Remote Control 3 1 Step 2: Setting up the TV IMPORTANT! Make sure you have completed all the necessary connections. (See pages 7-8 “Connecting TV”). 1 Turn on the TV and set to the correct 2 video-in channel. You should see the DVD background screen on the TV. 1 Open the battery compartment. 2 Insert two batteries type R06 or AA, following the indications (+-) inside the compartment. 3 Close the cover.
Setting up Progressive Scan feature (for Progressive Scan TV only) The progressive scan display twice the number of frames per seconds than interlaced scanning (ordinary normal TV system). With nearly double the number of lines, progressive scan offers higher picture resolution and quality. IMPORTANT! Before enabling the progressive scan feature, you must ensure: 1) Your TV can accept progressive signals, a progressive scan TV is required.
Getting Started English To deactivate Progressive manually ● When the distorted picture still appears on the TV, it may be due to the connected TV does not accept progressive signals, and progressive is set by mistake. You must reset the unit to interlace format. 1 Turn off your TV progressive scan mode or turn on to interlaced mode (refer to your TV user manual.) 2 Press OPEN/CLOSE on the DVD player to open the disc tray. 3 Press numeric keypad ‘1’ on the remote control for few seconds.
Step 3: Setting language preference Setting the Audio, Subtitle and Disc menu language You can select your preferred language settings. This DVD Player will automatically switch to the language for you whenever you load a disc. You can choose your own preferred language or soundtrack from audio, subtitles and disc menu languages. If the language selected is not available on the disc, the disc’s default language will be used instead.
Disc Operations English IMPORTANT! – If the inhibit icon (ø) appears on the TV screen when a button is pressed, it means the function is not available on the current disc or at the current time. – Depending on the DVD or VIDEO CD, some operations may be different or restricted. – Do not push on the disc tray or put any objects other than disc on the disc tray. Doing so may cause the disc player malfunction.
Disc Operations Unless otherwise stated, all operations described are based on Remote Control use. 1 Pausing playback During playback, press PAUSEÅ. ➜ Playback will pause and sound will be muted. 2 To resume normal playback, press PLAY B. Selecting track/chapter ● Press S / T or use the numeric keypad (0-9) to key in a track/chapter number. ➜ If repeat mode is active, pressing S / T will replay the same track/chapter.
Disc Operations English Operations for video playback (DVD/VCD/SVCD) Using the Disc Menu Depending on the disc, a menu may appear on the TV screen once you load in the disc. To select a playback feature or item ● Use 1 2 3 4 keys or numeric keypad (0-9) on the remote, then press OK to start playback. To access or remove the menu ● Press DISC MENU on the remote. Zooming in This function allows you to enlarge the picture on the TV screen and to pan through the enlarged picture.
Special DVD Features Special VCD & SVCD Features Playing a Title Playback Control (PBC) 1 Press DISC MENU. ➜ The disc title menu appears on the TV screen. 2 Use 3 4 1 2 keys or numeric keypad (0-9) to select a play option. 3 Press OK key to confirm. Camera Angle ● Press ANGLE repeatedly to select different desired angle. Changing the Audio Language For DVD ● Press AUDIO repeatedly to select different audio languages.
Disc Operations English Preview Function (DVD/VCD) The preview function allows you to reduce the picture of 6 tracks enough to display in a full screen. 1 Press PREVIEW. ➜ The preview menu appears on the TV screen. Select Digest Type: Title Digest Chapter Digest Title Interval Chapter Interval Select Digest Type: Track Digest Disc Interval Track Interval 3 Press 3 4 1 2 to select a track and input your selected track number using the numeric keypad (0-9), then press OK.
Playing MP3/JPEG/Kodak Picture CD You have to turn on your TV and set to the correct Video In channel. (See page 12 “Setting up the TV”). 2 Press 3 4 to select a track/file. 3 Press S / T to go to previous/next page. 4 Press OK to confirm. General Operation 1 Load a disc. ➜ The disc reading time may exceed 30 seconds due to the complexity of the directory/file configuration. ➜ The data disc menu appears on the TV screen. Playback will start automatically. If not press PLAY B.
Disc Operations English Special picture disc features IMPORTANT! You have to turn on your TV and set to the correct Video In channel. (See page 12 “Setting the TV”). ● Load a Picture disc (Kodak Picture CD, JPEG). ➜ For Kodak disc, the slide show will begin. ➜ For JPEG disc, the picture menu appears on the TV screen. Press PLAY B to start the slide-show playback. Preview Function (JPEG) This function shows the content of the current folder or the whole disc. 1 Press PREVIEW during playback.
Playing Karaoke discs IMPORTANT! You have to turn on your TV and set to the correct Video In channel. (See page 12 “Setting up the TV”). General Operation 1 Connect a microphone (not supplied) to MIC on the side panel of the DVD player. Vocal ● You can fade out the original vocal from a karaoke disc. ● Press VOCAL repeatedly to choose different audio modes. Helpful Hint: – This function and on screen display depends on the availability of the disc.
DVD Setup Menu Options English This DVD Player setup is carried out via the TV, enabling you to customise the DVD Player to suit your particular requirements. Dimming player’s display panel You can select different levels of brightness for the display screen. 1 In ‘GENERAL SETUP PAGE’, press 3 4 to highlight {DISPLAY DIM}, then press 2. General Setup menu 1 In disc mode, press SYSTEM MENU. 2 Press 1 2 to select ‘General Setup’ icon. 3 Press OK to confirm. 100% – Select this for full brightness.
If you want to remove a track Sleep Sleep function allows you to turn off the DVD Player automatically after a preset time. 6 Use 1 2 3 4 keys to move the cursor to the track you want to remove. 7 Press OK to remove this track from the programme menu. 8 1 In ‘GENERAL SETUP PAGE’, press 3 4 to To start programme playback Use 1 2 3 4 keys to highlight {START} on the programme menu, then press OK. ➜ Playback will start with the selected tracks under the programmed sequence.
DVD Setup Menu Options English Audio Setup Menu Digital Audio Setup 1 In disc mode, press SYSTEM MENU. 2 Press 1 2 to select ‘Audio Setup’ icon. 3 Press OK to confirm. The options included in Digital Audio Setup are: ‘Digital Output’ and ‘LPCM Output’. 1 In ‘AUDIO SETUP PAGE’, press 3 4 to 2 3 4 - - Audio Setup Page - Analog Output Digital Audio Setup Sound Mode Night Mode Go to Audio Setup Page Analog Output This options allows you to set the stereo analog output of your DVD Player.
DVD Setup Menu Options Helpful Hint: – LPCM Output can be selected only when PCM Only is activated. Sound Mode English LPCM Output If you connect the DVD Player to a PCM compatible receiver via the digital terminals, such as coaxial or optical etc, you may need to adjust ‘LPCM Output’. Discs are recorded at a certain sampling rate. The higher the sampling rate, the better the sound quality. ➜ 48kHz: Playback a disc recorded at the sampling rate of 48kHz.
DVD Setup Menu Options English Night Mode - turning on/off In this mode, the high volume outputs are softened and low volume outputs are brought upward to an audible level. It is useful for watching your favourite action movie without disturbing others at night. Video Setup Menu 1 In disc mode, press SYSTEM MENU. 2 Press 1 2 to select ‘Video Setup’ icon. 3 Press OK to confirm. 1 In ‘AUDIO SETUP PAGE’, press 3 4 to highlight {NIGHT MODE}, then press 2. ON Select this to level out the volume.
Setting the TV Display Set the aspect ratio of the DVD Player according to the TV you have connected. The format you select must be available on the disc. If it is not, the setting for TV display will not affect the picture during playback. 1 In ‘VIDEO SETUP PAGE’, press 3 4 to highlight {TV DISPLAY}, then press 2. 2 Press 3 4 to highlight one of the options below: 4:3 PAN SCAN – Select this if you have a normal TV and want both sides of the picture to be trimmed or formatted to fit your TV screen.
DVD Setup Menu Options English Picture Setting This DVD Player provides three predefined sets of picture colour settings and one personal setting which you can define yourself. 1 In ‘VIDEO SETUP PAGE’, press 3 4 to highlight {PICTURE SETTING}, then press 2. STANDARD Select this for standard picture setting. BRIGHT Select this will make the TV picture brighter. SOFT Select this will make the TV picture softer.
Preference Page 1 Press Ç twice to stop playback (if any), then press SYSTEM MENU. 2 Press 1 2 to select the ‘Preference Setup’ icon. 3 Press OK to confirm. - - Preference Page - - Audio Subtitle Disc Menu Parental PBC Password Default 1 In ‘PREFERENCE PAGE’, press 3 4 to highlight {PARENTAL}, then press 2. - - Preference Page - - Go To Preference Page Audio, Subtitle, Disc Menu These menus contain various language options for audio, subtitle and disc menu which may be recorded on the DVD.
DVD Setup Menu Options English Restricting playback by Parental Control - cont’d 2 Press 3 4 to highlight a rating level for the disc inserted and press OK. ➜ To disable Parental controls and have all Discs play, select {8 ADULT}. PBC You can set the PBC to ON or OFF. This feature is available only on Video CD 2.0 with playback control (PBC) feature. For details, see page 19. 3 Use the numeric keypad (0-9) to enter the six-digit password (see page 33 “Changing the password”).
DVD Setup Menu Options 1 In ‘PREFERENCE PAGE’, press 3 4 to highlight {PASSWORD}, then press 2 to select {CHANGE}. Restoring to original settings Setting the DEFAULT function will reset all options and your personal settings to the factory defaults, except your password for Parental Control and Disc Lock. English Changing the Password The same password is used for both Parental Control and Disc Lock. Enter your six-digit password when prompted on the screen. The default password is 136 900.
Troubleshooting English WARNING Under no circumstances should you try to repair the system yourself, as this will invalidate the warranty. Do not open the system as there is a risk of electric shock. If a fault occurs, first check the points listed below before taking the system for repair. If you are unable to remedy a problem by following these hints, consult your dealer. Problem Solution No power – Check if the AC power cord is properly connected.
Problem Solution Disc can’t be played – – – – Picture freezes momentarily during playback – Check the disc for fingerprints/scratches and clean with a soft cloth wiping from centre to edge. No return to start-up screen when disc is removed – Reset the unit by switching the player off, then on again. The player does not respond to the Remote Control – Aim the Remote Control directly at the sensor on the front of the player. – Reduce the distance to the player.
Specifications English TV STANDARD (PAL/50Hz) (NTSC/60Hz) AUDIO PERFORMANCE Number of lines Playback DA Converter DVD 625 Multistandard 525 (PAL/NTSC) SVCD VIDEO PERFORMANCE Video DAC YPbPr Video Output 12 bit, 108mHz 0.7 Vpp — 75 ohm 1Vpp — 75 ohm VIDEO FORMAT Digital Compression MPEG 2 for DVD,SVCD MPEG 1 for VCD DVD Horiz. resolution Vertical resolution 50Hz 720 pixels 576 lines 60Hz 720 pixels 480 lines VCD Horiz.
Analog: Sound that has not been turned into numbers. Analog sound varies, while digital sound has specific numerical values. These jacks send audio through two channels, the left and right. Aspect ratio: The ratio of vertical and horizontal sizes of a displayed image. The horizontal vs. vertical ratio of conventional TVs. is 4:3, and that of widescreens is 16:9. AUDIO OUT Jacks: Jacks on the back of the DVD System that send audio to another system (TV, Stereo, etc.).