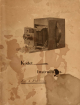
Kodet~-~
A-VDAK. Trade .lfllrk, 1888. EASTMAN KODAK CO . ROCHESTER, N. Y. MANUFACTURERS OF Kodak" Kodets, Ea. tman's S"lio Paper, Western Collodion Paper, Eastman s Dry Plates. Eastman', Permanent Bromide Paper, Eureka Bromille Paper, Eastman', !'latino-Bromlde Paper, Eastman', gnameled Bromide Paper, Ea'tman'~ Transparent Film, Eastman's Tr.
CONTENTS. PART I. Operation of the Kodet. PART II. Roll Holder Directions. PART III. Hint on Time \V ark, In-doors and out. PART IV. Taking Flash Light Pictures. PART r V. Developing.
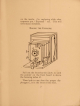
PART I. OPERA TION OF THE KODET. KODET i te ted in actual u e EYERY and carefully adjusted until it i in perFect working condition before shipment. The operation of the Kodet is simple 1n the e xt rem e. To open the front, pull out the leather thumb piece A. The front will then form t he ed of the era. The op is opened for recelvtng the holder by releasing the 8 A plat e (or roll) catch B .
LOADING THE PLATE HOLDER. The plate holders must, of course, be loaded in a dark room from which every particle of white light is excluded. Having provided such a room or closet where, when the door is closed, no ray of Ii ght can be seen, set upon the table or shelf an Orange Candle lamp, and light It as directed in the circular which comes in the box in which the lamp enclosed. TIle lamp giz1es a subdued )'ell01JI or orallge liglzt wl/iell will not il7jllrt tlu plates ullless tluy are I/eld clost to it.
on the inSide. On replacing slide after expo ure put" Exposed" out. This will save many mi takes. MAKING THE EXPOSURE. Pull out the front by the catch A, until the pointer on the front board i above the focusing index B. Then look to see that the proper diaphragm C, is in the front of the lens.
• S AP SHOTS. For snap shot use tlu largest openillg. The lever H, regulates the peed of the shutter and for ordinary snap shot work hown in hould be set in the middle a the cut. Look in the finder D, and you will ee The ju t what will show in the picture. finder i reyer ible and can be used for horizontal or vertical pictures. The focu ing for snap shots is usually done by the index B.
To Set tile Shutter Press down the lever E, as far as it will go. To lIfake an InstantaJUous Exposure hold the camera lez,eI, liold it steady and c, press the button" F. 'fhi relea e the shutter and makes the exposure. TIME Expo URES. To Make a Time Exposure-The camera mu t be on a tripod or ome other steady support. Pre - the lever G, over to the pomt marked T, (Time) and set the speed regulator H of the hutter at S ( low). Then pre s the lever E, down a far as it will go. The shutter is now set.
F. When all i ready remove the cap; give the proper exposure; replace the cap. If more time exposures are to be made the shutter need not be clo ed until you are through. Then touch the button F, again. This will close the shutter. After an exposure i made the dark slide should be replaced in plate holder at once and the holder rever ed, or another holder put into the camera as the ca e may be, otherwise the beginner is likely to forget whether he ha made a change or not.
THE SWI G BACK. The swing back, with which the special Kodet · are supplied, is to be u ed in taking picture of high building, etc. If It is found to be neces ary to tilt the Kodet in order to take in the top of the object to be phJtographed the swing back mu t be u ed or the re ult will be a hown 111 the accompanying cut.
glass and compose the picture thereon, adjusting it by means of the thumbscrews and sliding back at the top until the ground glass is perpendicular and the lines show true. \\'hen the picture i composed fa ten the wing back securely and in ert the roll holder (or plate holder). I n order to make a sharp picture when using the swing back it will be better to t1 e a mall stop, and a this in turn necesc,itates a time expo ure, a tripod or other firm upport mu t be provided.
PART II. ROLL HOLDER DIRECTIONS. . are written on T HEtheE upDIRECTIO po ition that the roll holder has been purchased ready loaded. For instructions for reloading see page 18. To insert the roll holder in the Kodet : First. Remove the ground gla s from the Kodet by pulling up on the leather thumb piece. Second. Insert the rollholder making sure that the tongue on the bottom enters the grooves in the bottom of camera.
Till,,!. Remove the dark slide from the front of the roll holder first making certain that the shutter i closed. The ground glas and dark slide may be carried in the space back of the roll holder when not in u e. MAKI G THE EXPOSURE. E,'ery roll-holder is carefully te ted before leaving the factory and is known to be in perfect working condition. When ordered loaded, the key i tied with wire and sealed. Read Theile Dil·eolioll., nefol'c Cut tillY the Wh ·e.
It will be wise to make this order of procedure a IIabil, for then the 1" odet will be ready for any view that may be pre ented. You will not need to try to remember whether you" Turnt!d the Key," ler the "Turn the Key" be the last act of the Exposure "gone before." The automatic regi ter on tile rt ht hand side of the roll·holder, count each expo ure a it i reeled off and you can thu alway tell ju t how much film ha been u ed and how much you have left.
PACKING THE KODET OR ROLL HOLDER. Either the Kodet or Roll Holder alone may be returned to u if desired. To return the Roll Holder first insert the dark lide and then remove from the Kodet. Provide a box large enough to contain it with plenty of soft packing. Pack carefully; put on the cover of box and finally wrap in one thickne of stout manilla paper and tie with a strong cord.
Then write us a letter as follow : To Eastmall KOliak COli/Pall)', ROc/lester, .l.V. y. :I send you to-day by expre s, prepaid, my No. 4 Kodet R(~m~~3cr to be reloaded and the picture tini hed. Enclo ed please find [0.00* in GENTLE"lE exl'l' hlO IOfilt."r t~l ., bill: ('If'[~11 . '''I<-r Ilm Ib.o r, ..~ 1.... 1.) to pay for -ame. Your truly, ame. Office. ounty. tate iT Po Thi> IS t the price for 48 exposures only.
To RELOAD THE ROLL HOLDER. ProvIde a. An extra spool of 5 inch Kodet Film. b. An extra Reel, (5 inch Kodet l{eel).* c. An Eastman Orange Candle Lamp. d. A dark room having a shelf or table . • X OTE: The extra reel does not accompany the pool, unless ord ered. While not an a tual nece,sity, it is a convenience and saves unwinding the exposed film from the old reel, and the consequent liability o f fogging the film by exposure to white light. The exposures should be sent to the fa ctory on the f.
Tile lamp giz·es a subdued J'ellow or orange It:E;ht wlLiclt wdlllot injure tile film 11 nless it z\' luM close to it. et the lamp on the table at lea t eighteen inches from and with the side toward the operator. ~ ~ TUF. l.A\U ' , L 2, Remo\'e the Roll Holder from the Kodet. Relea e the back of the Roll Holder by pringing up the catches at the top and remove the back thus: 3. Remove the dark slide.
4. With a penknife sever the film as shown below. 5. Release the catch A and pull out center No. I. This will release the roll upon which is wound the exposed film. 6. Take the free spool of film out of its box, unroll the black paper that is wound about it and wrap it around the reel of exposures and put the latter in a box and put on the cover. This box is then ready to be tied up and mailed to the Eastman Kodak Company. For shipping directions see page 16.
7. Release the catch B and pull out center NO.2. ThIS will release the empty spool (which may be thrown away). The Roll Holder is then ready for the insertion of a fre h spool. This is the spool as taken from its wrapper. 8. Insert the spool by fitting the slotted end upon the tension head then push in the center o. 2, and fasten with catch B. It will go in easily when the spool is in proper position for the point to enter the hole in the center of the pool.
@': THE REEl.. 10. Remove the paper band which preyents the film from unwinding, antI pllll out the end 1 0 inche , thu I I. 1'111 eau the film through the opening over the first guide roll. as shown here.
12. Pull the film through and thread it over the second g u ide roll 13 . Thread the film through the lot in the reel, and turn the key until the film binds firmly on itself around the reel.
14. TOW examine the band of film and see that it is true on all the rollers, t'. e., that there is an equal space at each side between the edge of the film and the side of the roll holder. Also see that the coils of film have not been allowed to slide edgewise on the spool.
17. et the automatic register at I by turning dial with the point of a pencil, thus: The Ro" 1101(1(')' 1s 1101(' read" for use.
How TO REMOVE THE EXPOSED FILM WHE ONLY A PORTION OF THE Expo URE HAVE BEEN MADE. It is not neces ary to make the entire 48 picture before taking out and developIng the expo ure that have been made. When any number of exposure have been made they can be removed and the remainder of the film attached again for further exposure, a follows: I. 2. Cut the film as shown on page 20, then throw back the pawl a shown on page 24.
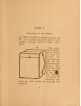
PART Ill. How 1. TO MAKE PICTURE DOOR. Put the Kodd ill position. Use some llrm support, like a Tripod, mantel or table. et it in uch a po ition that the finder or ground gla will embrace the view de ired. The diagram hows the proper po ition for the Kodet. It should not be pointed directly at a window a the glare of light will blur the picture. If all the window cannot be avoided pull down the hade of such as come within the the range of the Kodet. -~ I I '-1 ~ lJ IA GR.
2. Opm tile front and turn the second largest stop into the lens tf you ILazie a single lens and tlte tllird largest tf )'OU ILave a double lens. K OTE. - The Kodets with single lenses have three stops, those with double lenses have four stops . 3. Focus with the index or on the ground glass. 4. Make a time exposu re as descri bed on page 9, Part 1. • TIMI G . For interio rs, the follow ing table is a good guide: TIME NEEDE D FOR INTERIOR EXPOS URE.
the largest stop in the single lens or the second stop in the double lens : bright sun outside, 4 seconds ; hazy sun, 10 seconds; cloudy brig-ht, 20 seconds ; cloudy dull, 40 seconds. White walls, and only one window: bright sun outside, 6 seconds; hazy sun, ] 5 seconds ; cloudy bright. 30 seconds; cloudy dull, 60 seconds. Medium-colored wall and hangings, and more than one window; bright sun outside, S seconds; hazy sun. 20 second ; cloudy bright, 40 seconds; cloudy dull, 80 seconds.
Dark-colored wall and hangings, and only one window: bright sun outside, 40 econds; hazy sun, 80 seconds; cloudy bright, 2 minutes 40 seconds; cloudy dull. 5 minutes 20 seconds; The foregoing is calculated for room whose windows get the direct light from the sky, and for hours from three hours after unri e to three hours before sunset. If earlier or later, the time required will be longer. The Slops-Single lel/s.
With Sll1lshllU- The lens can hardly be opened and hut quick enough LO avoid over-exposure. With Liglzt Clouds-From 34 to I second will be sufficient. With Heavy GOltds-From 2 to 3 seconds will be required. The above is calculated for the same hours a mentioned on page 30 and for object in the open air. For other hour and for objects in the shadow, under porches, or under trees, no accurate directions can be given; experience only can teach the proper expo ure to give. T/ze Stops.
I . Th e Largut-For a/l ordinary instantaneous ~xposuru when the sun shines. 2. The Suolld-For instantaneous exposures when the sun-light is unusually strong and there are no heavy shadows; such as in views on the seashore or on the water or in tropical or semi.tropical climates: also for interiors, time exposures, (the time of exposure required is given in the table on pages 2 to 30). 3· Th~ Third-The third opening may be used for interiors. (time exposures) with th~ double Ims.
PART lV. TAKI G PICTURE AT NIGHT WITH FLA H LIGHT ApPARATUS. THE recent invention of the flash light T HEapparatus makes easy the takmg of photographs at night, with such a camera as the Kodet. The requisites are: The Kodet Camera, The Flash Light Apparatus. The fla h light apparatus consi ts of a specially constructed alcohol lamp, having in front of it a little tray upon which is poured a teaspoonful of flash light powder (see table, page 36).
Many interiors can be taken with the fla h light that are impracticable by daylight, either by reason of a lack of illumination or becau e there are windows in the direct line of the view which cannot be darkened sufficiently to prevent the blurring of the picture. Pictures are taken 0 quickly that groups of people around a dinner table or card table can be taken as clear and harp as if they were in the open unlight.
upon which the lamp i placed should not project far enough In front of it to ca t a . haclow in front of the camera. A piece of cardboard a foot quare placed under the lamp will prevent any sparks from the fla h doing damage. A piece of white cardboard et up behind the fla h lamp will act as a reflector and increa e the trength of the picture. TAKING THE PICTURE. Having the Kodet and lamp both in po.
TABLE. For 10 fut dr'stallce and light walls and hanging, use For 10 I even teaspoonful. 2 even teaspoonfuls. 2 even teaspoonfuls. feet distance and dark walls and hangings, use For IS feet distallce and light walls and hanging, use For IS feet distance and dark walls and hangings, use 3 even teaspoonfuls. For 25 feet distallce and light walls and hangings, use 3 even teaspoonful. For 25 fut distance and dark walls and hangings, use 4 even teaspoonful. To make a Portrar't.
per on compo ing the group should be eated and the re t hould tand behind the chairs. If the group i large, any number of chair may be u ed, but none of the ubjects should be eated on the floor, as sometime seen in large pictures, because the per pective would be too violent. Bllckgroullds.
PART V. DEVELOPI G. Provide a dark room as described on page 18, and an *Eastman ,~ B, C, De\'eloping and Printing outfit which contain : I Eastman's Candle Lamp, 4 Developing Trays. I Gla s Beaker, I 4 x 5 Printing Frame, J 4 x 5 Gla s for arne. I Stirring Rod, % Dozen Developing POlI'ders, 12 Pound Hyposulphite 'oda, 2 Dozen Sheets 4 x 5 Solio Paper, 2 z. Bottle 'olio Toning Solution, I Package of Bromide of Potassium, I Ounce Glycerine, Pro\'ide a pair of shear, a pitcher of cold \Yater (preferably, ic
• 2 Fill one of the trays nearly full of water, and put the expo ures, into it one by one, face down; put them in edgewi e, to avoid air bell, and immerse them fully. Cover the tray with a bit of brown paper to keep out the light from the lamp. 3. Open one of the developer powder · and put the contents (2 chemical ) into the beaker and fill it up to the ring with water. tir until dis olved with the wooden stirring rod. 4.
• in spot., repre enting the lights of the picture, and in about 2 minute the operator will be able to di tinguish objects in the picture. The developer should be allowed to act 5 to 10 minute. The progre of the development may be watched by holding the negative, from time to time, up to the lamp. 5. Transfer the developed film to the third tray and rinse two or three times with water, leaving it to oak while the next film is being developed.
fill two-thirds full of water, and tir until dis.olved. This is called the fixing bath. 7. Immer e the negatives one by one in the fixing bath until they are entirely clear of white spots and are tran parent instead of milky by tran mitted light. Thi will require about 10 minutes. 8. The yellow hade can be removed from the lamp a soon a all the exposures have been developed and fixed. 9.
are ready to go into the fixing bath, otherwi-e they will be potted or blackened, so as to b~ useless. 10. When the negatives are thoroughly washed, put one-half ounce of glyc· erine in one pint of water (four portions mea ured with the developer gla ), stir well and soak the negative in the solution for 5 minute, then remove them and wipe off the surplu moisture with a soft, damp cloth, and pin them by the four corners, face up, to a flat surface to dry. The glycerine solution may be used repeatedh·.
when the light i weak, late in the day, by clo ing the len too 0011 on time expo ures, or the use of a small stop in the lens when making nap shots. Under-expo ure i evidenced by lowness in the appearance of the image in development, and the ab ence of detail in the hadows. In under-exposure the kyappear black, in development, and the rest of the negative remain white, with no detail. OZler-E.xposure-Caused by too much light. egative develop evenly, shadows almost as fa t TO contrast, and no deep hadow.
I n this ca e the negati ve IS very strong and intense by transmitted light and requires a very long time to print. The remedy is obvious. Under-Delle!oplllent.-Cau ed by removal from the developer too soon. An under-developed negative differs under-exposed one, in that it is apt to be full of detail, in tead of har h and lacking If the development i carried on as before this defect is not ltable to occur. DEVELOPING GLA from an thin and in detail directed, PLATE.
PART VI. PRINTING 0 EA TMAN'S SOLIO PAPER. VI~G that amateurs can easily HA handlefound our Paper we have now ~olio sub tituted it for the Ferro-Pru iate Paper, which we formerly furnished with the A, B, C, outfit, a it makes far handsomer pictures than the blue print. olio prints have a warm, brown tone and are usually mounted on card-board and highly burnished. AfdllOd of P, illlillg.- 0 pen the printing frame of the A, B, C, outfit and lay the negative back down u po nth e g I as (the ~=:.
register with the negative. The operation of putting in the en itive Paper must be performed in a subdued light, that i to say in an ordinary room, as far as po sible from any window. The paper not used must be kept covered in its envelope. The printing frame, when filled as directed, is to be laid gla s ide up ill the tronge t light po ible (sunlight preferred) until the light, pa sing through the negative into the ensitive Paper, ha impressed the image ufficiently upon it.
the other in the toning bath . Five or ix prints can be toned together if they are kept in motion and not allowed to lie in contact. Turn the prints all face down and then face up and repeat this all the time they are toning. The print will begin to change color almost immediately from reddi h brown to reddi h yellow, then brown to purple. The change will be gradual from one shade to another and the toning should be stopped wnen the print get the hade desired.
DEVELOPl G AND PRl TlNG. The Eastman Kodak Company was the first to render commercially po ible the separation of the developing and printing from the picture laking. The division of labor inaugurated by It has brought picture taking within the reach of thousands of persoll throughout the world who could not otherwi e practice the art. Carrying the division of labor still further, in our own factory we employ trained operator in every branch of the work.
E LARGI G. In thi department we also excel. We are the large t manufacturers and u er of Bromide Paper in the world, and our operator are kil)ful and experienced. Kodet negative of all size lend themelve to enlargement with facility. Any Kodet negati ve that will make a good contact print, will make a good enlargement of any size. A negative 4XS inche can be enlarged perfectly by lI', lip to 30x40 inche ; or, of course, to any mailer size.
PRICE LIST. DEVELOPI G AND PRINTING. Reloading Camera, developing and finishing negatives, and furni hmg one silver prtnt from each negative, mounted and burnished (48 finished photographs .) - 10 00 NOTE- Where th e re are any failures we finish enough duplicates from the good negatives to make up the full number. Developing and reloading only, Developing and printlDg wIthout reloading, PARTS OF 6 7 00 00 SPOOLS.
• PRICE LIST, CONTINUED. Eastman's Orange Candle Lamps, each, tall Tripod, No. I Kodak Tripod, foldi ng lug No.2 Kodak Tripod, solid lu KODET LJPPl.IE I 25 I 5 .. 50 00 00 CHE.\\ICALS, ETC, Spools of Tran parent Film, 4 exposures, 1 00 Eastman Dry Plates, .t x 5, per doz. 65 Developing Outfit for .. H negatives, 4 3 Printing Outfit for.. print, .. 53 Combined Printing and Developing Outfits, 6 50 A, B, C, De\'elopin and Printing Outfits including Sollo Paper and Toning Solution sufficient for 24 pr
• The Improv Staff Tripod. A yery conven~ ient Tripod for 4- 5 cameras or smaller. I t does not fold. but .closes ogether. forming a staff or cane. Strong, Light, . Convenient. Made of bet seasoned maple, with accurately mill1:d ra fittings. Length, . 8 Inches. Weight , 17 ounces. Price of Impro ved Staff Tripodi , $1 . 50 . I Foldin g T ripod s $:z .oo t o $ 5 .00. Ten st y les and s ize,. i EASTMA~ "ODAK COMPANY , R h oc e r, N V . .