OL400-10 KODAK OMS Imaging Software Installation Guide
Notice © PracticeWorks Systems, LLC, 2009. No part of this publication may be reproduced, stored in a retrieval system, translated to another language, or transmitted in any form by any means, electronic, mechanical, photocopied, recorded, or otherwise, without prior written permission.
Installing KODAK OMS Imaging Software This guide describes the process for new and upgrade installations of the Kodak OMS imaging software. Read this document carefully before installing the new software.
Getting Started Getting Started Before you install the software, make sure that each computer in your network meets the minimum system requirements. For more information about system requirements, see the System Requirements document shipped with your software. Mapping a Network Drive Share the server’s hard drive and map a drive on each workstation running the software to the drive.
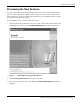
Previewing the New Features Previewing the New Features If you want to preview the new and enhanced features in this version of the imaging software, you can watch a video from the software DVD. The preview video contains a brief overview of the new features. To hear the audio portion of the video, your computer must have a sound card and either headphones or speakers. To run the Release Overview video, follow these steps: 1.
Installing the KODAK OMS Imaging Software Note If upgrading a previous software installation, see Upgrading the KODAK OMS Imaging Software on page 7. Caution! Before performing a server installation on a computer with the Vista operating system, contact technical support for assistance. Installing the KODAK OMS Imaging Software To install the Kodak OMS imaging software for the first time, follow these procedures: • • • • Install the software on the image server.
Installing the KODAK OMS Imaging Software 4. Select Image Server and click OK. The Welcome window is displayed, reminding you to exit all programs running on this computer. 5. Verify that all programs are closed and click Next. The Choose Destination Location window is displayed. 6. Click Next. The software is installed. Note The default folder location is based on your system configuration and should not be changed. Note 7. Click Finish. A message is displayed, prompting you to restart your computer.
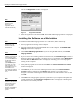
Installing the KODAK OMS Imaging Software The second Registration window is displayed. Note If you register the software over the Internet, the registration code is retrieved automatically. Figure 5 Registration Window 3. Enter the registration code and click OK. The Kodak OMS imaging software is displayed.
Upgrading the KODAK OMS Imaging Software 8. Click Finish. A message is displayed, prompting you to restart your computer. 9. Click OK to restart your computer. After your computer restarts, a message is displayed, prompting you to select the feature to install. 10. Click Exit and repeat these steps to install the software on each workstation in your network.
Upgrading the KODAK OMS Imaging Software 3. Click Install OMS Imaging Software. If you are using the DR software, click Install Imaging Software. The setup program copies the system files to your computer and updates the system configuration. Note If you are installing the software using a cd, when prompted remove the first cd from the CD-Rom drive and insert the second cd to install the hardware. 4. Click Finish. A message is displayed, prompting you to restart your computer. 5. Restart your computer.
Upgrading the KODAK OMS Imaging Software Upgrading the Software on a Workstation To upgrade the Kodak OMS imaging software on a workstation, follow these steps: 1. Exit any applications running on this computer. 2. Insert the software DVD in the DVD-ROM drive on the computer. The KODAK OMS Imaging install menu is displayed. Important You must turn on the image server. The software will check to ensure the upgrade was run on the image server. If it does not find the upgrade, an error is displayed.
Installing the KODAK CR 7400 Digital Radiography System Installing the KODAK CR 7400 Digital Radiography System Important For information on setting up your system, see the KODAK CR 7400 Digital Radiography System Installation Guide (AT074412). To install the KODAK CR 7400 digital radiography system, complete the following in this order: • • Install the drivers. Install the software. To install the Kodak CR 7400 software, follow these steps: 1.