OMPDV70X.
OMPDV70X.book Page ii Sunday, May 28, 2006 8:45 PM Protron PDV-70X Portable DVD Player User’s Manual. © 2006 Protron Digital Corporation. All rights reserved. Under copyright law, this manual may not be reproduced in any form, in whole or in part, without the prior written consent of Protron Digital Corporation. Disclaimer Protron Digital Corporation has reviewed this manual and provides it only as a guide to operation.
OMPDV70X.book Page i Sunday, May 28, 2006 8:45 PM Product Cautions TO PREVENT POSSIBLE DANGER, ELECTRIC SHOCK, AND INJURY WHEN HANDLING YOUR PORTABLE DVD PLAYER, PLEASE BE AWARE OF ALL WARNINGS AND SAFETY PRECAUTIONS LISTED BELOW. Never spill any liquid of any kind on the device. Never insert anything into the device, where objects can come into contact with high voltage nodes or damage internal components. Do not attempt to service the device yourself.
OMPDV70X.book Page ii Sunday, May 28, 2006 8:45 PM Conformity and Compliance FCC Compliance Statement This equipment has been tested and found to comply with the limits for a Class B digital device, pursuant to Part 15 of the FCC Rules. These limits are designed to provide reasonable protection against harmful interference when the equipment is operated in a residential installation.
OMPDV70X.book Page iii Sunday, May 28, 2006 8:45 PM Table of Contents Introduction . . . . . . . . . . . . . . . . . . . . . . . . . . . . . . . . . . . . . . . . . . . . . . . . . . . . . . 1 Features . . . . . . . . . . . . . . . . . . . . . . . . . . . . . . . . . . . . . . . . . . . . . . . . . . . . . . 1 Unpacking Your New DVD Player . . . . . . . . . . . . . . . . . . . . . . . . . . . . . . . . . . . . . 2 Operating the Player . . . . . . . . . . . . . . . . . . . . . . . . . . . . . . . . . . . .
OMPDV70X.book Page iv Sunday, May 28, 2006 8:45 PM Table of Contents Controlling Image File Playback . . . . . . . . . . . . . . . . . . . . . . . . . . . . . . . . . Controlling Video File Playback. . . . . . . . . . . . . . . . . . . . . . . . . . . . . . . . . . Repeating Files . . . . . . . . . . . . . . . . . . . . . . . . . . . . . . . . . . . . . . . . . . . . . . . Programming Playback Sequence . . . . . . . . . . . . . . . . . . . . . . . . . . . . . . . . Using the Remote Control. . . . . . . .
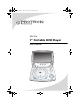
OMPDV70X.book Page 1 Sunday, May 28, 2006 8:45 PM Introduction Congratulations on purchasing your new Protron Portable DVD Player! With a large 7" screen and over two and a half hours of battery life, your new player allows you to watch movies on the road, in the air—anywhere. In addition, it can play music and photo CDs so you can listen to music or browse photo albums wherever you are.
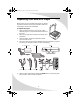
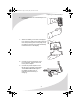
OMPDV70X.book Page 2 Sunday, May 28, 2006 8:45 PM Unpacking Your New DVD Player Before using your new portable DVD player, you should unpack the contents of the box and check to make sure everything is present and undamaged. To unpack the player: 1. Open the box. Remove the carrying case, which holds the player in one pocket and the accessories in the other. 2. Open the carrying case and remove the player and accessories. 3. Open the player and peel the protective plastic cover from the screen. 4.
OMPDV70X.book Page 3 Sunday, May 28, 2006 8:45 PM Unpacking Your New DVD Player 6. Pull the plastic tab out of the battery slot on the remote. 7. Attach the battery to the rear of the player: Line up the four tabs on the battery with the four corresponding slots on the player, drop the tabs into the slots, then slide the battery toward the front of the display. 8. Connect one end of the power cord to a wall socket, and the other end to the power adapter. 9.
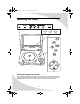
OMPDV70X.book Page 4 Sunday, May 28, 2006 8:45 PM Operating the Player UP MODE DOWN SETUP MENU PLAY/PAUSE TITLE STOP ENTER V I D E O PUSH POWER Power Light Remote Control Receiver Turning the Player On and Off Once a charged battery is attached to the player or the player is attached to a power outlet with the power adapter, turn the player on and off by sliding the POWER switch on the left side of the player to the appropriate position.
OMPDV70X.book Page 5 Sunday, May 28, 2006 8:45 PM Operating the Player Inserting a Disc The receptacle for DVDs and CDs is located directly beneath the screen. To insert a disc: 1. Press the OPEN button to open the receptacle. 2. Snap the disc onto the spindle in the center. 3. Close the receptacle cover. The player will begin to play the disc. Adjusting the Volume The VOL knob on the left side of the player sets the speaker and headphones volume.
OMPDV70X.book Page 6 Sunday, May 28, 2006 8:45 PM Playing DVDs DVDs will play upon insertion. The player can perform all standard DVD playback and search functions. The On-Screen Display The DVD OSD has two modes: The first mode (press OSD once) shows the current title, chapter, and playback time. DVD TT 2/18 CH 2/40 00 : 00 : 31 The second mode (press OSD a second time) shows the current audio channel, subtitle channel, and camera angle.
OMPDV70X.book Page 7 Sunday, May 28, 2006 8:45 PM Playing DVDs Searching to a Location You can search to a title, chapter, or time on the current disc using the SEARCH button. To search to a location: 1. Press SEARCH to bring up the Search menu. 2. Use 3. Enter the desired location. and to select title, chapter, or time. 4. Press . Repeating Chapters Press REPEAT to cycle through the repeat modes: Off, Chapter, Title, and All. You can repeat an arbitrary section of video using the A-B RPT button.
OMPDV70X.book Page 8 Sunday, May 28, 2006 8:45 PM Playing Video CDs Video CDs can contain video or still images such as photos. Your DVD player will play all standard Video CD formats. Upon insertion, the player will read and begin to play the CD. If there is a menu on the CD, it will appear, allowing you to navigate through the tracks stored on the CD. Otherwise, the player will begin playing the video back beginning with the first track.
OMPDV70X.book Page 9 Sunday, May 28, 2006 8:45 PM Playing Video CDs Searching to a Location You can search to a track or time on the current disc using the SEARCH button. To search to a location: 1. Press SEARCH to bring up the Search menu. 2. Use 3. Enter the desired location. and to select track or time. 4. Press . Repeating Tracks Press REPEAT to cycle through the repeat modes: Off, Repeat One, and Repeat All. You can repeat an arbitrary section of video using the A-B RPT button.
OMPDV70X.book Page 10 Sunday, May 28, 2006 8:45 PM Playing Audio CDs Audio CDs will play upon insertion. All standard Audio CD navigation features are available. The On-Screen Display The Audio CD OSD displays the current track, mute status, repeat mode, and playback time. CD TRK 2/18 00 : 00 : 31 Controlling Playback Press once to stop the disc at the current location, and twice to stop the disc completely. When the disc is playing, press to pause it. Press to return to the previous track.
OMPDV70X.book Page 11 Sunday, May 28, 2006 8:45 PM Playing Audio CDs 2. Press A-B RPT once more to mark the end of the section. “REPEAT A–B” will display on the screen. The section will begin repeating and will continue until you press A-B RPT again. Programming Playback Sequence The PROGRAM button brings up the Program menu, which allows you to program playback sequence. There are 16 slots available. To program playback sequence: 1. Press PROGRAM to bring up P ROG the Program menu. 2. 3. 4.
OMPDV70X.book Page 12 Sunday, May 28, 2006 8:45 PM Playing Kodak Picture CDs Upon insertion, the player will read and begin to play your Kodak Picture CD, displaying a slideshow of the images on the disc. The On-Screen Display The OSD shows the current image number and repeat mode. CDrom TRK 2/18 00 : 00 : 00 Controlling Playback Press to stop slideshow playback and return to the menu. When the disc is playing, press Press to pause it.
OMPDV70X.book Page 13 Sunday, May 28, 2006 8:45 PM Playing Kodak Picture CDs Press and to scroll through menu pages. Use the arrow controls to select the desired image and press . Alternatively, enter the number of the desired image on the keypad. The selected image will display on the screen. Press to start a slideshow beginning with the selected image. Transforming Images Press to rotate the image 90° clockwise. Press to rotate the image 90° counterclockwise. Press to flip the image vertically.
OMPDV70X.book Page 14 Sunday, May 28, 2006 8:45 PM Playing Kodak Picture CDs Programming Playback Sequence The PROGRAM button brings up the Program menu, which allows you to program playback sequence. There are 16 slots available. To program playback sequence: 1. Press PROGRAM to bring up P ROG the Program menu. T C 2. Select the first slot using the arrow controls, and enter the desired folder (under the “T” column) and file (under the “C” column) numbers using the keypad.
OMPDV70X.book Page 15 Sunday, May 28, 2006 8:45 PM Playing Media on Data CDs Upon inserting a data CD, the player will display a menu showing all media files on the disc and allowing you to select files for playback. The On-Screen Display The OSD displays the current file number, mute status, repeat mode, and playback time. CDrom TRK 2/18 00 : 00 : 00 Using the Menu The menu allows you to navigate tracks and program playback sequence. [ DIRECTORY ] FILENAME 0 1 .
OMPDV70X.book Page 16 Sunday, May 28, 2006 8:45 PM Playing Media on Data CDs Controlling Audio File Playback Press to pause playback. Press to resume playback. Press once to stop CD playback at the current location, and twice to stop the CD completely. Press to return to the previous file. Press to skip to the next file. Press to fast reverse playback. Press to fast forward playback. Repeated presses cycle through the speed options: ×2, ×4, ×8, and ×20.
OMPDV70X.book Page 17 Sunday, May 28, 2006 8:45 PM Playing Media on Data CDs • Window Vertically • Wipe from Edge to Center • Random Controlling Video File Playback When video is playing, press When the video is paused, press Press to pause it. to step forward one frame at a time. to stop playback and return to the menu. Press to return to the previous file. Press to skip to the next file. Press to fast reverse playback. Press to fast forward playback.
OMPDV70X.book Page 18 Sunday, May 28, 2006 8:45 PM Playing Media on Data CDs Programming Playback Sequence The PROGRAM button brings up the Program menu, which allows you to program playback sequence. There are 16 slots available. To program playback sequence: 1. Press PROGRAM to P ROG bring up the Program T C menu. 1 –– : –– 2. Select the first slot using the arrow controls, and enter the desired folder (under the “T” column) and file (under the “C” column) numbers using the keypad.
OMPDV70X.book Page 19 Sunday, May 28, 2006 8:45 PM Using the Remote Control The remote control can be used to control every aspect of the display’s operation and includes more functionality than the controls on the player itself.
OMPDV70X.book Page 20 Sunday, May 28, 2006 8:45 PM Using the Remote Control Button Function Zooms in on the picture When viewing a DVD or Video CD, pressing this button repeatedly cycles through seven zoom levels: ×2, ×3, ×4, ×1/2, ×1/3, ×1/4, and ×1. When viewing a data CD containing images, pressing the button cycles through five zoom levels: 25%, 50%, 100%, 150%, and 200%.
OMPDV70X.book Page 21 Sunday, May 28, 2006 8:45 PM Using the Remote Control Button Function Confirms the current selection or entry Brings up the mark display, which you can use to mark the current location and later return to it Brings up the program display, which you can use to program playback sequences for CDs When playing DVDs or Video CDs, turns off playback control to enable playback sequence programming using the PROGRAM button.
OMPDV70X.book Page 22 Sunday, May 28, 2006 8:45 PM Using the Remote Control Button Function Slows down the playback speed of a DVD. Pressing this button repeatedly cycles through the speeds: ×1/2, ×1/3, ×1/4, ×1/5, ×1/6, and ×1/7. Note: If a hand icon appears upon pressing a button on the remote, it means that the button you have pressed does not function in the current mode or for the disc in the player.
OMPDV70X.book Page 23 Sunday, May 28, 2006 8:45 PM Configuring the Player The Setup menu allows you to configure the operation of the player. You can change video, audio, and language settings, control access to mature programming, and configure other general display behavior. Video Setup Audio Setup Language Setup System Setup To use the Setup menu: 1. Press the SETUP button to bring up the menu. 2. Once the menu appears, use the and menus listed at the top of the menu. 3. Press 4.
OMPDV70X.book Page 24 Sunday, May 28, 2006 8:45 PM Configuring the Player Video TV Type Selects the aspect ratio used by the external display, as well as the mode used to display widescreen video (when 4:3 is selected): • 4:3PS—Crops the video image to fill the entire screen of a 4:3 format display • 4:3LB—Displays the full image on the screen, but does not fill the entire screen • 16:9—Native widescreen 4:3 PS 16:9 4:3 LB Password Sets the password for parental control.
OMPDV70X.book Page 25 Sunday, May 28, 2006 8:45 PM Configuring the Player OSD Language Changes the language of the Setup menu and the OSD, which displays information about the current media and settings. Audio Lang Changes the language used for audio. Subtitle Lang Changes the language used for subtitles. Menu Lang Changes the language used for disc menus. Audio Setup This menu configures the audio format used for audio output.
OMPDV70X.book Page 26 Sunday, May 28, 2006 8:45 PM Using the Player in a Vehicle Your portable DVD player is designed to accommodate usage in a vehicle. A vehicle power adapter is included to power the player from your vehicle, and the carrying case can be adapted to attach the player to a seatback.
OMPDV70X.book Page 27 Sunday, May 28, 2006 8:45 PM Using the Player in a Vehicle 3. Attach the carrying case strap to the front set of plastic eyelets and tighten it around the base of the headrest.
OMPDV70X.book Page 28 Sunday, May 28, 2006 8:45 PM Connecting the Player to Other Devices You can connect your portable DVD player to an external display for a larger picture, or to an external audio system for better sound. Connecting to a Separate Display To connect to a separate display, attach the yellow end of the included video adapter cable to the composite video input on the display, and attach the other end to the VIDEO jack on the player.
OMPDV70X.book Page 29 Sunday, May 28, 2006 8:45 PM Connecting the Player to Other Devices To connect to an analog system, attach the red (left) and white (right) connectors on the included audio adapter cable to an audio system input, and connect the other end of the cable to the AUDIO jack on the player.
OMPDV70X.book Page 30 Sunday, May 28, 2006 8:45 PM Using the Battery Pack The battery life of the included battery pack is more than two and a half hours. It attaches to the rear of the player and may be charged separately or while connected to the player. Connecting the Battery To connect the battery to the player, align the notches on the battery with the holes on the bottom of the player, push the notches into the holes, and slide the battery and player together.
OMPDV70X.book Page 31 Sunday, May 28, 2006 8:45 PM Using the Battery Pack To charge the battery separately, attach the power adapter to the DC 12V IN jack on the battery itself.
OMPDV70X.book Page 32 Sunday, May 28, 2006 8:45 PM Troubleshooting Symptom Possible Cause Resolution Power light does not come on Power cord(s) not securely connected Make sure the power cable from the DC power adapter is firmly inserted into the socket on the display. Make sure the power cord from the wall is connected securely to the DC power adapter and wall outlet.
OMPDV70X.book Page 33 Sunday, May 28, 2006 8:45 PM Troubleshooting Symptom Possible Cause Resolution No sound Audio cable(s) not securely connected Make sure the audio signal cable(s) are firmly connected. Headphones plugged in Unplug the headphones. Audio muted Unmute the audio by pressing the MUTE button on the remote. Display is too dark or too bright Contrast or brightness too low or too high Adjust the contrast and/or brightness to desired setting.
OMPDV70X.book Page 34 Sunday, May 28, 2006 8:45 PM Troubleshooting Symptom Possible Cause Resolution “Wrong disc” displays upon disc insertion Unreadable disc Ensure disc is not scratched or dirty. Clean and re-insert as necessary. Disc format not supported Ensure the disc has a format compatible with the player (see “Specifications” on page 35). Note: Further troubleshooting information may be found on the Protron website at www.protronusa.com.
OMPDV70X.book Page 35 Sunday, May 28, 2006 8:45 PM Specifications General Dimensions Weight Playback Formats Outputs DC Power Adapter Power Consumption Storage Temperature Operating Temperature 7.7"W × 1.7"H × 5.9"D 194mm (W) × 43mm (H) × 148mm (D) 3.
OMPDV70X.book Page 36 Sunday, May 28, 2006 8:45 PM Limited Warranty Protron warrants this product to be free from manufacturing defects in material and workmanship under normal use for the period listed at the bottom of this document. How to obtain service: • Call the Protron Customer Support line at 1-888-257-8899. If the issue cannot be resolved over the phone, a service tag number will be issued and the product must be returned to Protron, at your expense, for assessment and repair/replacement.
OMPDV70X.book Page 37 Sunday, May 28, 2006 8:45 PM Limited Warranty What we will do: • Protron will assess the product and cover all labor charges to repair your product. • Protron will provide new, or at our discretion, refurbished replacement parts required to repair your product. This warranty is void if: • Product is used in a commercial application or rental. • Damaged through misuse, negligence or abuse. • Modified or repaired by anyone other than an authorized PROTRON service center.
OMPDV70X.
OMPDV70X.
OMPDV70X.
OMPDV70X.
OMPDV70X.book Page 42 Sunday, May 28, 2006 8:45 PM Protron Digital Corporation http://www.protronusa.