KODAK PROFESSIONAL ML-500 Digital Photo Print System User’s Guide P/N 6B8614 Contents Back Next Index
Eastman Kodak Company 343 State Street Rochester, New York, 14650 © Eastman Kodak Company, 2003 Kodak, Kodak Professional, and XtraLife are trademarks of Eastman Kodak Company.
Using This Manual and Workflow Overview Using This Manual and Workflow Overview This online manual will help you install and use the KODAK PROFESSIONAL ML-500 Digital Photo Print System.
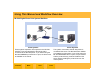
Using This Manual and Workflow Overview ML-500 Digital Photo Print System Workflow Client Systems These systems represent client systems in the ML-500 workflow. They are networked to the server that is connected to the ML-500 printer. If you will be using the ML-500 WINDOWS printer driver to print, the driver must be installed on the clients. Contents Back Next Index Server Systems The system connected to the ML-500 printer is considered the server.
Table of Contents System Requirements and Installation ...........................................................................................1 System Requirements (ML-500 Utilities) .....................................................................................1 Installing the ML-500 Utilities.......................................................................................................1 Upgrading to a New Version of the ML-500 Utilities ...................................................
Table of Contents Uninstalling the MACINTOSH Printer Driver ....................................................................14 Before You Can Print (WINDOWS Operating Systems)............................................................15 Naming the Printer ................................................................................................................15 Setting Print Server Preferences...........................................................................................
Table of Contents Getting Started...........................................................................................................................25 Starting the Configuration Application...................................................................................25 Status Bar .............................................................................................................................26 Showing or Hiding the Status Bar..........................................................
Table of Contents Viewing History .....................................................................................................................36 Checking Printer Usage ........................................................................................................37 Checking the Media Supply ..................................................................................................37 Saving a Report .....................................................................................
Table of Contents Print Job Settings ..................................................................................................................48 Displaying a Dialog Box for Changing Print Job Settings .................................................52 Selecting the Number of Copies to Print...........................................................................54 Choosing Paper Cutting Boundaries ................................................................................
Table of Contents Creating and Printing Command Files ..................................................................................70 Allowable Command File Commands ...................................................................................71 Command File Rules.............................................................................................................72 Sample Command File..........................................................................................................
Table of Contents When to Send a LUT to the Printer...................................................................................84 To Send a LUT to the Printer............................................................................................84 Making Temporary Color Adjustments .............................................................................85 Performing a Complete Calibration Analysis.........................................................................
Table of Contents To Change Settings for the Current Print Job...................................................................96 Laying Out the Page .............................................................................................................96 Scaling a Document Page ................................................................................................97 Creating a Custom Form.......................................................................................................
Table of Contents Adding a Custom Paper Size..........................................................................................112 Using the Print Dialog Box ..................................................................................................113 Viewing a Summary of Print Settings..................................................................................114 Adding a Logo to a Page.....................................................................................................
System Requirements and Installation System Requirements (ML-500 Utilities) Installing the ML-500 Utilities System Requirements and Installation ✔ 800 MHz PENTIUM III processor with minimum 512 MB of memory ✔ WINDOWS 2000 Professional (Service Pack 2, or latest), WINDOWS 2000 Server (Service Pack 2, or latest) with Services for MACINTOSH installed, WINDOWS 2000 Advanced Server (Service Pack 2, or latest) with Services for MACINTOSH installed, or WINDOWS XP Operating Systems If you are installing the ML-
System Requirements and Installation Upgrading to a New Version of the ML-500 Utilities Downloading and Installing the ML-500 Utilities from the Kodak Web Site Uninstalling a Previous Version If you are upgrading to a new version of the ML-500 Utilities, you must first uninstall the previous version. You can then install the new version. 1. From the Start menu select Settings, then select Control Panel. Software updates for the ML-500 printer can be found on the KODAK web site. 1.
System Requirements and Installation Installing the ML-500 Utilities from the CD The Software screeen listing all software components on the ML-500 Software CD appears. 1. Choose the KODAK PROFESSIONAL ML-500 Digital Photo Print System CD with the appropriate language. 2. Insert the CD in your CD drive. 3. Select a language. NOTE: At the top of this screen you can select Documentation or Additional Support for more information. 4. Click Printer Utilities to launch the installation wizard.
System Requirements and Installation applications and disable virus protection software. Follow those instructions then click OK. 5. Click Next on the Welcome screen. 7. On the Customer Information screen, enter your user name and company name. Click Next. IMPORTANT: You must enter both your user name and company name before you can continue. 8.
System Requirements and Installation System Requirements (Port Monitor and Printer Drivers) The port monitor is installed on the server system. Therefore, the system requirements for the port monitor are the same as for the ML-500 Utilities. See page 1. To install the printer drivers, your client system must have the following minimum hardware and software: WINDOWS 2000/XP Operating Systems ✔ 350 MHz PENTIUM III processor with a minimum of 256 MB of memory 9.
System Requirements and Installation WINDOWS 98/ME Operating Systems WINDOWS NT Operating System ✔ 350 MHz PENTIUM III processor with 64 MB of memory ✔ 350 MHz PENTIUM III processor with 64 MB of memory ✔ WINDOWS Millennium or WINDOWS 98 Second Edition ✔ WINDOWS NT 4.0 Workstation with Service Pack 6a (or latest) or WINDOWS NT 4.
System Requirements and Installation Installing the Port Monitor and Drivers MACINTOSH Operating System ✔ 300 MHz G3 processor or higher ✔ 128 MB of memory or higher Provided with your printer are ML-500 Drivers for WINDOWS 98/Me, WINDOWS NT 4.0, WINDOWS 2000/XP and MACINTOSH Operating Systems. ✔ MAC OS 10.2.3 or higher (OS 10.2.3 or higher is required to use the Custom Paper Size panel.
System Requirements and Installation Install the port monitor and drivers in the following order: 1. Install the port monitor on the server system. The server must be WINDOWS 2000 or WINDOWS XP. 2. Install the WINDOWS 2000/XP driver on the server system (see page 10). 3. If the client operating system is Windows 98, WINDOWS Me (see page 12), or WINDOWS NT 4.0 (see page 12), you must install that driver on the server before installing it on the client.
System Requirements and Installation 6. Click the Add Port button. 11. Select Kodak Source Directory Port from the list then click the New Port... button. 7. Click the New Port Type... button. 12. Specify a port number (1-999) and the name of the Source folder you wish to use. Click OK. Close dialog boxes until the Printers window comes to the front. If you did not verify the Source folder in step 1, you will not be able to complete this step. 13.
System Requirements and Installation Installing WINDOWS Printer Drivers ✔ Select the Printer Port dialog box (WINDOWS 2000), Select a Printer Port dialog box (WINDOWS XP) Choose Use the following port and select the EKSDn port where n is the number that was used when the port monitor was installed. Click Next. ✔ Add Printer Wizard dialog box (WINDOWS 2000), Install Printer Software dialog box (WINDOWS XP) This dialog box displays a list of manufacturers and their associated printers. a.
System Requirements and Installation c. Navigate to the directory on the CD where the ML500.inf file resides, for example, :\English\Print_Driver\Win_X P_Win_2000). d. Open this file. The Install From Disk dialog box reappears. e. Click OK. The Kodak Professional ML-500 printer appears in the list. f. Click Next. ✔ Name your Printer dialog box Click Next to accept the default selections or choose an appropriate printer name. Select whether or not you want this to be the default printer.
System Requirements and Installation Installing the WINDOWS NT Driver on the Server System Installing the WINDOWS 98/Me Driver on the Server System 1. For proper operation of the WINDOWS NT 4.0 printer driver, you must first install the WINDOWS 2000 printer driver (see page 10) on the ML-500 Print Server. 1. From the Start menu select Settings, then select Printers. Right-click the ML-500 printer and select Properties. 2. Click the Sharing tab and click the Additional Drivers button. 2.
System Requirements and Installation Installing the WINDOWS Drivers (any version) on the Client System From the client system, browse to the print server system and install the shared printer on the client: 1. Check that your computer is properly connected to your network. 2. From the Start menu select Run. 3. Type \\"system name" where "system name" is the name of the system running the ML-500 Printer Utilities. Click OK. 5. The ML-500 driver will be installed on the client system.
System Requirements and Installation Installing the MACINTOSH Printer Driver Uninstalling the MACINTOSH Printer Driver 1. Remove the ML500 folder from the Library/Printers/Kodak folder on the volume used to start your MACINTOSH computer. Installing the MACINTOSH Driver on the Client System 1. Double-click the ML-500.pkg file. 2. Enter the Administrator name and authorization password. NOTE: You may need to change permissions for the folder or log in as root to remove this folder. 3.
System Requirements and Installation Before You Can Print (WINDOWS Operating Systems) Naming the Printer Before using the KODAK PROFESSIONAL ML-500 Digital Photo Print System, you must do the following: After installing the Printer Utilities software, start the ML-500 Utilities (see page 20). The following dialog box appears: ✔ Name your printer in the ML-500 Utilities software. ✔ Set preferences in the Print Server application (see page 16).
System Requirements and Installation Setting Print Server Preferences Selecting the XTRALIFE Option 1. Start the Print Server application (see page 41). 1. Start the Configuration application (see page 25). 2. From the Server menu select Server Preferences. 2. Click the General tab (see page 27). 3. Change the Source folder, if needed (see page 44). The Print Server application monitors this folder for files and places them in the print queue.
System Requirements and Installation Before You Can Print (MACINTOSH Operating System) After you have installed the MACINTOSH printer driver on the client system, you must do the following before printing: 1. On the WINDOWS server: Enable File Services for MACINTOSH Operating System (see page 18). IMPORTANT: WINDOWS 2000 Server or WINDOWS 2000 Advanced Server is required for sharing the Source Folder using File Services for MACINTOSH with the APPLETALK Protocol.
System Requirements and Installation Enabling File Services for MACINTOSH Operating System Sharing the Server’s Source Folder On the WINDOWS 2000 Server or Advanced Server System: 1. Right-click My Network Places and choose Properties. 2. Select Advanced in the Menu bar and choose Optional Networking Components to display the WINDOWS Optional Networking Components wizard. The Source folder resides on the WINDOWS server. ML-500 jobs are queued there for printing.
System Requirements and Installation On the WINDOWS 2000 Server or Advanced Server System: 1. Right-click My Computer and choose Manage. Adding the ML-500 Printer to the Printer List On the MACINTOSH client: 1. Open the Print Center. 2. Expand the Shared Folders in the left panel and select Shares. 2. Click Add, choose Kodak File from the Printing Protocol list, then click Select. 3. Right-click and select New, then select File Share. 3. Navigate to the WINDOWS Source folder and click Choose. 4.
ML-500 Print Utilities ML-500 Print Utilities This section provides an overview of the ML-500 Print Utilities and the ML-500 applications that work with the KODAK PROFESSIONAL ML-500 Digital Photo Print System. Starting the ML-500 Utilities ✔ From the Start menu select Programs, then select Kodak Professional ML-500 Utilities.
ML-500 Print Utilities Utility Bar To move the Utility Bar using the grab handles: 1. Position the cursor over the grab handles. 2. Click and drag the Utility Bar to a new location. Dragging the Utility Bar to the right or left of the viewing window attaches it to that edge. The Utility Bar is located at the left of the ML-500 Utilities screen. It contains icons that represent the ML-500 applications. Double-clicking an icon opens the application.
ML-500 Print Utilities Starting ML-500 Applications Closing the ML-500 Applications ✔ From the File menu select Open Configuration, Open Print Server, or Open Calibration. Alternatively, double-click the appropriate icon on the Utility Bar. Contents Back Next ✔ Click the at the upper right of the screen, for example, the Configuration screen. IMPORTANT: If you select Exit from the File menu, all ML-500 applications close.
ML-500 Print Utilities Selecting a Printer Arranging and Viewing Open Applications If more than one printer is installed on your computer, you can choose the printer that you wish to use: 1. Leaving the ML-500 Utilities open, close all other running ML-500 applications. If you proceed without closing applications, dialog boxes may appear to confirm closing of each application.
ML-500 Print Utilities Exiting the ML-500 Utilities IMPORTANT: You can exit the ML-500 Utilities at any time; however, if any ML-500 applications are running, you will be prompted to close them. If you continue exiting the ML-500 Utilities, open applications will be interrupted and closed, and unsaved information may be lost. Whenever possible, make sure to close running applications before exiting the ML-500 Utilities. 1. Exit all running applications. 2. From the File menu select Exit.
Configuration Configuration Overview Getting Started Using the ML-500 Configuration application you can change printer settings such as power saver, print speed, and image length. You can also: Starting the Configuration Application ✔ Click the Configuration icon on the Utility bar. ✔ Monitor the printer and media status ✔ Obtain serial numbers and firmware versions ✔ View the error history The Configuration screen appears.
Configuration Status Bar Showing or Hiding the Status Bar ✔ From the View menu select Status Bar. The Status Bar, located at the bottom of the window, shows the current state of the printer and media. Refreshing the Configuration Screen To update the screen with current printer information: One of the following printer states appears: Ready, Initializing, Printing, Printing stopped, Canceling, Setup, Cooling, or Not found.
Configuration Setup Selecting a Language for the Printer Control Panel General Tab Most setup functions are accessed through the General tab. The Printer control panel on the front of the ML-500 printer provides status and error information. When you first set up the ML-500 printer, you should select the language to appear in the Printer control panel. 1. Click the General tab. 2. Select English, French, German, Italian, Spanish, or Portuguese. 3. Click Apply.
Configuration Setting the Time and Date 3. To change the date: Click the arrow next to the month to display a monthly calendar. Set the time and date when first setting up the ML-500, then as needed. The printer time and date are associated with printed images. 1. Click the General tab (see page 27). 2. To change the time: Click a field, for example, hours, then use the arrows to select the appropriate number. Repeat for each field.
Configuration Setting the Power Saver Setting the Media Low Threshold To conserve energy, the ML-500 goes into a power save state after a specified period of inactivity. You can specify the amount of time that the printer remains inactive before the power saver takes effect. 1. Click the General tab (see page 27). You can specify the media low threshold. When the ribbon or paper reaches this threshold, a media low status appears in the Status Bar and in the Media Supply area on the General tab. 1.
Configuration Selecting the XTRALIFE Ribbon Type Selecting the Paper Type You can select glossy or matte ribbon type. (Matte is usually used for portrait work.) 1. Click the General tab (see page 27). You can specify the type of paper used in your printer. Currently there is only one paper type, but there may be others in the future. 1. Click the General tab (see page 27). 2. Select a ribbon type. 3. If you selected Matte, you can specify a Matte level or use the default.
Configuration Choosing Default Settings for the Cutter 1. Click the General tab (see page 27). 2. Choose an option: No cuts - the paper will not be cut Cut between prints - the paper will be cut once between images Trim leading and trailing edges - the paper will be cut twice between images to remove leading and trailing edges 3. Click Apply.
Configuration Adjusting Print Head and Paper Cutter Registration 2. Click Start Wizard. 1. Click the Settings tab. 3. Click Next on the Registration Wizard screen. A registration test print is sent to the printer. 4. Examine the test print and note the number closest to the following occurrences: ✔ Magenta: magenta and yellow converge ✔ Cyan: magenta and cyan converge ✔ Cutter: the point at which the cutter intersects the diagonal line NOTE: Ideally all values are zero.
Configuration 5. Enter the Magenta, Cyan, and Cutter values from the registration test print and click Next. Valid entries for Magenta and Cyan are -64 to +64. Valid entries for the cutter are -16 to +16 6. Click Next to print another test print or click Finish to close the wizard.
Configuration Viewing and Changing Printer Names 1. Download the firmware file from the Kodak Web site (http://www.kodak.com/global/en/service/ software/ML500/ml500Software.jhtml) to your computer hard drive. 1. From the Printer menu select Edit List. 2. Under Name, highlight the name of the printer you wish to change and type a new name. 2. Click the Download Firmware tab. 3. Click OK. Downloading Firmware You may occasionally need to download new firmware for your printer.
Configuration Checking Status 4. In the File Open dialog box, navigate to the folder containing the downloaded firmware (.rom) file. Checking Printer Identification 5. Select the firmware file. 6. Click Download. A message indicates the approximate download time and an elapsed time indicator shows the progress of the download. ✔ Click the Identification tab to view the following: Serial numbers for the printer and print heads Firmware versions for printer components 7.
Configuration Checking Printer and Media Status Viewing History There are several ways to check printer and media status: To view the error history for your printer: 1. Click the History tab. ✔ The Status Bar (see page 26) indicates the current state of the printer and media ✔ The General tab (see page 27) shows the amount of available media ✔ The Usage tab (see page 37) shows information about printer and media usage 2.
Configuration Checking Printer Usage Checking the Media Supply To view information about the current printer’s usage, the amount of paper used on the printer, and the number of paper cuts: To view information about each type of media on the current printer: ✔ Click the General tab (see page 27) to view the following: Amount remaining for each type of media (paper, and cyan, magenta, yellow, and XtraLife ribbon) State of each type of media (OK, Low, Empty, Unknown) ✔ Click the Usage tab.
Configuration Saving a Report Making a Test Print You can save a report showing history, serial numbers, and firmware versions. The report is saved in a text file (.txt), which can be opened by an application such as NotePad. 1. From the Configuration menu select Save Report. You can make a test print and look for artifacts such as dust spots, lines, or banding. Some patterns bring out certain artifacts better than others. 1. Click the Test Print tab. 2.
Configuration Pattern Pattern Output #5 One pixel grid #1 Mid gray #6 Two pixel grid #2 Min gray #7 Max gray #3 Boxes on mid gray #8 Offset dots #4 Grid on gray Contents Output Back Next Index 39
Configuration Pattern Output #9 Registration squares #10 Matte XtraLife #11 Max CMYX- gray Contents Back Next Index 40
Print Server Print Server Overview Getting Started Using the KODAK PROFESSIONAL ML-500 Digital Photo Print Server application, you can manage basic and custom printing of JPEG (*.jpg), TIFF (*.tif), and Rosetta (*.ros) image files. Starting the Print Server Application ✔ Click the Print Server icon on the Utility bar. NOTE: Rosetta files are created by the Print driver. In addition to printing individual image files, you can print packages or layouts (see page 59).
Print Server Status Bar The following table describes the Status Bar fields. The Status Bar, located at the bottom of the window, provides helpful information about printing status.
Print Server Tool Bar Showing or Hiding the Tool Bar A Tool Bar appears at the top of the Print Server screen. It provides shortcuts to functions that you access through the menus. ✔ From the View menu select Tool Bar. Closing the Print Server Application ✔ Click the at the upper right of the Print Server screen. IMPORTANT: If you select Exit from the File menu, all ML-500 applications close.
Print Server Changing the Source Folder Selecting a Log File The Source folder is designated for printing image files. When an image file is placed in the Source folder, a print job is created and placed in the print queue. The log file is a text (*.txt) file where all actions performed by the ML-500 Print Server are recorded. The file contains the date and time the ML-500 Print Server is started and stopped, as well as the date and time of printing activities.
Print Server Printing and the Print Queue Adding Print Jobs to the Print Queue Making Prints You must create a print job before an image file can be printed. Print jobs that appear in the print queue are sent to the printer. Once a print job has completed, it disappears from the print queue. Jobs in the print queue appear on the Print Server screen. Image files that don't print are temporarily stored in the Failed Jobs folder instead of being sent to the print queue.
Print Server To create a print job when images are on a different computer than the ML-500 Print Server: NOTE: Images are deleted from the Source folder after a job has run. ✔ Copy an image file into the Source folder (see page 44). Unless you specify otherwise, printing starts when one print job is in the print queue. You can change the print queue limits (see page 68), or you can override them by forcing printing (see page 65).
Print Server 2. Next to Image File, click Browse to locate the image file or files, then click Open. Manually Creating a Print Job 1. From the Server menu select Enqueue or press the Enqueue Tool Bar button. Contents Back Next 3. Change other settings, if needed, then click OK. 4. To initiate printing, select Resume from the Server menu.
Print Server Print Job Settings See the table on next few pages for descriptions and default values for the settings. Print settings are used to change a variety of features, from altering a print's appearance to specifying print queue options. Change settings using the Job Preferences dialog boxes.
Print Server Print Setting Description Copies Allowable Range See Specifies the number of 1 copies to print 1 - 9999 Selecting the number of copies to print (see page 54) Cutter Specifies how to cut the Cut between prints paper No cuts Cut between prints Trim leading and trailing edges Choosing paper cutting boundaries (see page 55) Sharpen Specifies the level of image sharpness Normal None Normal High Sharpening images (see page 56) Use label Specifies whether to use a label and allows se
Print Server Print Setting Description Trailing border (pixels) * Allowable Range See Specifies the amount of 75 white space that prints after the image 0 - 3000 Adjusting borders on prints (see page 57) Image offset (pixels) * Specifies the amount of white space that prints on the left side of the image Not applicable if Center Image box is checked, otherwise 75 0 - 2560 Adjusting borders on prints (see page 57) Center image Ensures that an equal amount of white space prints on both sides of
Print Server Print Setting Description Default Value Output profile Specifies the output profile to use for printing ML-500 3Color Photo Files with the Using color Gloss extension ICC or ICM management (see page 58) Rendering intent Specifies the type of output for the print job Perceptual (for photos) Package Specifies the layout of the package being printed None Selecting a print package or layout (see page 59) Layout Specifies the layout of None the image being printed Selecting a print pa
Print Server Displaying a Dialog Box for Changing Print Job Settings You can change job settings for the following: To change settings for all jobs in the Source Folder: ✔ From the Server menu select Job Preferences. The Job Preferences dialog box appears. ✔ Jobs in the Source folder ✔ When manually enqueuing files ✔ For jobs already in the queue A different dialog box is used for each method. All dialog boxes contain the same tabs.
Print Server To change settings when manually enqueuing jobs: 1. From the Server menu select Enqueue. The Enqueue Print Job dialog box appears. To change settings for jobs already in the queue: 1. In the Print Server window, click the job or jobs for which you wish to change print settings. (Press and hold the Ctrl key while clicking to select multiple jobs. Press and hold the Shift key while clicking to select a range of jobs.) 2.
Print Server The Edit Print Job dialog box appears. Selecting the Number of Copies to Print You can change the number of copies for a print job. 1. Display a dialog box for changing print job settings (see page 52). 2. Select the Job Settings tab. 3. Next to Copies, select the number of copies, between 1 (default) and 9999, to print. 4. Click OK. NOTE: For Rosetta (*.ros) image files, this setting is controlled by the ML-500 Printer Driver and cannot be changed using the ML-500 Print Server.
Print Server Choosing Paper Cutting Boundaries WARNING: The cutter is very sharp and can cause injury. Stay away from the cutter when the printer is running. You can choose how prints are cut, or you can choose not to cut prints at all: 1. Display a dialog box for changing print job settings (see page 52). 2. Select the Job Settings tab. 3. Under Cutter, select an option.
Print Server Sharpening Images Labeling Prints 1. Display a dialog box for changing print job settings (see page 52). You can add labels (up to 256 characters) to your prints to help identify them. 2. Select the Job Settings tab. The text label you create appears below the image and adds 1/2 inch to the trailing border. 1. Display a dialog box for changing print job settings (see page 52). 3. Under Sharpen, select an option: None - No sharpening is applied.
Print Server Adjusting Borders on Prints ✔ Next to Trailing Border, select the amount of white space, between 0 and 3000, that will print after the image. ✔ To change the amount of white space that will print on either side of the image, deselect the Center Image box. Next to Image Offset, select the amount of white space, between 0 and 2560, from the left edge of the paper to the left edge of the image. The amount on the right side of the image will decrease by this amount.
Print Server Using Color Management 1. Display a dialog box for changing print job settings (see page 52). The Print Server contains embedded color management support. This allows optimum color reproduction to be achieved from your image files. Furthermore, if your monitor is properly color managed, it will improve the degree of print-to-monitor match that is obtained. 2. Select the Color Management tab. 3. Select the On option for Color Management.
Print Server 4. Next to Input Profile, click Browse. Selecting a Print Package or Layout 5. Select an input profile and click Open. With package printing, you send a single document page to the printer and get multiple document page sizes on your print. For example, if you select the package "5 x 7 in. and 3.5 x 5 in. and Wallets," your print contains one 5 x 7 in. print, one 3.5 x 5 in. print, and a number of wallet size prints (depending upon the paper size selected). 6.
Print Server The print sizes may not be exact because of the aspect ratio of the images on the document page. 1. Display a dialog box for changing print job settings (see page 52). 3. Select the Package or Layout option. 4. Select Scale to Fit or Scale to Fill. 2. Select the Packages and Layouts tab. Scale to Fit The longest edge of the image file is scaled to match the desired layout size. In some cases, the shorter edge of the image file will be shorter than the layout size when printed.
Print Server Using Custom Printing Packages or Layouts 3. Click Custom. To create a custom printing package or layout, see page 127. 1. Display a dialog box for changing print job settings (see page 52). 4. Click Browse. 5. In the file selection box, locate the custom package or layout file you wish to use, or choose the last and most recently used custom package file at the bottom of the drop-down package list. 2. Select the Packages and Layouts tab.
Print Server 8. Select Scale to Fit to shrink the images to fit in the available space or select Scale to Fill to enlarge the images to fit in the available space. 9. Click OK. Removing Jobs from the Print Queue To remove a specific job: 1. In the Print Server window, click the job you wish to remove. NOTE: For Rosetta (*.ros) image files, this setting is controlled by the ML-500 Printer Driver and cannot be changed using the ML-500 Print Server. 2. From the Server menu select Dequeue.
Print Server To remove a range of jobs from the print queue: 1. In the Print Server window, hold the Shift key and click the first and last jobs in the range you wish to remove. 2. From the Server menu select Dequeue. Alternatively, press the Delete key, or press the Dequeue Tool Bar button. Rearranging the Print Job Order You can change the order in which print jobs are processed by moving jobs within the queue. To move a single job: 1. In the Print Server window, click the job to be moved.
Print Server Suspending Printing To move multiple jobs: 1. In the Print Server window, press and hold the Ctrl key and click the jobs to be moved. 2. From the Server menu select Move Up or Move Down to move the jobs up or down in the queue. Alternatively, drag and drop the highlighted jobs to the desired position in the print queue. To move a range of jobs: 1. In the Print Server window, press and hold the Shift key and click the first and last jobs in the range you wish to move.
Print Server Resuming Printing Forcing Printing Resuming "unlocks" the print queue and sets the ML-500 Print Server to its normal mode of operation. By default, printing starts when one job is in the print queue. You can change print queue limits (see page 68), if desired. Force printing lets you override these limits and begin printing immediately. Existing print jobs in the print queue are processed without delay.
Print Server Attended and Unattended Printing Server Preferences You can operate the ML-500 Print Server in attended or unattended mode. If a printing error occurs, attended mode requires direct intervention before printing can continue, while unattended mode does not. Unattended mode is useful when printing overnight, or during times when no one is available to respond to error messages. Change server settings using the Server Preferences dialog box.
Print Server Print Setting Description Default Value Allowable Range See Threshold (jobs) Specifies the minimum number of print jobs required in the print queue before printing begins 1 1 - 100 Setting print queue limits (see page 68) Threshold override (minutes) Specifies the number of minutes after which printing begins, regardless of the threshold value 60 1 - 1500 Setting print queue limits (see page 68) Startup state Specifies the startup mode of Suspend the print queue for the ML-500 P
Print Server Setting Print Queue Limits Allocating Disk Space to Print Job Folders Unless you specify otherwise, printing starts when one job is in the print queue. You can change the number of jobs or the number of minutes from the time the first print job was created before printing begins. After leaving the print queue, image files for failed jobs are moved to a Failed Jobs folder. If you have allocated disk space to the Successful Jobs folder, image files for successful jobs are moved there.
Print Server 1. From the Server menu select Server Preferences. Selecting a Startup State 2. Under Folder size limits, specify the amount of memory, between 0 (default) and 50000 megabytes, to allocate to the storage of successfully printed image files. To receive a notification when the storage is full, select Alert when full. 3. Specify the amount of memory, between 0 and 50000 megabytes (250 is the default), to allocate to the storage of image files that failed to print.
Print Server Command Files To create a command file: 1. From the Start menu select Programs, select Accessories, then select Notepad. Creating and Printing Command Files A command file (*.kmd) specifies an image to be printed and the job settings to apply to that image. 2. Type the command lines you wish to use to print your image. Settings in the command file override settings in the Enqueue Print Job window.
Print Server Allowable Command File Commands LABEL_PRINTER_SERIAL_NUMBER: (TRUE or FALSE: whether to include printer serial # on label) The following commands are allowed in command files: LABEL_JOB_NUMBER: (TRUE or FALSE: whether to include job number in label) FILENAME: (String: full (path and file) name of the image file) COPIES: (Numeric, 1 to 9999: number of copies to print) LABEL_CUSTOM_TEXT: (String, 0 to 512 characters: custom text to include in the label) CUT: (NO, BETWEEN, or TRIM: cut type)
Print Server PACKAGE: (Numeric, 0 to 65535: package to be used, 32767 or higher is a Custom package and 0 is no package) PACKAGE_SCALING: (Selection, FIT or FILL) Command File Rules The following rules describe command file functionality and convention: ✔ A command file specifies an image to be printed and the job settings to apply to that image. If any settings are missing, the settings specified in the Server Preferences dialog box apply.
Print Server ✔ The set of values allowed depends on the command. For example, the COPIES command accepts a value between 1 and 9999. Values, like commands, can be uppercase, lowercase, or mixed case. All values are of three types: numeric (as in the COPIES command), a selection of choices (such as No, Between, and Trim for the CUT command), or a text string (for the FILENAME and LABEL_CUSTOM_TEXT commands). ✔ The extension of a command file must be ".kmd".
Print Server Sample Command File The following is an example of a typical command file. FILENAME: H:\Images\Jpg\Birthday_1152x864.
Calibration Calibration Overview Getting Started Using the ML-500 Calibration application you can control the color balance and density of the prints made with the ML-500 printer. You can verify and change the color look-up tables (LUTs) for the printer. Starting the Calibration Application ✔ Click the Calibration icon on the Utility bar. When to Calibrate the Printer The Calibration screen appears.
Calibration Status Bar Tool Bar The Status Bar, located at the bottom of the window, shows the following: A Tool Bar appears at the top of the Calibration screen. It provides shortcuts to functions that you can access through the menus.
Calibration Calibration Process Closing the Calibration Application ✔ Click the at the upper right of the Configuration screen. Process Overview IMPORTANT: If you select Exit from the File menu, all ML-500 applications close. 1. Print a calibration target (see page 79). 2. Analyze a calibration target (see page 80). 3. Send the LUT to the printer (see page 83).
Calibration Selecting a Calibration Starting Point ✔ Redo last calibration: Starts the calibration from the beginning of the last calibration. Use this option if the calibration was in tolerance or very nearly in tolerance up until the most recent calibration. When printing a calibration target (see page 79), you must select a calibration starting point. Each starting point serves a different purpose. Use the starting point that best suits your needs.
Calibration Printing a Calibration Target You print the calibration target using a defined set of printer response curves as the starting point. Most often the starting point is the ending point of the previous calibration event. Options for other starting points exist for special needs. To print a calibration target: 1. From the Calibration menu select Print Calibration Target. When you print a calibration target, a specific calibration event number is created that is related to the media and printer.
Calibration NOTE: If you select Designated event as a starting point, you must select an event number and date from the drop-down list on the Select Calibration Event dialog box then click Next. 4. Click Finish. You need not analyze the target immediately. If necessary, you can exit the calibration application between printing and analyzing the target so that you can resume printing. Analyzing a Calibration Target You can analyze the printed target visually or with a suitable densitometer.
Calibration 1. From the Calibration menu select Analyze Calibration Target. 2. Enter the event number from the target or scan the bar code. NOTE: If the event has been completed (see page 92), a warning message appears. 3. Click Next to print the calibration target. Contents Back Next Index 4. Analyze the target. You can only use Status A densitometers (see page 92). ✔ For visual analysis a. Visually examine the calibration print and enter the cluster number that appears most neutral (gray). b.
Calibration ✔ For analysis on a strip reading densitometer a. Prepare the target for reading in the densitometer. b. Click Next. ✔ For file analysis a. Read the calibration target and save the results to a file. b. Click Next. c. Search for and select the file in which you saved the target readings. d. Click OK. Contents Back Next Index 5. Based on the analysis, indicate what to do with the calibration data.
Calibration ✔ Refine data by calibrating again: allows you to perform another iteration of calibration, using the calibration LUT calculated from the previous calibration as the starting point. Use this option if the current calibration is out of tolerance and you wish to continue calibrating the printer to get it within the selected tolerance limits. 6. Click View Graph to view a graph of the most recent calibration data.
Calibration When to Send a LUT to the Printer If You can view graphs (see page 91) to see how close the calibration target densities are compared to the calibration aims. The graphs can help you to determine if you should send the LUT to the printer. Then Production printing colors are off calibrate and then immediately send a new LUT to the printer. Calibration is out of tolerance send a new LUT to the printer immediately after calibration.
Calibration 4. Select Apply Master Balance if you wish to apply a temporary adjustment to the colors for this print job. NOTE: The Master Balance dialog box does not appear for Visual Analysis. Making Temporary Color Adjustments You can make temporary color adjustments to print jobs using the Send LUT to the Printer wizard. Temporary color adjustments last until overwritten by a new temporary or permanent adjustment or until turning off the printer. You might want to make temporary color adjustments: 5.
Calibration To make temporary color adjustments: 1. From the Calibration menu select Send LUT to Printer. 2. Select a Media name from the drop-down list, then click Next. (If there is only one media type in the calibration database, omit this step.) 3. Select an event number and date, then click Next. 4. Select Apply Master Balance to apply a temporary adjustment to the colors for this print job. 5. Adjust the temporary values for the Red, Blue, Green, and Density and click Next.
Calibration 6. Do one of the following: ✔ Click Finish to close the wizard and record that the calibration is complete. ✔ Click Next to continue. ✔ Click Cancel to exit the wizard and wait to send the new calibration data to the printer, for example, if the printer is busy. 1. From the Edit menu select Configuration. Changing Calibration Settings You can change the calibration settings such as the measurement source, the port where the densitometer is connected, and the calibration tolerance level.
Calibration Setting Meaning Setting Meaning Measurement Source A measurement source consists of the following: DP2 (KODAK PROFESSIONAL Digital Print Production Software) Select the check box to use DP2 with the ML-500. This places a copy of the LUTs as files where DP2 can use them. Calibration Tolerance Level Select a tolerance level of Loose, Normal, or Tight. This option is disabled if Visual is selected in the Measurement Source list.
Calibration Working with Media and Printers 2. Select a Media type. Adding New Media 3. Select an XtraLife setting, either Glossy or Matte. 4. Select a Media Width. Add new media: ✔ When the media you want to use is not in the database ✔ When adding a new media type To add new media: 1. From the Calibration menu select New, then select Media. Contents Back Next 5. Click OK. When a new media type is created, the name is added to all media type drop-down lists for the selected printer.
Calibration Importing a Media Type Catalog Deleting Media from the Media List You can import a new media catalog whenever a new media catalog becomes available from Kodak. The catalog lists all media that can be used by the ML-500 printer. Importing a new media catalog does not change the name of any media or any calibration history. The media name is based on the ribbon set, media type, media width, and XtraLife settings when you add the media.
Calibration Importing a Printer Model Catalog Viewing Calibration Data Graphs When printer models change or when new printer models are introduced, a new printer model catalog can be imported. The Calibration application obtains the new printer information from the printer model catalog and uses this information for all printers of the same type. Kodak may update the printer model catalog on occasion. 1. Copy the new printer model catalog to the following location: \Cal2000\MDB\.
Calibration Reference Approved Densitometers Completed Calibration Event Use densitometers with a Status A spectral response with the ML-500 calibration application. Densitometers with a Status T spectral response are unsuitable for the ML-500 calibration application. A completed calibration event is any calibration target that has been printed and analyzed. You can reanalyze a target if the following are true: ✔ The calibration target was analyzed visually.
Calibration Calibration Tolerance Level The calibration tolerance level defines the range within which a target must fall to be considered acceptable. There are three options for tolerance from which you can choose based on the accuracy and repeatability of the densitometer and printer: ✔ Loose: Use if you may be redoing the calibration needlessly because of inherent statistical noise in the system.
Printer Drivers Image Color Management (ICM) Printer Drivers Printer drivers are used to print to the ML-500 printer from applications on your system. Image Color Management (ICM) is a MICROSOFT WINDOWS color management tool that is part of the WINDOWS operating systems. ICM lets you match the colors on your monitor with the colors on the printed page.
Printer Drivers WINDOWS XP / WINDOWS 2000 Operating Systems Displaying the Printing Preferences Screen Removing a Printer Driver 1. From the Start menu select Settings, then select Printers. 2. Select the ML-500 printer. 3. From the File menu select Delete. 4. Click Yes for the prompt. When you access the Printing Preferences screen through the Start menu, you can change settings for print jobs in all applications.
Printer Drivers To Change Settings for All Print Jobs 2. Click the Layout tab. 1. From the Start menu select Settings, then select Printers. 2. Right-click the ML-500 printer and select Printing Preferences. To Change Settings for the Current Print Job 1. From the File menu select Print. 2. Right-click the ML-500 printer and select Printing Preferences. Laying Out the Page You can select portrait or landscape orientation for your document page. 1. Display the Printing Preferences screen (see page 95).
Printer Drivers Scaling a Document Page 3. Click Advanced. You can scale a document page by a specified percentage between 10% and 400%. 1. Display the Printing Preferences screen (see page 95). 4. Expand the Document Options, Printer Features, if necessary. 5. Select the desired scaling percentage. 2. Click the Layout or Paper/Quality tab. 6. Click OK.
Printer Drivers Creating a Custom Form 3. Select the Forms tab then select the Create a New Form check box. You can create a custom paper size using WINDOWS functionality, then select the paper size when you print using the ML-500 driver. 1. From the Start menu select Settings, then select Printers. 2. From the File menu select Server Properties or right-click an open area in the window and select Server Properties. .
Printer Drivers 4. Enter the Form Description and Paper Size. One of the dimensions must be 8.53 in. (21.67 cm). The left, right, top, and bottom margins must all be 0.00. To Use a custom form from an application: 1. From the File menu select Print. 2. Right-click the ML-500 printer, select Properties, then click Advanced. 5. Click OK. Contents 3. Select the custom paper size from the Paper Size drop-down list, then click OK.
Printer Drivers Using Package Printing Using Standard Printing Packages With package printing, you send a single document page to the printer and get multiple document page sizes on your print. For example, if you select the package "5 x 7 in. and 3.5 x 5 in. and Wallets," your print contains one 5 x 7 in. print, one 3.5 x 5 in. print, and a number of wallet size prints (depending upon the paper size selected).
Printer Drivers 6. Click the Packages tab. 7. Select Package as the Print format. 8. From the drop-down list, select a standard package. 4. Select the 8.5 x 14 in. paper size. You must use this size for all standard packages. NOTE: Custom packages may require different paper sizes. 5. Click OK. 9. Click OK.
Printer Drivers Using Custom Printing Packages 7. Check for any page size mismatch messages. If necessary, select a different page size. To create a custom printing package or layout, see page 127. 1. Display the Printing Preferences screen (see page 95). If only a portion of a custom package fits on the page, the partial image is outlined in red, and a message appears indicating that some images in the custom package file are off the page. 2. Click the Packages tab. 3.
Printer Drivers Cutting Prints 5. Under Cutter, select an option. (See page 31.) WARNING: The cutter is very sharp and can cause injury. Stay away from the cutter when the printer is running. 1. Display the Printing Preferences screen (see page 95). 2. Click the Layout or Paper/Quality tab. 3. Click Advanced. 4. Expand Document Options, Printer Features, if necessary. 6. Click OK.
Printer Drivers Adding a Logo to a Page 4. Locate and select the file for your logo. 1. Display the Printing Preferences screen (see page 95). 2. Click the Logo tab. NOTE: The logo must be either an uncompressed TIFF (.tif) or a bitmap (.bmp) file. Do not compress the logo file. If you select a compressed file, a message appears indicating that the driver is unable to read the logo file and that the file format is incorrect. 5. Click OK to open and read the file. 6. Click OK.
Printer Drivers WINDOWS 98/ME Operating Systems When you access the Properties screen through the Start menu, you can change settings for print jobs in all applications. Displaying the Properties Screen When you access the Properties screen while printing a file from an application, you can change settings for that print job only. To Change Settings for All Print Jobs 1. From the Start menu select Settings, then select Printers. 2. Right-click the ML-500 printer and select Properties.
Printer Drivers Laying Out the Page 3. Select the orientation (Portrait or Landscape). 4. Select the desired scaling percentage (10% - 400%). You can select the orientation for your page. 1. Display the Properties screen (see page 95). 5. Click OK. 2. Click the Layout tab.
Printer Drivers Using Package Printing Using Standard Printing Packages With package printing, you send a single document page to the printer and get multiple document page sizes on your print. For example, if you select the package "5 x 7 in. and 3.5 x 5 in. and Wallets," your print contains one 5 x 7 in. print, one 3.5 x 5 in. print, and a number of wallet size prints (depending upon the paper size selected). See page 100 for a description of standard printing packages. 1.
Printer Drivers 3. Select the 8.5 x 14 in. paper size. You must use this size for all standard packages. IMPORTANT: You must use this size for all standard packages. 4. Click Apply. 5. Click the Layout tab. 6. Select Package as the Print format. 7. From the drop-down list, select a standard package. 8. Click OK.
Printer Drivers Using Custom Printing Packages 7. Check for any page size mismatch messages. If necessary, select a different page size. To create a custom printing package or layout, see page 127. 1. Display the Properties screen (see page 95). If only a portion of a custom package fits on the page, the partial image is outlined in red, and a message appears indicating that some images in the custom package file are off the page. 2. Click the Layout tab. 3. Select Package as the Print format. 4.
Printer Drivers Cutting Prints Adding a Logo to a Page 1. Display the Properties screen (see page 95). WARNING: The cutter is very sharp and can cause injury. Stay away from the cutter when the printer is running. 2. Click the Logo tab. 1. Display the Properties screen (see page 95). 2. Click the Media tab. 3. Next to Cutter, select an option. (See page 31.) 4. Click OK.
Printer Drivers MACINTOSH Operating System 3. Click Browse. 4. Locate and select the file with your logo. NOTE: The logo must be either an uncompressed TIFF (.tif) or a bitmap (.bmp) file. Do not compress the logo file. If you select a compressed file, a message appears indicating that the driver is unable to read the logo file and that the file format is incorrect. Color management is built into the MACINTOSH printer driver and is always used. Laying Out the Page 5. Click OK to open and read the file.
Printer Drivers 2. From the Settings menu select Page Attributes. Adding a Custom Paper Size 3. From the Format for menu select ML-500. 4. From the Paper Size menu, select an option: ✔ 8.5 x 7 in. (216 x 178 mm) ✔ 8.5 x 11 in. (216 x 279 mm) ✔ 8.5 x 12 in. (216 x 305 mm) ✔ 8.5 x 14 in. (216 x 355 mm) Custom papers are included at the bottom of the list. The default setting (as shipped) is 8.5 x 11 in. NOTE: This feature is available only in MAC OS 10.2.3 and higher. 1.
Printer Drivers Using the Print Dialog Box 2. Select the desired panel from the list. 1. Open a document. From the File menu select Print.
Printer Drivers The following panels are available ✔ Copies & Pages ✔ Layout ✔ Output Options ✔ Logo ✔ Printer Options ✔ Packages ✔ Summary Viewing a Summary of Print Settings ✔ On the Print dialog box (see page 113), select the Summary panel. The current settings are displayed. 3. Change settings, as needed. 4. Click Print.
Printer Drivers Adding a Logo to a Page 2. Check Use Logo. 3. Click Select. 1. On the Print dialog box (see page 113) select the Logo panel. 4. Select the file for your logo NOTE: The logo must be PICT file. 5. Click Open. The logo appears in the Logo preview window. Placing the Logo To change vertical and horizontal position, enter values from 0 to 100.
Printer Drivers Editing Opacity ✔ To edit the opacity of the logo, enter a value from 1 to 100% (the larger the percentage, the greater the opacity). Editing Scale ✔ To edit the scale of the logo, enter a value from 1 to 400% (or until the image exceeds the imageable area, whichever comes first). Using Printer Options On the Printer Options Panel you can select the paper finish, select cutting options for the printer, and sharpen prints. 6. Click Print.
Printer Drivers Choosing Glossy or Matte Cutting Prints 1. On the Print dialog box (see page 113) select the Printer Options panel (see page 116). WARNING: The cutter is very sharp and can cause injury. Stay away from the cutter when the printer is running. 2. Select the XtraLife menu. 3. Select an option: ✔ Glossy – invokes the "gloss" ICM profile in the print job ✔ Matte – invokes the "matte" ICM profile in the print job 1.
Printer Drivers Sharpening Prints 1. On the Print dialog box (see page 113) select the Printer Options panel (see page 116). 2. Click the Sharpen pull-down menu. 3. Select an option: ✔ None – no sharpening in the print job ✔ Normal – normal sharpening in the print job ✔ High – high sharpening in the print job 4. Click Print. NOTE: The default setting (as shipped) is Normal sharpening.
Printer Drivers Using Package Printing Using Standard Printing Packages With package printing, you send a single document page to the printer and get multiple document page sizes on your print. For example, if you select the package "5 x 7 in. and 3.5 x 5 in. and Wallets," your print contains one 5 x 7 in. print, one 3.5 x 5 in. print, and a number of wallet size prints. See page 100 for a description of standard printing packages. 1. Verify that 8.5 x 14 paper size is selected (see page 111).
Printer Drivers 2. On the Print dialog box (see page 113) select the Packages panel. Using Custom Printing Packages To create a custom printing package, see page 127. 1. On the Print dialog box (see page 113) select the Package panel. 2. Click Select Custom Package. 3. Select the custom package file you wish to use. NOTE: If a custom package has previously been selected, it appears at the bottom of the list. 4. Click Print. The preview window changes to represent the actual custom package layout. 3.
Getting Help Using Online Help Getting Help In addition to this User’s Guide, the following resources provide information about the ML-500 Utilities: Help is available for the following: ✔ Online Help ✔ ML-500 Utilities ✔ KODAK PROFESSIONAL ML-500 Digital Photo Print System CD contains printable and multimedia documentation ✔ Print Server ✔ KODAK PROFESSIONAL ML-500 Digital Photo Print System Web site: http://www.kodak.com/global/en/service/softw are/ML500/ml500Software.
Getting Help Viewing a Help System With the exception of the Printer Drivers, view Help as described below: 1. In the current window, select the Help for that application from the Help menu. For example, from the Help menu select Configuration Help, then select Help Topics. 2. Use the Contents, Index, or Search tabs to navigate to the desired Help topic.
Getting Help Viewing Help for Printer Drivers Using Context Sensitive Help WINDOWS: 1. In any application, select Print from the File menu. WINDOWS: Do one of the following to view a description of a window item: 2. Select the ML-500 printer then click Properties. ✔ Right-click a window item (for example, a button or list item) then click the What’s This? popup. 3. Click the Help button. MACINTOSH: ✔ Launch the Help Center and select ML-500 Help.
Troubleshooting Troubleshooting Error Message or Problem Reason for Error Message indicates that the ML-500 is out of ribbon Check the following (Refer to the ML-500 Operator’s Guide): ✔ Is the platen assembly screwed in completely? ✔ Is the ribbon installed properly? ✔ Is the ribbon wound properly? ✔ Is the paper threaded properly over all of the rollers? No source folder appears during port monitor installation You must run the Print Server application before installing the port monitor.
Troubleshooting Error Message or Problem Reason for Error Driver can’t read logo file. Format is incorrect. Logo files must not be compressed. They can be uncompressed TIFF (.tif) or bitmap (.bmp). Job isn’t printing or blank sheet is printed When you move, delete, or edit a print job, printing is suspended. Complete the task and printing resumes automatically.
Troubleshooting Error Message or Problem Reason for Error When printing from ADOBE PHOTOSHOP, To resolve (in PHOTOSHOP), select Page Setup. from the File 8.5 x 14 images are cropped or blank pages are menu, select the ML-500 printer, and select a new page size. printed. Custom form does not appear in the Paper Size One of the dimensions must be 8.53 in. (21.67 cm). drop-down list (see page 99).
Appendix A Appendix A Creating Custom Printing Packages or Layouts Appendix A: For each image in the job, use pixels to indicate: You may create a custom package or layout template file using any word processing application and then save it as a text file. Use pixels as the units for the image size, and specify where you want the images to appear on the printed page. When you print your job, select the custom package template file, and apply it to your print job.
Appendix A Specifications for creating a template file Use the following format to define the placeholders for the images in your custom template: ✔ The # sign designates the beginning of a comment. The end of a comment is indicated by (End of Line, the Enter or Return key). Comments can appear anywhere. ✔ The upper left corner of image N is identified by xN, yN as referenced from the 0,0 datum of the printable area of the page. Type: KPKG Version 1.
Glossary GlossaryGlossary Aim The desired response of the printer. Client systems Remote computer systems that are networked to the server system that is connected to the ML-500 printer. If you will be using the ML-500 WINDOWS printer driver to print, the driver must be installed on the client systems. Command file (*.kmd) Specifies an image to be printed and the job settings to apply to that image. Glossy A shiny finish that coats the top surface of the paper. Hot folder See Source folder.
Glossary Media name The media name is a combination of several media properties: ribbon set, paper type, XtraLife type (glossy or matte), and media width. Package A single print with multiple document page sizes, for example, one 5 x 7 in. print, one 3.5 x 5 in. print, and a number of wallet size prints. Printer control panel The display panel on the front of the ML-500 printer that provides printer status and error information. Print job A block of information that is assigned a number in the print queue.
Index A adding a logo to a page, 104, 110, 115 adding media, 89 adding the ML-500 printer to the printer list (MACINTOSH), 19 analyzing a calibration target, 80 arranging open applications, 23 attended printing, 66 when to calibrate, 75 Calibration application closing, 77 starting, 75 Status bar showing and hiding, 76 Tool bar, 76 showing or hiding, 76 using, 76 calibration target analyzing, 80 printing, 79 catalog media type, 90 printer model, 91 changing the source folder, 44 closing Calibration applicat
Index rules, 72 complete calibration analysis, 86 completed calibration event, 92 Configuration application closing, 26 refreshing the screen, 26 starting, 25 Status bar, 26 showing or hiding, 26 copies, selecting the number to print, 54 cutter choosing default settings, 31 cutter and print head adjusting registration, 32 cutting prints, 103, 110, 117 E editing configuration for calibration, 87 editing the printer list, 34 enabling file services (MACINTOSH), 18 error history, viewing, 36 exiting ML-500 Uti
Index I ICM, 94 identification information for printer, 35 Image Color Management, 94 importing media type catalog, 90 printer model catalog, 91 installing ML-500 Utilities, 1 port monitor and drivers, 7 port monitor on the server, 8 installing on the client, 14 system requirements, 7 MACINTOSH printer driver see printer drivers, 111 media adding, 89 and printer status, checking, 36 checking status, 35 deleting from media list, 90 supply, checking, 37 media low threshold, setting, 29 media type catalog, im
Index O online help, 121 orientation, selecting, 112 overview Calibration, 75 Print Server, 25 printing, 45 changing, 52 print jobs creating manually, 47 rearranging the order, 63 removing from queue, 62 print queue adding jobs, 45 rearranging jobs, 63 removing jobs from, 62 setting limits, 68 Print Server application closing, 43 overview, 25 starting, 41 Status bar, 42 showing and hiding, 42 Tool bar, 43 using, 43 printer checking status, 36 checking usage, 37 identification, 35 selecting, 23 when to cali
Index adding a logo to a page, 115 choosing glossy or matte, 117 cutting prints, 117 laying out the page, 111 package printing, 119 system requirements, 111 using the Print dialog box, 113 viewing a summary of print settings, 114 WINDOWS 98 / ME, 105 cutting prints, 110 displaying the Properties screen, 105 laying out the page, 105 package printing, 107 WINDOWS XP / WINDOWS 2000, 95 adding a logo to a page, 104, 110 cutting prints, 103, 110 displaying the Printing Preferences screen, 95 laying out the page,
Index selecting a startup state, 68 setting print queue limits, 68 setting up the log file, 44 setting print queue limits, 68 settings calibration, changing, 87 print jobs, 48 sharing the server’s source folder (MACINTOSH), 18 sharpening images, 56, 118 source folder, selecting, 44 starting Calibration application, 75 Configuration application, 25 ML-500 applications, 22 ML-500 Utilities, 20 Print Server application, 41 starting point for calibration, selecting, 78 startup state, selecting for print server,
Index V viewing open applications, 23 W WINDOWS 2000/XP driver installing on the server, 10 system requirements, 5 WINDOWS 98/ME driver installing on the server, 12 system requirements, 6 WINDOWS drivers installing on the client, 13 WINDOWS NT driver installing on the server, 12 system requirements, 6 X XtraLife option setting (WINDOWS), 16 XtraLife ribbon type, selecting, 30 Contents Back Next Index Index-7