KODAK EKTAPRO 3020 4020 5020 7020 9020 Slide Projector Bedienungsanleitung Instruction Manual Mode d’emploi Manual de Instrucciones Istruzioni per l’uso
Projector-Features 1 2 3 4 5 6 7 8 19 20 21 22 23 24 25 26 27 28 29 30 31 32 33 34 35 36 20 Focusing buttons Standby button Lamp economy switch and High Light (EKTAPRO 7020, 9020) Fan (air inlet) Interval Timer (EKTAPRO 5020, 9020) Autofocus - on/off switch (EKTAPRO Open the cover flap. Here you will find illustrations of the projector. The figures have also been incorporated into the op-erating instructions to enable quick and exact identification of the individual projector features.
Electrical Approvals and Conformity Mark Electrical Approvals The KODAK EKTAPRO 3020/4020/5020/7020/9020 Slide Projector complies with International Safety requirements and bears the following safety marks: UL (Underwriter Laboratories Inc.) CSA (Canadian Standards Association) VDE (Verband Deutscher Elektrotechniker) CE Conformity Mark To show compliance with EMV-Directive 89/336/EEC and product safety requirements, the slide projector bears the CE mark.
Important Safety Precautions When using your equipment, basic safety precautions should always be followed, including the following: 1. Read and understand all instructions before using. 2. Always use the correct voltage, as described on page 24. Incorrect voltage can lead to malfunctions in the projector. 3. Close supervision is necessary when any appliance is used by or near children, or others who may not understand the need for the following precautions.
Introduction W elcome to the world of the KODAK EKTAPRO Slide Projectors. You are, with your EKTAPRO Slide Projector, holding one of the newest generation KODAK projectors. It will certainly help you meet your current and future 35 mm slide projection challenges. A few benefits of your new KODAK EKTAPRO Slide Projector are listed below. We wish you much pleasure in presenting with this projector.
Switching-on the projector Switching- on the projector Check voltage setting EKTAPRO Slide Projectors will be exported throughout the world to countries with differing mains voltages. The projectors are already set during manufacture to a fixed mains voltage. Shipments to countries with 100 or 120 V mains will be equipped with a 4 A slow blow/ 250 V fuse. A spare fuse for replacement is also supplied. Shipments to countries with 220, 230 or 240 V mains will be equipped with a T 2A L/ 250 V fuse.
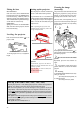
Extra Bright Lamp Module - Important Hints Loading and installing the slide tray 1. Check that the baseplate of the slide tray is locked into zero-position and cannot be rotated. 2. 2. Load the slides upside down for normal front projection. With the higher light ouput of the Extra Bright Lamp Module the temperature in the slide gate rises. To enable a smooth operation following hints should be considered: 1. Use only light respectively light gray slide mounts (e.g. Wess slide mounts).
Fitting the lens Setting up the projector Gear rack lenses: Gear rack lenses (such as KODAK Slide Projection FF Lenses) are pushed into the lens mount housing. A slide tray index (80 slides) for copying can be found on page 86. This is ideal for archiving and an index copy can be made for each slide tray. Spiral lenses: Spiral grooved lenses are screwed clockwise (from front of the projector) into the lens mount housing. Place the projector on a firm, vibration free base for stable and smooth operation.
Operation EKTAPRO 5020 and 9020 Projector: Focusing with the autofocus Manual refocusing during projection is no longer necessary as the built-in autofocus device will automatically give the best definition. However, before you start, the first slide has to be manually focused by turning the knob for gear rack lenses (11) or by turning the spiral lens (the lens mount should be about in middle position) : 1. Slide changing I. Using the buttons on the projector or remote control* II.
Standby Function III. With the Autotimer function via IR remote control (EKTAPRO 7020 and 9020) Automatic slide shows can be programmed directly via remote control with the Autotimer function. You can input times between 1 and 60 seconds! Use the number combinations 601 - 660. Then use the <*> key to confirm. The first slide is then transported immediately, the next one in the preprogrammed time. By inputting <600> and <*> you switch the autotimer off again (see also separate manual).
Changing the slide tray (in zero position) Removing the slide tray (in any position) Always lift off the slide tray in the zero position. The zero positioning indicator (24) lights up when the slide tray transport ring is in the zero position. In an emergency, e.g. transport failure, the tray can be removed from the projector in any position: 2. Move tray to zero position: a) Using the slide change button on your projector or remote control units Hold the slide transport-backwards button down.
EKTAPRO 4020/5020/ 7020/9020 Projector: Lamp failure indicator Your KODAK EKTAPRO Slide Projector is provided with an automatic lamp changer module (20) (also available as an accessory, see page 35). Should the projection lamp (L1) fail, the system automatically activates the second projection lamp (L2). Centring of the lamp is not necessary because each lamp is prealigned in its own reflector.
Simultaneous Projection 1. With the KODAK EKTAPRO Twin Socket Adapter (accessory) You can connect two projectors in parallel using the Twin Socket Adapter and an EKTAPRO Twin Socket Connecting cable (accessory). The adapter is inserted into the remote control socket (25). The cable connects the Twin Socket Adapter with the remote control socket of the second projector (see illustration). You control the projectors with the cable remote control as shown in the drawing.
Service Continuous projection You can either run automatic slide shows using the built-in timer (EKTAPRO 5020 and 9020) or via the IR remote control using the Autotimer function (EKTAPRO 7020 and 9020 -in single or in the MASTER/ SLAVE combination). This makes slide change times between 1 and 60 seconds possible. For further information please see under Timer, page 27 or in the separate manual under "Autotimer".
Servicing Maintenance and guarantee Replacement of fuses WARNING: Always switch off the projector and unplug the mains lead before replacing a fuse! Avoid the risk of fire, replace only with a fuse of same type and rating! The electric circuits in your projector are protected by three fuses which you can replace yourself. The casing need not, therefore, be opened. Replacement of primary circuit fuses 1. Pull out the fuse link compartment (31).
Possible problems during operation 3UREOHP 3RVVLEOH UHDVRQV +HOS After switching on, the projector is not operable. No defect is indicated by the red LED. Fuse (primary or secondary) blown. Check fuse and possibly replace it. For UK users: Check 13 A plug fuse also. EKTAPRO 7020/9020: After switching on, the tray is moved (to 0-position) and the projector is switched off. The projector is in "silent mode" (no defect). Press transport button and the projector will leave the silent mode (see.
Accessories KODAK Slide Projection FF Lenses (lens summary, page 85) KODAK EKTAPRO Lens Support -the lens support for large and heavy lenses. European CAT No. 715 1335 KODAK EKTAPRO 80 Slide Tray with transparent cover. European CAT No. 712 8580 Trays are available for holding 80 slides. KODAK CAROUSEL TRANSVUE 140 Slide Tray European CAT No. 184 0768 (not widely available in Europe). KODAK EKTAPRO Cable Remote (4 m) European CAT No. 712 1080 Control of slide change, focus and standby.
Technical Data Mechanical System Projector Measurements (see page 90): Length: 340 mm Width: 336 mm Height: 140 mm Height with tray: 175 mm Weight without tray: approx. 9000 g Weight of tray without slides: 540 g Slide Formats: 24 x 36 mm 4 x 4 (superslide) with special condenser Slide Trays: KODAK EKTAPRO 80 Slide Tray for holding 80 slides with a maximum slide mount thickness of 3.2 mm. KODAK CAROUSEL TRANSVUE 140 Slide Tray for holding 140 slides with a maximum slide mount thickness of 1.2 mm.
Electrical System Control system Power Voltage: AC ONLY! Different power voltages are adjustable via the removable fuse link. (120, 220, 230, 240 V) External: P-Bus-in 9-pin Sub-D female connector (V.24/V.28 standard interface) P-Bus-out 9-pin Sub D male connector (V.24/V.28 standard interface).
Diamagazin Register-80 Tray Index Card-80 Identification magasin 80 Indice para Bandeja-80 Sequenza diapositive nel caricatore da 80 Kodak 1 21 41 61 2 22 42 62 3 23 43 63 4 24 44 64 5 25 45 65 6 26 46 66 7 27 47 67 8 28 48 68 9 29 49 69 10 30 50 70 11 31 51 71 12 32 52 72 13 33 53 73 14 34 54 74 15 35 55 75 16 36 56 76 17 37 57 77 18 38 58 78 19 39 59 79 20 40 60 80 86 "
Projektor-Übersicht KODAK Projektionsobjektive KODAK Projection Lenses Objectifs KODAK Objetivos KODAK Obiettivi Kodak .2'$.
Projektionsbildweiten Dimensions des vues projétées Projected picture sizes Anchura de la imagen proyectada Dimensioni dell'immagine a c 88
Projektionsbildweiten Dimensions des vues projétées Projected picture sizes Anchura de la imagen proyectada Dimensioni dell'immagine b1 = 35 mm b2 = 23 mm b3 = 38 mm a c a c f = 36 mm 89
1 90 7 5
Austria: Kodak Gesellschaft mbH Albert-Schweitzer-Gasse 4 A-1148 Wien Germany: Kodak Aktiengesellschaft D-70323 Stuttgart Australia: Kodak Pty. Ltd. P.O. Box 90 Coburg 3058 Belgium: N.V. Kodak S.A. Steenstraat 20 1800 Konigslo-Vilvoorde Denmark: Kodak A/S Dybendal Alle 10 DK-2630 Taastrup England: Kodak Limited P.O. Box 66 Hemel Hempstead Herts. HP1 1JU Netherlands: Kodak Nederland BV Zeisterweg 1 Odijk Postbus 1000 3970 BA Driebergen Finland: KODAK OY P.O.