
Owner's Manual


CHARGING
THE PROJECTOR
Before using the proiector,
connect
it
to
the charger and allow
it
to
fully charge.
Always use the original charger that was provided
to
ensure proper charging.
If the red indicator
LED
light
1s
flashing, you see a red battery icon
in
the upper
right corner
of
the screen,
or
you receive a Low Battery notification on-screen,
this means that the battery
is
low. While the proiector
is
charging, the indicator
LED
will be a solid red light. Once charging completes, the indicator
LED
will
change
to
a solid white light.
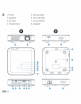
To charge the projector,
connect
the charging cable
to
the
USB-C
charging
port
or
connect
the
DC
adapter
to
the
DC
port.
POWERING THE PROJECTOR
ON/OFF
To
turn the projector on
or
off, hold the power button on the side for
three (3) seconds.
NOTE: The projector can be turned on
or
off with the remote control by
pressing the
POWER
button when projector
1s
connected
to
a power adapter.
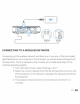
ADJUSTING THE FOCUS
If the image on the screen appears fuzzy
or
unfocused when you turn the
projector on, use the focus wheel on the side
to
correct the image. Turn the
wheel
up
or
down until the image appears sharp and clear.
9I
EN