
User Manual

79
5.6.2.3 Operation
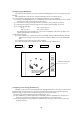
(1) Acquisition of a target
Firstly, select the target to track. Place the cursor on the target image and acquire it by using the ACQ (ac-
quisition) function.
Press the ACQ key. When operating from the MENU, place the cursor on NAVI/ACQ and press the ENT
key.
Select the target when it is displayed clearly and no other targets are displayed around it. If other targets are
displayed around it, the ATA may track a different one.
All targets acquired by ATA are identified by the numbers, from 0 to 9. These figures will be shown in the
upper right window on the screen. A vacant column shown like "-" indicates no target being acquired.
Before starting selection, use the TGT NUM (target number) function so that "-" is highlighted.
The TGT NUM function is used to change the target numbers. The target number will not change auto-
matically unless this function is used.
Press the TGT NUM key. When operating from the MENU, place the cursor on NAV/TGT NUM and press
the ENT key.
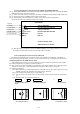
When ATA starts acquisition, a symbol appears at the cursor position on the screen, and the target number is
shown on the lower right side of the symbol.
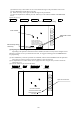
(2) Tracking the target
When the operator acquired the target by the procedure (1), ATA automatically detects the target to start
automatic tracking. As soon as stable tracking is established, a vector will be developed on the screen.
The target tracking is not relevant to the range scale in use, i.e. the tracking continues even if the range scale
is changed beyond the viewable ranges for the target.
Note: A tracked small target may be lost when the range scale is changed to shorter pulse ranges, causing
the target signal level to be decreased. This may lead to a tracking failure on the target that will become a lost
target.
(3) Canceling target tracking
To cancel tracking, use the DEL (delete) function. The number highlighted on the upper right of the screen
will disappear. If ALL DEL (delete all) is selected, the ATA will cancel tracking of all targets.
Press the soft key if the DEL function has been set.
When operating from the MENU, place the cursor on NAVI/DEL or NAVI/ALL DEL and press the ENT
key. When the radar is set to the SY'BY mode, the ATA will cancel tracking of all targets.
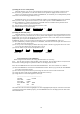
(4) Data display
When necessary, numerical data of the current tracking target can be displayed in the data display window.
Use the DATA function to display the numerical data of the number highlighted on the upper right corner of
the screen. Press the soft key if the DATA function has been set.
When operating from the MENU, place the cursor on NAVI/DATA and press the ENT key.
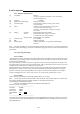
Items to be displayed are as follows.
Target number: TGT NO.x The number of the target currently displayed.
Vector time: TIME xx MIN. Setting time to display vector length. (Speed x Time=vector length)
Vector mode: TRUE or REL Display mode of vector and data. TRUE and REL represent true and
relative speeds, respectively.
Target data: BRG (bearing), DIST (distance), CRS (course), SPD (speed),
CPA (closest point of approach) and
TCPA (time required for the ship to reach the CPA)
State: A collision or lost alarm will appear according to
the state of the target.
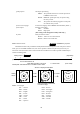
Example:
------------------------------------------------------------------------------------------------------------
| TGT No.x ALM LOST TIME xxMIN TRUE |
------------------------------------------------------------------------------------------------------------
| BRG 123.4DEG CRS 234.5DEG CPA 12.3NM |
| DIST 12.3NM SPD 10.0KT TCPA 12.3MIN |
-------------------------------------------------------------------------------------------------------------