
User Manual

49
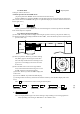
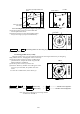
(c) Measuring
Perform the operations in the above mentioned "Common operation for the MARK menu" and
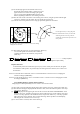
"measuring the distance(VRM2)", and place the VRM2 on other target.
VRM2 will be shown on the screen around the fixed cross cursor.
The distance display " 2 xx. NM" will be shown in the lower right corner of the screen, showing the
distance between the two targets.
Note: EBL2 and VRM2 does not follow to "ZOOM" and "OFF-C" function.
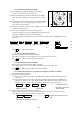
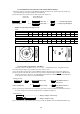
5.5.1.6 Measuring the angle between two points (FL EBL2)
(a) Preparation for the measurement
(1) Use the up-down cursor keys to select FL EBL2 from the pull-down display items, and press the
"ENT" key.
(2) Use the up-down cursor keys to select ON from the ON/OFF display beside the FL EBL2 items, and
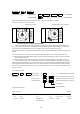
press the "ENT" key. “SET START POINT” is displayed and a small cross mark appears. (Once
this is set, the "ON" state continues unless changes are made.)
Up/Down → ENT → Up/Down → ENT ---------------------- FL EBL2 is turned
ON and
(Select FL EBL2) (Select ON) the small cross
mark appears.
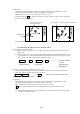
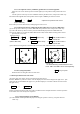
(b) Setting a reference point for measurement of the angle.
Use the left-right and up-down cursor keys to place the small cross mark on one of the two echoes
whose angle will be measured, and press the "ENT" key.
Up/Down & Left/Right → -------- ENT Criterion of the reference point is set.
(Place the cross cursor on an echo)
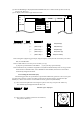
(c) Measuring
Perform the operations in the above mentioned "Common operation for the MARK menu" and
"measuring the distance(EBL2)", and place the EBL2 on other echo.
EBL2 is displayed on the screen based on the placed fixed cross cursor.
" 2 xx. xx" which is displayed at the lower right will be the angle between the two points.
Note: The displayed EBL angle is relative to heading or true to north, depends on the setting of "EBL
BRG" in the "SETUP" menu.
.75
.25
HU
2 0.72NM
Place the VRM2 on other target
SET START POINT
.75
.25
HU
To measure the distance
between two targets
Small cross
mark
FL VRM2 Indication of VRM2
Center of VRM2