
User Manual


40
note: TM is valid on PPI screen only. The mode will change to NU on the other screen automatically.
Note: Refer to "5.5.2.1 Changing display mode (MODE)".
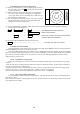
5.4.13 Guard Zone (GZ)
A function that sets a guard zone of any distance and any angle range, creating an alarm tone when either echoes
above a certain level exist (IN MODE) or no echoes exist(OUT MODE).
When you activate the GZ function with soft keys, the guard zone and ON/OFF settings can be made, however, the
guard zone mode (IN or OUT) must be set in the menu.
Note: Refer to "5.5.2.2 Guard Zone (GZ)".
(1) When you press the "GZ" key, the present mode setting will be displayed on the left side of the screen shown as GZ
IN. A small cross cursor for setting the guard zone will be displayed on the screen center while "SET CENTER
POINT" is displayed at the bottom, activating a guard zone setting state.
(2) Use the up-down/left-right cursor keys to move the cross cursor to the center of the warning zone to be set, and press
the "ENT" key.
(3) From the cross cursor position set in (2) above as the center, expand the guard zone towards further out of the range
with the up cursor key, and towards azimuth, use the right cursor key, thus forming a fan-shaped guard zone. To make
the warning zone smaller, press the down cursor key to reduce the range and press the left cursor key to reduce the
azimuth angle.
(4) Press the "ENT" key to fix the settings.
Press the GZ key twice to cancel the guard zone function.
GZ
→
Up/Down & Left/Right
→
ENT
→
Up/Down & Left/Right
→
ENT Setting completed
(Setting the center of GZ) (Setting the scope of GZ)
→
GZ -------------------------------------------------------------------------------------------Canceling GZ
<Silencing the audio alarm>
Press the "MENU" key or "ENT" key to silence the beep.
NOTE: Set the mode (IN or OUT) at the "GZ MODE" of the "PRESET2" function in the "CUSTOM" menu of the
"SETUP"
Set the alarm level (IN or OUT) at the "GZ LVL" of the "PRESET2" function in the "CUSTOM" menu of the
"SETUP"
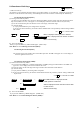
5.4.14 Off Center (OFF-C)
Own ship position can be offset to any desired point designated by the cross cursor within the screen.
Note: Refer to "5.5.2.3 Shifting display in specific direction (OFF-C)".
(1) When you press the "OFF-C" key, the sign OFF-C will be displayed in the upper right corner of the screen and "SET
OFF CENTER POINT" at the bottom of the screen, and setting is ready to be entered.
(2) Move the cross cursor with the cursor keys to move own ship’s position to an intended location, and press the "ENT"
key. Own ship’s position will be offset to the point as designated by the cursor. OFF-C is displayed in the upper
right corner of the screen, indicating the "OFF-C" state is entered.
(3) To cancel "OFF-C" function, press the "OFF-C" key.
(a) To set off-centering point, press relevant keys as follows:
OFF-C
→
Up/Down & Left/Right
→
ENT --------------- Fixes the off-centering point and exit the
off-centering state.
Note: VRM2 and EBL2 do not follow the off-centered picture
while they are floated. The function operates on PPI
screen only.
(b) To cancel the OFF-C function, press the OFF-C key again.
OFF-C The "OFF-C" display at the upper right disappears and function
returns to the ordinary state from the Off Center state.