
User Manual


42
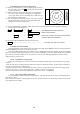
15 sec
→
30 sec
→
1 min
→
3 min
→
6 min
→
CONT
→
OFF
Note: The "OFF" state will not be displayed on the screen and the "TK xx " display will disappear.
5.4.19 Enlarging selected areas (ZOOM)
The video image shown around the cross cursor can be zoomed twice as large as normal one on the screen.
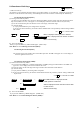
Press the "ZOOM" key to "ZOOM" ON. A small cross cursor and the sign "SET ZOOM POINT" will be displayed on the
screen center and at the bottom respectively, and the magnification point is to be set. Use cursor keys to move the cross
cursor to the point to be magnified and press the "ENT" key to complete the settings. The area around the cross cursor is
displayed in 2x magnification, with blinking "ZOOM" displayed at the screen upper right, indicating that a ZOOM dis-
play is being conducted.
To cancel the ZOOM function, press the "ZOOM" key again or change the range scale.
Note: Refer to "5.5.3.7 Enlarging selected areas (ZOOM)".
ZOOM
→
Up/Down & Left/Right
→
ENT --------------- ZOOM setting
(Move cross cursor)
→
(Select OFF)
→
ZOOM ZOOM canceled
Note1: VRM2 and EBL2 do not follow the ZOOM function during a floating state.
Note2: Normal screen returns when you change the range scale.
Note3: ZOOM function is unusable in 3D/PPI screen.
Note4: ZOOM function is unusable in OFF-C.
Note5: Center of ZOOM can be set to any desired position within the set range.
5.4.20 Increasing sensitivity (S/L)
The transmitting pulse length is automatically set as you change the range scale. However, on certain range scales, you
have an option to select the pulse length to shorter or longer pulse length. Select the pulse length according to the navi-
gational situation you are facing, shorter pulse lengths for better picture definition and longer pulse lengths for better
range performance. As an adverse effect, the shorter pulse lengths may sacrifice the range performance and in turn, the
longer pulse lengths lose the picture clarity compared with those selected as standard.
Press the "S/L" key to select the Pulse length (LONG or SHORT). The pulse length changes L (Long) and S (Short)
alternately.
Note: Refer to "5.5.3.8 Increasing the sensitivity (S/L)".
S/L
→
(Select SHORT)
→
Set to short pulse
→
or (Select LONG)
→
Set to long pulse
5.4.21 Switching the screen (SEL WIN)
On the PPI+PPI mode display, you need to select an activated screen first for subsequent key operations like range scale,
GAIN, STC, FTC, VRM and EBL.
For example, you want to change the range scale on the PPI+PPI screen. Press the “SEL WIN” key to select an active
screen. The range scale display will be reversed as a result, showing the screen is active. Press the UP or DOWN key to
change the range.
Note: Refer to "5.5.4.2 Switching screens on PPI/PPI screen ( SEL WIN )".
SEL WIN
→
(Select right screen)
→
Right screen activated
→
or (Select left screen)
→
Left screen activated