DOKuStar Validation for Ascent Capture User Manual Océ Document Technologies GmbH
Océ Document Technologies GmbH Max-Stromeyer-Straße 116 D-78467 Konstanz - Germany Phone: ++49(0)75 31/87-0 Fax; ++40(0)7531/87-4567 E-Mail: sales@odt-oce.com www.odt-oce.com The reproduction, transmission or use of this document or its contents is not permitted without express written authority. Offenders will be liable for damages. All rights, including rights created by patent grant or registration of a utility model or design, are reserved. Availability and changes of technical information reserved.
Contents Introduction 1 What is DOKuStar Validation for Ascent Capture?............................................................ 1 Installing.............................................................................................................................. 2 Registration ......................................................................................................................... 4 Overview 7 Using DOKuStar Validation for Ascent Capture .........................................
List of Shortcut Keys ........................................................................................................ 26 Controlling Project Window .................................................................................. 26 Controlling Image Window ................................................................................... 26 Controlling Index Fields ........................................................................................ 27 Controlling Table Fields ...............
Introduction What is DOKuStar Validation for Ascent Capture? DOKuStar Validation for Ascent Capture is a software module that links DOKuStar Validation into Ascent Capture as a custom module. DOKuStar Validation for Ascent Capture can be used in Ascent Capture Batch Classes like any other Ascent Capture queue. Typically, it would replace the Ascent Capture Validation queue, but it could also be used together with it.
Installing DOKuStar Validation for Ascent Capture has to be installed on the same computer than Ascent Capture. Installing of DOKuStar Validation for Ascent Capture requires Ascent Capture V5.0 or later and at least 100 MB of free memory. To install DOKuStar Validation for Ascent Capture, place the CD into the CD-ROM drive of your computer. If the CD-ROM drive has AutoPlay enabled installation will start automatically. If installation doesn't start automatically, start the program Setup.
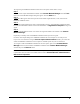
Figure 1-2: Specifying DOKuStar Validation stations You can select up to four DOKuStar Validation stations and the kind of the station, user controlled (default) or automatic. The dialog shows two check mark boxes for each validation station. If the first one is marked, the respective station will be installed. If the second one is also marked the respective station will be configured as an automatic station without user interface.
Registration From Ascent Captures point of view, DOKuStar Validation for Ascent Capture is a so called custom module. That is a module that is not a native part of Ascent Capture but is supplied by a third party, in this case by Océ Document Technologies. Before a custom module can be used, it must be registered first, so that Ascent Capture knows of its existence.
The registering of a DOKuStar Validation station in Ascent Capture will be done in 4 steps: Step 1 Start the Ascent Capture Administration module. Select Custom Module Manager from the Tools menu. The Custom Module Manager dialog box appears. Click the Add button. Step 2 A File Select Box appears. Select and open the custom module registration file (*.acm) of the desired DOKuStar Validation station. Step 3 The opened custom module appears in the Custom Modules window.
Overview Using DOKuStar Validation for Ascent Capture DOKuStar Validation for Ascent Capture can be used together or instead of the modules Ascent Capture Validation and Verification respectively. DOKuStar Validation for Ascent Capture offers more features than Ascent Capture verify modules and offers standardized user interfaces for programming (VBA scripting) and describing classes of input data objects (XML).
The DOKuStar Validation scripting files are stored in the folder(s) DOKuStarValidation, DOKuStarValidation_2 (and so on) in your Ascent Capture server directory AdminDB. These scripting files are named like the according Ascent Capture batch class with an extension .vps. Important Note: If an Ascent Capture batch class is renamed using the Ascent Capture Administration Module, this will not be perceived by DOKuStar Validation.
Starting DOKuStar Validation Both variants of DOKuStar Validation for Ascent Capture modules can be started in different ways. Start from the Ascent Capture Program Folder: If the default has not been changed during installation, you will find DOKuStar Validation for Ascent Capture in the Ascent Capture program folder. The stations are named ValidationAC, ValidationAC_2 and so on. Automatic stations of DOKuStar Validation are recognizable by the string (Automatic).
User Interface Automatic DOKuStar Validation After starting an automatic DOKuStar Validation station, the main window for an automatic station appears. The layout of this window is similar to that of the Ascent Capture Recognition Module. Figure 3-1: Automatic DOKuStar Validation main window The Event Log window displays messages about the batch progress. The amount of messages displayed here can be changed using the Logging command in the Options menu.
Figure 3-2: Window for logging settings Select the amount of messages you would like to be displayed in the main window. You can also direct all window output to a file named DOKuStarValidation.log. This file resides in the …\Local\ DOKuStarValidation… subdirectory of the Ascent Capture installation. The name of the subdirectory correspond to the installed DOKuStar Validation station. The log file is mainly for error tracking, so you normally choose the default setting Errors only.
By default, DOKuStar Validation will look every 60 seconds for new validation batches to process automatically. This polling interval can be changed using the Polling Interval command in the Options menu. Figure 3-3: Setting/changing the polling Interval The time until the next poll is always displayed in the status line of the main menu. In the Batch menu will find the commands Process Next, Terminate and Exit.
User Controlled DOKuStar Validation When a user controlled DOKuStar Validation station is started from the desktop or from the Ascent Capture program folder, an empty user controlled DOKuStar Validation window appears. From the Batch menu click on the Open command.
Figure 3-5: Screen layout of a user controlled DOKuStar Validation station While processing great tables, it will be helpful to switch to Table Mode. The following figure shows the default screen layout of a user controlled DOKuStar Validation station for Ascent Capture in Table Mode.
Note, that your main window of DOKuStar Validation for Ascent Capture may not look exactly like the one shown in Figure 3-5, or Figure 3-6 respectively. Most window elements can be shown or hidden. Also control views or toolbars may appear at different locations, because DOKuStar Validation allows you to resize, move or undock most windows. The default window layout can be restored using the Reset Layout command of the View menu.
Menu Bar Batch Menu The Batch menu contains commands for processing batches by DOKuStar Validation. With the Open command you will open and load a ready batch for processing by DOKuStar Validation. The Close command terminates the processing by DOKuStar Validation of the currently loaded batch. The Suspend command suspended the processing by DOKuStar Validation of the currently loaded batch. When suspending a batch a message box appears with the question "Save Changes?".
View Menu This menu allows to show or hide the different windows of the user interface (Project, Edit, Fields, Field Source, Information and Custom) and the Status Bar. By default all windows except the Custom window are shown. If the Custom window is activated, it will be docked at the bottom of the Validation window. It is only significant, if it is used by an add-in. Additional information you will find in the Programming Manual.
Tools Menu This menu will only be visible if the DOKuStar Validation station is started in Administration Mode. Picture 4-1: Commands of the Tools menu The command Visual Basic Editor starts VBA development environment that allows to generate project-specific scripts. For additional hints see the Programming Manual. The Logging...
The option Start Event Spy will start the Event Spy window. In this window all events fired by DOKuStar Validation will be listed. This will be helpful during development and test of Validation scripts.: Picture 4-3: Event Spy window Note: Changes of logging options will not take effect until the Validation station is restarted. With the commands Load workspace and Save workspace allow to save or load project-specific interface layouts.
Toolbars The toolbar icons provide shortcuts for frequently needed menu commands. The buttons or the group of buttons, can be separately switched on or off or dragged to another position for easy access. If the mouse cursor rests on a button of a toolbar, a tool tip text shows you the function of the button. This tool tip text you will also see on the Status Bar of the main window. Standard Toolbar This toolbar contains command buttons of the Batch, Edit, Tools and Help menus.
Image Toolbar This toolbar contains command buttons of the Image menu which will affect the Image Window.
Document Type Filter Toolbar With this toolbar you are able to control which form types will be selectable. The drop down list of this toolbar shows all form types of the current batch class and the keyword all. If a form type is selected, only this form type will be shown in the Edit or Project Window as long as function keys are used to step through the batch class. Other form types will be skipped.
View Windows The View Windows, considered together, will give you a good survey about the actual batch and of the currently processed form. The different windows will be described in the next sections. Project Explorer This window shows all forms of the currently processed batch class in a tree representation. The pages are represented by sub-nodes showing the image file name. When a batch is loaded, you will see all forms according to the batch in this view.
(Table) Edit Window The information shown in this window and the available edit operations depend on the selected edit mode: Index Field Edit Mode The window shows the character recognition results of index fields, at times associated with the image displayed in the Field Source Window. The default property of this window is "overwrite", typing any key will overwrite the whole displayed value. To switch from overwrite to insert mode, use the Left key or the Right key in case of simple index fields.
List of Shortcut Keys Controlling Project Window Shortcut Description Ctrl+F First document Ctrl+Shift+F Last document Ctrl+P Next document Crtl+Shift+P Previous document Ctrl+T First source Ctrl+Shift+T Last source Ctrl+B Next source Crtl+Shift+B Previous source Ctrl+G Next field, adjusted to selected filter(s) Crtl+Shift+G Previous field, adjusted to selected filter(s) Crtl+Del Delete documents Ctrl+R Reject document Controlling Image Window Shortcut Description Ctrl+Plus Zoom
Controlling Index Fields Shortcut Description Tab, Return Next field; if next field is table field focus will be on 1st element Shift+Tab Shift+Return Previous field; if previous field is table field focus will be on 1st element Pos1 Set cursor to the beginning of the index field End Set cursor to the end of the index field Right key Set cursor to the end of the index field or to the next right character in an index field respectively Left key Set cursor to the beginning of the index field or t
Editing Shortcut Description Ctrl+C Copy selection to clipboard Ctrl+X Cut selection and move it to clipboard Ctrl+V Insert contents of clipboard Ctrl+Z; Esc Undo last action Ctrl+Return New Line (not in case of table fields) Del Delete selection Ctrl+A Replace value by next alternative Crtl+Shift+A Replace value by previous alternative Miscellaneous Shortcut Description Ctrl+O Open batch Ctrl+L Close batch Ctrl+S Suspend batch F4 Toggle layout Table Mode/Normal and vice versa Al