DOKuStar Validation User Manual Océ Document Technologies GmbH
Océ Document Technologies GmbH Max-Stromeyer-Straße 116 D-78467 Konstanz - Germany Phone: ++49(0)75 31/87-0 Fax; ++40(0)7531/87-4567 E-Mail: sales@odt-oce.com www.odt-oce.com The reproduction, transmission or use of this document or its contents is not permitted without express written authority. Offenders will be liable for damages. All rights, including rights created by patent grant or registration of a utility model or design, are reserved. Availability and changes of technical information reserved.
Contents Introduction 1 What is DOKuStar Validation?........................................................................................... 1 Installing.............................................................................................................................. 1 Overview 3 Using DOKuStar Validation ............................................................................................... 3 DOKuStar Validation Interface..........................................................
List of Shortcut Keys 17 Controlling Project Window ............................................................................................. 17 Controlling the Image Window......................................................................................... 18 Controlling Index Fields ................................................................................................... 18 Controlling Table Fields .......................................................................................
Introduction What is DOKuStar Validation? DOKuStar Validation is a system independent product for indexing, capturing and editing of data in DMS applications. A powerful document model is integrated and complex data structures like tables are supported by DOKuStar Validation. In addition, Microsoft Visual Basic for Applications (VBA) is embedded into DOKuStar Validation as a programming interface.
Overview Using DOKuStar Validation DOKuStar Validation is used to validate and edit data in a workflow. DOKuStar Validation allows the testing and editing respectively of complex data structures like table fields and elements of addresses (Free Form Validating/Editing) and allows the processing of field alternatives. Of course simple index fields, document classes, and types will be processed by DOKuStar Validation.
Starting DOKuStar Validation Starting DOKuStar Validation in Administrator Mode To be able to develop project specific scripts you have to execute DOKuStar Validation in Administrator Mode. To do this, DOKuStar Validation must be started from a DOS prompt with the command line parameter –a: Open a DOS box and change to the directory .\bin in the installation directory of DOKuStar Validation. Enter dsval.exe –a.
In contrast to the User Mode of DOKuStar Validation, the button for Visual Basic Editor (VBA) is enabled in the tool bar and on the left bottom of the program window you will see the tabs Documents and Schema. The additional functions of DOKuStar Validation running in Administrator Mode for developing scripts are described in detail in the Programming Manual of DOKuStar Validation.
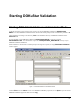
For validating click Open in the File menu. A file dialog box appears, that allows to select and open a DOKuStar Validation project file with extension .vpj. When a project file is opened, the project is loaded by DOKuStar Validation. You will see the project specification in the title bar: Figure 2-2: DOKuStar Validation with loaded project MyBatch The next step is to attach data to the project. This will be done by a script file, corresponding to the currently loaded project.
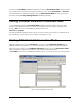
Screen Layout The following figure shows the screen layout of DOKuStar Validation. A project has already been loaded and data are attached to the project. Note, that the main window may not look exactly like the one shown in Figure 3-1 in your installation. Most window elements can be shown or hidden. Also control views or toolbars may appear at different positions, because DOKuStar Validation allows you to resize, move, or undock most windows.
Figure 3-2: Screen layout of DOKuStar Validation in Table Mode DOKuStar Validation User Manual Screen Layout • 9
Menu Bar File Menu The File menu contains commands for processing DOKuStar Validation project files. The New command creates a new validation project file with the extension .vpj. The Open loads an existing project file. The Close command terminates processing of the currently loaded project. The Save command saves the currently processed project file. The commands Import Data... and Export Data... will attach documents to the currently loaded project. Exit terminates DOKuStar Validation.
Tools Menu This function is only available in Administrator Mode. The command Visual Basic Editor starts the VBA studio. For details about this programming interface of DOKuStar Validation refer to the Programming Manual. The commands Load Workspace and Save Workspace allow to save and restore application specific layouts of the Validation user interface. Help Menu Allows to show the About box with version information.
Toolbars The toolbar icons provide shortcuts for frequently needed menu commands. The buttons (or the group of buttons) can be separately switched on/off or dragged to another position for easy access. If the mouse cursor rests on a button of a toolbar, a tool tip text shows you the function of the button. This tool tip text you will also see in the status bar of DOKuStar Validation. Standard Toolbar This toolbar contains buttons for commands of the File-, Edit-, Tools- and Help Menu.
Navigation Toolbar This toolbar contains command buttons of the Navigation Menu.
Alternatives Toolbar This toolbar is also significant if a recognition server module precedes DOKuStar Validation and the recognition produces more than one result. If a recognition server produces one or more alternative values for a result, all available alternatives will be found in the drop-down list of this toolbar. Selecting a value from this list will replace the value in the Edit Window. In many cases, this will be much more convenient than editing a whole term.
View Windows The View Windows, considered together, will give a good survey of the currently processed document and the project structure. The different windows will be described in the next sections. Project Explorer This window shows the structure of document types of the currently processed project in a tree view representation. The pages are represented by sub-nodes showing the image file name.
(Table) Edit Window The information shown in this window and the available edit operations depend on the selected edit mode: Index Field Edit Mode: The window shows the character recognition results of index fields, at times associated with the image displayed in the Fields Window. The default property of this window is "overwrite". Typing any key will overwrite the whole displayed value. To switch from overwrite to insert mode, use the Left or Right key in case of simple index fields.
List of Shortcut Keys Controlling Project Window Shortcut Description Ctrl+F First document Ctrl+Shift+F Last document Ctrl+P Next document Crtl+Shift+P Previous document Ctrl+T First source Ctrl+Shift+T Last source Ctrl+B Next source Crtl+Shift+B Previous source Ctrl+G Next field, adjusted to selected filter(s) Crtl+Shift+G Previous field, adjusted to selected filter(s) Crtl+Del Delete documents DOKuStar Validation User Manual List of Shortcut Keys • 17
Controlling the Image Window Shortcut Description Ctrl+Plus Zoom in Ctrl+Minus Zoom out Ctrl+3 (num. key) Scroll image down fast Ctrl+2 (num. key) Scroll image down slow Ctrl+9 (num. key) Scroll image up fast Ctrl+8 (num. key) Scroll image up slow Ctrl+4 (num. key) Scroll image horizontal left Ctrl+6 (num. key) Scroll image horizontal right Ctrl+1 (num. key) Scroll image bottom Ctrl+7 (num.
Controlling Table Fields Shortcut Description Return Next field in table in vertical order; column by column from top to bottom. At the end of the table: next field. Shift+Return Previous field in table in vertical order; column by column from bottom to top. At the beginning of the table: previous field. Tab Next field in table in horizontal order; line by line from left to right. At the end of the table: next field.
Editing Shortcut Description Ctrl+C Copy selection to clipboard Ctrl+X Cut selection and move it to clipboard Ctrl+V Insert contents of clipboard Ctrl+Z; Esc Undo last action Ctrl+Return New Line (not in case of table fields) Del Delete selection Ctrl+A Replace value by next alternative Crtl+Shift+A Replace value by previous alternative Miscellaneous Shortcut Description Ctrl+O Open batch Ctrl+L Close batch F4 Toggle layout Table Mode/Normal and vice versa Alt+F11 Change to VBA (a