
Owner's manual


DOKuStar Validation for Ascent Capture Page • 85
Note 1: You can also mix the modes: Use the editing mode for some fields, and the display mode for others
Note 2: Tables can only be edited in the editing window, not in the HTML view.
The HTML file itself can be created with any HTML editor (FrontPage etc.). To link it to the document model, you
must use an attribute named
id in your tags, which has the field name as value.
In editing mode, you will use an
input tag, which has this id attribute set:
<input type="text" id='CustomerId'>
In the display mode, you will use a tag like <span>:
<span id='CustomerId'>
Which mode (display/editing) you use, is only determined by the HTML tags you use (<input> versus <span>,
<pre>,..). Using the id is all that needs to be done to link to the Validation data!
There are two examples of customized HTML files installed with DOKuStar Validation for Ascent Capture. These
are named
form_Static.html and form_Edit.html and reside in the …\Ascent\bin\DokuStar directory.
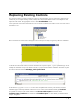
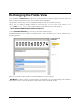
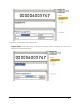
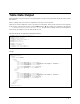
These examples define the two views you see in the pictures above;
form_Static is the example for the display
mode,
form_Edit for the editing mode. If you have DOKuStar Extraction for Ascent Capture installed as well, you
can try out these HTML views in the following way:
Along with the DOKuStar Extraction for Ascent Capture installation comes an example named
AllTypes, which
consists of a
.cab file and the DOKuStar file. Import this .cab file in the Administration module, and add the
DOKuStar Validation module to the batch classes’ queues. This
AllTypes batch class defines, among others, a
form type named
form. This form type is the one we want to be displayed in the Validation according to our HTML
definition.
To do so, choose which one of the two HTML files you want to use. Copy it to the
…\Ascent\AdminDb\DokuStarValidation\templates directory and rename it to form.html.
When you now run the sample images, those which have the form type
form will be displayed in Validation in the
way shown above.