
User`s guide


VRS Desktop Productivity Features
VirtualReScan (VRS) User’s Guide
101
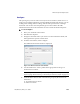
Scanning from Windows Explorer
Once the VRS Desktop Productivity add-in for Microsoft Windows is activated, you
can use the following options on the context menu to scan directly from a folder in
Windows Explorer:
Fast Scan: Quickly scan and save a scanned document to a folder in Windows
Explorer using default settings
Scan with Preview: Scan and preview the results before saving a document to
a folder in Windows Explorer
Configure: Configure settings, scan, and optionally preview the results before
saving a document to a folder in Windows Explorer
Scan Using Profile: Select a scanning profile and quickly scan and save a
document to a folder in Windows Explorer
Note The VRS Desktop Productivity add-in for Microsoft Windows must be
activated to access the VRS Desktop Productivity features from Windows Explorer.
For details, see Activating VRS Desktop Productivity Features on page 78.
Fast Scan
With Fast Scan, you can quickly scan a document and save it to a folder in Windows
Explorer.
Note The document is scanned using the most recent profile and file name to be used
with the VRS Desktop Productivity features. The Configure option supports the ability
to update scan settings and file name options.
X To use Fast Scan
1 Place your document in the scanner.
2 Start Windows Explorer.
3 Navigate to the folder where you want to save the scanned document, and
then right-click to open the context menu.
4 From the context menu, select Fast Scan.
The document is scanned and automatically saved to the specified folder.