
User Guide


Table Of Contents
- VirtualReScan 3.5 User’s Manual
- Contents
- How to Use This Guide
- Overview
- Operating VRS
- Introduction
- Scanning with VRS Default Settings
- Kofax VRS Scan Interfaces
- Configuring VRS Before You Scan
- Using VRS While You Scan
- VRS Advanced Properties Dialog Box Overview
- VRS Restore Default Values Utility
- Long Paper Support
- VRS Non-Interactive Mode
- Enhanced Bar Code Engine
- Patch Code Recognition
- Advanced Color Processing
- Index
Chapter 2
54 VRS User’s Manual
Using the Profile Tab
As stated already, VRS allows you to scan documents and accurately capture data in
the shortest time possible without any adjustments. However, invariably there are
going to be documents that will evade even the best imaging software. You can use
the VRS Interactive Properties dialog box to correct each image, but if you are going to
be scanning large amounts of problematic documents, the best solution is to create
custom profiles for them.
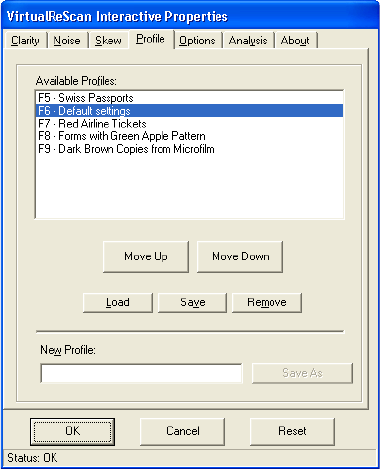
Figure 2-42. Profile Tab
A profile is a combination of settings from the Clarity, Noise, and Skew tabs. A profile
works like a memorized strategy for image correction and enhancement. With the
exception of the Default profile, which is pre-determined and created when you
install VRS, profiles are created by the user. However, VRS uses the profile Default
settings unless you define and select another profile.
The Profile tab helps you set up and manage VRS image property profiles. From the
Profile tab, you can define, update, load, and remove profiles. You can establish
multiple profiles to accommodate different scanning situations. You are not limited
on the number of profiles you can create. However, only the first eight profiles will be