3-IN-1 MULTIFUNCTION SLOW JUICER KA12SLWJCRB
SAFETY & WARNINGS • This appliance is not intended for use by persons (including children) with reduced physical, sensory or mental capabilities or lack of experience and knowledge, unless they have been given supervision or instruction concerning use of the appliance by a person responsible for their safety. • Children should be supervised to ensure that they do not play with the appliance. • Cleaning and user maintenance should not be performed by children without supervision.
• During operation, feed the food material slowly to avoid blocking the rotation. Take care to avoid inserting large or hard food materials. Cereal grains and legumes soaked in water to soften. Seeds and cores should be removed. o If blockage occurs, stop working immediately. Reverse the motor for a while then open the lid to take out the food and continue working again in the forward (“on”) motor setting. • Use the special pusher stick to feed food material into the feeder opening.
OVERVIEW Top cover Pusher Smart Cap Juicing bowl Screw Fine strainer Sorbet strainer (Blank strainer) Coarse strainer (Smoothie strainer) Container Cleaning brush Note: The illustrations above are for reference only and the product may differ slightly in appearance.
Strainer type Description Functions Coarse strainer: The bigger holes in the strainer produce thick juice when tender and soft fruits are extracted such as strawberries, kiwis and tomatoes. Milkshakes and smoothie Fine strainer: The holes of the strainer are small. Use it when making pure juice with hard fruits or high fibred vegetables. Pure juice Sorbet strainer: Used for sorbet products.
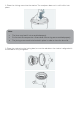
ASSEMBLY STEP 1 Topset assembly Align the red dots ● on each part and assemble in the order shown. Once assembled, turn the drum lid clockwise to close. STEP 2 Topset and base assembly Place the bowl on the base, the 3 holes of bowl lock into the 3 feet at the base.
For safe operation • Operating the juicer without ingredients can cause damage to the screws. • Do not continuously operate the juicer for more than 10 minutes. This can damage the motor from overheating. After continuous use, let the juicer rest for 10 minutes before starting another session. If the juicer stops due to the overload protection, let the juicer cool for 30 minutes to 2 hours before juicing again. Do not place fingers or other objects near the food chute.
2. Place the Juicing screw into the strainer. Turn and press down on it until it clicks into place. Note: • • • The juicer may leak if not assembled properly. Ensure that the compression silicone and silicone ring are assembled properly. The juicing screw needs to be locked in-place in order to close the drum lid. 3. Place the strainer into the juicing bowl, ensure the red dot on the strainer is aligned with the red dot on the juicing bowl.
4. Place the drum lid on to the juicing bowl, align the red dot on the drum lid with the red dot on the juicing bowl. Turn clockwise to close, align the red dot on the drum lid with the lock mark. Step 2: Top-set and base assembly Tip: For easy assembly, hold the drum lid by grabbing the food chute and turn clockwise as shown in the above illustration.
1. Place the bowl on the base. The 3 holes of bowl will lock into the 3 feet at the base. 2. To lock the juicer in-place, turn it clockwise. To unlock, turn the juicer counterclockwise.
3. Place the pulp cup under the pulp spout and place the juice cup under the juice spout as shown in the illustration. Note: • • Juicer will not operate if parts are not assembled properly, or may leak during operation. Ensure all steps have been followed correctly before operating juicer.
Disassembly Step 1: Switch OFF and unplug the power cord from the wall outlet. Note: • • • • Extract all the remaining pulp in the juicing bowl before stopping the juicer. For easy clean up, operate the juicer for an additional 30 seconds after the juice is extracted. When the drum lid is stuck, press the REVERSE, OFF, then ON buttons in this order, switching back and forth 2 to 3 times to dislodge.
OPERATION Step 1: After preparing the ingredients, plug the power cord into a wall outlet. Note: • Do not touch the power cord with wet hands, it may cause electrical shock, short-circuit or fire. Check the safety of the wall outlet. • Step 2: Press the ON button to operate. Note: On (Forward): Pulls down and slowly masticates the ingredients. RVS (Reverse): Pushes the ingredients back up to dislodge them.
Step 4: Use the smart cap to make mixed juices. Stop juice from dripping or rinse between different juices. • • • • • Juicing with the smart cap closed creates various mixed juices when different fruits and vegetables, milk, banana, beans etc., are selected. After juicing, close the smart cap to stop the juice from dripping, especially when disassembling the juicing bowl off the base.
TIPS ON INGREDIENTS Figure 1 Figure 2 Double size food chute: One for whole apple, another for strip shaped vegetables. 1. 2. Open the lid to feed the whole round fruits like apples, oranges (figure 1). Feed the strip shaped vegetables like carrots (figure 2).
DO NOT put the following ingredients into the juicer Hard seed Hard or inedible skins Peach, nectarines, apricot, plum, mango, etc. Remove hard seeds from the ingredients before juicing. Pineapple, melon, mango, orange, etc. Peel the skins from the ingredients before juicing. Frozen strawberry, blueberry, raspberry, etc. Frozen fruits or ice Completely thaw frozen fruits before juicing. Do not use ice. Vegetable/animal oil Others Sesame seed, butter, margarine, etc.
INGREDIENT PREPARATION Before operating • • • If the juicer is jammed or if the drum lid does not open, press the REVERSE button and hold until it becomes dislodged. Repeat REVERSE-OFF-ON as needed. Continue operating the juicer until all the ingredients in the juicing bowl are extracted. The drum lid may not open easily if there is a lot of pulp remaining in the juicer. Every ingredient yields different amounts of juice.
• If there is an excessive amount of foam, use a mesh strainer to separate it from the juice. • When an ingredient is being masticated by the juicing screw, it may splash juice through the food chute. Use the pusher to block out the juice splash when juicing. How to use the smart cap • Juicing with the smart cap closed allows mixed juice creations with different fruits, vegetable and liquids.
Hard fruits and vegetables (carrots, potato, beets and spinach) 15cm 1-2cm 2cm Hard, fruits and vegetables may put excess strain onto the motor and cause it to stall. Soak in cold water prior to juicing and cut to appropriate sizes. To increase the juice yield, juice fruits and vegetables with high water content. Preparation tips • Slice the ingredients 1cmthick or cut 1cmwide and 3-10cmlong. • Soak hard ingredients like carrots and ginger in cold water prior to juicing.
Extraction tips • Insert 3-5 grapes at a time, depending on size, while monitoring the extraction result. • Thaw frozen ingredients like pomegranate and raspberry, then add about 1 tablespoon each at a time. • Frozen ingredients usually lose significant amount of fluid after thawing. When juicing, you can mix milk or yogurt to balance the fluid lost.
• Roll leaves into spiral when inserting into the juicer. • Insert the leafy part of the ingredients first, then alternate between leafy parts and stem. • For ingredients like wheatgrass, grab a handful and insert a bundle. Caution The fibres from tough ingredients like celery can wrap around the juicing screw and affect juicer’s performance. Cut the stems that are thick and tough to 10cmlong or less. • Foam build up from juicing fibrous ingredients. Use strainer to remove the foam before serving.
SORBET STRAINER Before use, ensure the seal ring is in place. To assemble the topset, place the juicing screw and the sorbet strainer in the juicing bowl and close the lid. 1. Insert the sorbet strainer into the juicing bowl while aligning the red dots of the sorbet strainer and the juicing bowl. 2. Insert the juicing screw into the sorbet strainer in a twisting motion. 3. Place the lid onto the juicing bowl by aligning the red dot of the lid and the juicing bowl.
4. Place the assembled topset onto the base. topset Base Caution The sorbet strainer should only be used with frozen ingredients. Depending on the ingredient, allow the frozen items to thaw for 5 to 20 minutes before use. Slowly process a small quantity per batch. Note • Do not use ice or process ingredients containing vegetable or animal oil as they may cause the juicer to malfunction. • Remove hard seeds from the ingredients and peel the skin from the ingredients before juicing.
SMOOTHIE STRAINER To assemble the topset, place the juicing screw and the smoothie strainer in the juicing bowl and close the lid. 1. Insert the smoothie strainer into the juicing bowl while aligning the red dots of the smoothie strainer and the juicing bowl. 2. Twist the juicing screw into place on the smoothie strainer. 3. Place the lid onto the juicing bowl by aligning the red dots of the lid and the juicing bowl. Then rotate the lid clockwise until the lid is secured.
4. Place the assembled topset onto the base Topset Base Caution: When using frozen ingredients, ensure the frozen ingredients are thawed for about 5 to 20 minutes before use. The required period to thaw the ingredients will depend on how long the ingredients were in the freezer and the temperature it was kept in. When making smoothies, add milk or other liquid between ingredients. Check the consistency of the smoothie by looking through the juicing bowl and add more liquid as needed.
CLEANING & CARE Remove the juicing screw and strainer from the juicing bowl. Clean with the provided brush. Note • Immediately clean the juicer after each use. If remaining residue in the juicer dries up, it can make disassembling and clean-up difficult. The excess build-up can cause poor performance in future uses. • For easy disassembly, place the top-set in the sink and run the water through from the top of the top-set.
TROUBLESHOOTING No power to juicer Low juice yield Too much pulp in juice • Ensure power cord is properly plugged in. • Confirm the drum lid and the juicing bowl is properly assembled. • Ensure that the topset and base of the juicer have been assembled correctly, following the step by step instructions in the Assembly portion of this guide. • Juicer will not operate if parts are not assembled properly.
Drum lid will not close • Ensure the juicing screw is pushed all the way into the strainer for the drum lid to close properly. • Check if the parts are assembled correctly. Try reassembling the parts and listen to odd noises. • Do not start the juicer unless there are ingredients and/or liquid in it. • Operating the juicer without ingredients can cause damage to the screw. • If the juicer is operated without ingredients or liquid, the noise level can increase and can lead to damage of the juicer.
• Ensure the power cord is plugged in correctly. • Ensure that the juicer has been assembled correctly, following the step by step instructions in the Assembly portion of this guide. • If too many ingredients are inserted at one time, this can cause the juicer to stop. • If the juicer stops due to the overload protection, let the juicer cool for 30 minutes to 2 hours before juicing again. • If there are hard seeds within the ingredients, remove them before juicing. Hard seeds can damage the juicer.
• After juicing, if the juicer is not cleaned right away, the remaining pulp inside the topset can dry up which can make disassembling and cleaning hard. This can also affect the juicer’s performance and colour. • Ingredients that are rich in carotenoids such as carrots and spinach may dye plastic parts. • When the parts are dyed with carotenoids, rub vegetable oil into the dyed areas and use mild detergent to clean. • Vegetable oil should only be used during clean-up for parts that are discoloured.
SPECIFICATIONS Rated voltage AC 220-240V Rated frequency 50Hz Rated power 240W Speed 60RPM
Need more information? This is a Quick Start Guide and we hope that this has given you the assistance needed for a simple set-up. For the most up-to-date guide for your product, as well as any additional assistance you may require, head online to help.kogan.