
Installation Sheet


Installation Guide
SKU#23663, SKU#23664
USA/Canada: 1-800-4 KOHLER 1411463_2
www.kohler.com
PREPARATION
1. Record your model number for future reference.
2. DANGER: Risk of electric shock. To avoid electric shock, the power must be turned off at the circuit breaker or fuse box before
beginning the installation procedure.
3. DANGER: Risk of electric shock. To avoid electric shock, the outlet box must be properly grounded.
4. Important Information. Inspect the product for any damages. This product is for indoor use only. Observe all local codes.
5. Your product may appear different than the one illustrated. The installation procedures remain the same.
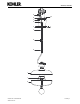
Please see next page for a larger installation image
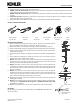
TOOLS AND MATERIALS NEEDED
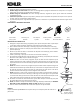
FIXTURE INSTALLATION
1. Remove the fixture and parts bag(s) from the carton. Put them onto a clean and soft
cloth to protect finish. Confirm all parts are included.
2. Thread wire through canopy (E), joint ball (D); install joint ball (D) onto rod (F).
3. Loosen knob (G), slide rod (H) out to desired height then tighten knob (G).
4. Trim excess wires to minimum 10” beyond canopy (E), strip wires to 5/8” at the end
and twist.
5. Install shade (I), cage (K) onto fixture with socket ring (J).
6. Attach mounting plate (B) onto outlet box with screws (C). Ensure the direction of
ground screw (M) is as shown.
7. NOTICE: To avoid short circuit, make sure wires are not exposed. Fasten fixture green
or bare ground wires to the green or bare copper wire in outlet box with wire nut (A)
or fasten onto ground screw (M) on mounting plate.
8. NOTICE: To avoid short circuit, make sure wires are not exposed. Fasten fixture white
wires to the white wire in outlet box with wire nut (A). Wrap the wire connector with
electrical tape so that the tape seals the end of wire nut (A), see diagram.
9. NOTICE: To avoid short circuit, make sure wires are not exposed. Fasten fixture lead
wire without ridge(s) or black wire to the black wire in outlet box with wire nut (A).
Wrap the wire connector with electrical tape so that the tape seals the end of wire nut
(A), see diagram.
10. Tuck wires carefully inside outlet box. Attach the canopy (E) onto mounting plate (B)
and secure it with screws (L).
11. NOTICE: Do not exceed recommended wattage. Install lamp(s). Rated for SKU23663
Max 60 W, Type G25; SKU23664 Max 100 W, Type G40. (Bulb(s) not included).
12. Restore power to circuit at breaker or fuse box.
CLEANING
Please clean fixture with a soft and dry cloth ONLY. Clean glass with a mild soap.
A
B
C
D
L
E
F
G
H
M
I
J
K
Approved fastener
(Wire nut)
Electrical tape
Phillips & Flathead
Screwdriver
Slip Joint
Pliers
Small Adjustable
Wrench
Wire
Cutter/stripper
Electrical
Current Tester
Electrical
Tape