
Installation Guide


Installation
With help, remove the bath from its carton and place it on top of the protective
floor covering.
Lift the outlet end of the bath until sufficient clearance is obtained to attach the
two front legs.
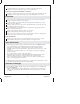
With the tapered edge of the washer facing up, insert the fastening bolt through
the beveled washer.
With the load lug resting on the flat of the interior leg, align the leg with the
attachment lug.
Insert the fastening bolt, then wrench tighten.
Repeat the above procedure for the remaining legs.
Once the bath is placed into position with the drain connected, verify the bath is
level and resting on all four legs.
Adjust for Level
Turn the leveling bolts at the bottom of the four legs or place metal shims under
the bath legs to achieve level.
Installation
Avec de l’assistance, retirer la baignoire de son emballage et la placer au-dessus de
la couverture de protection du sol.
Soulever l’extrémité de sortie de la baignoire pour permettre un espacement
suffisant et attacher les deux pieds avant.
Avec le côté conique de la rondelle vers le haut, insérer le boulon de fixation à
travers la rondelle biseautée.
Avec la cosse de support reposée sur le côté plat du pied intérieur, aligner le pied
avec le pied d’attache.
Insérer le boulon de fixation et serrer à clé.
Répéter la procédure ci-dessus pour les pieds restants.
Bath/Baignoire/Bañera
Load Lug/Cosse de support/Lengüeta de soporte
Fastening Bolt/Boulon de fixation/Perno de fijación
Beveled Washer/Rondelle biseautée/Arandela biselada
Attachment Lug/Cosse d'attache/Lengüeta de fijación
Leveling Bolt/Boulon de mise à niveau/Perno de nivelación
Kohler Co. 3 1123884-2-A