Installation and Care Guide Guide d’installation et d’entretien Guía de instalación y cuidado Bath-/Deck-Mount Faucet Robinet sur baignoire/comptoir Grifería de montaje en bañera o cubierta K-10873 M product numbers are for Mexico (i.e. K-12345M) Los números de productos seguidos de M corresponden a México (Ej. K-12345M) USA/Canada: 1-800-4KOHLER México: 001-800-456-4537 kohler.com 1151914-2-C ©2011 Kohler Co.
Tools/Outils/Herramientas Phillips Screwdriver Tournevis à pointe cruciforme Destornillador Phillips 14 mm Hex Wrench 14 mm Clé hexagonale 14 mm Llave hexagonal Adjustable Wrenches Clés à molette Llaves ajustable Before You Begin Please read all instructions before you begin. Observe all local plumbing and building codes. Shut off the water supply. Kohler Co. reserves the right to make revisions in the design of faucets without notice, as specified in the Price Book.
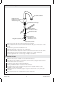
1. Install the Spout Spout/Bec/Surtidor Rubber Washer Rondelle en caoutchouc Arandela de goma Shank/Manche/Vástago Fiber Washer Rondelle en fibres Arandela de fibra Steel Washer Rondelle en acier Arandela de acero Ring/Anneau/Anillo Screw/Vis/Tornillo Remove the ring and steel washer from the spout shank. Slide a rubber washer onto the shank and fit it into the groove in the base of the spout. Position the spout in the installation hole. Partially thread two screws into one of the rings.
Instale el surtidor Retire el anillo y la arandela de acero del vástago del surtidor. Deslice la arandela de goma en el vástago y métala en la ranura de la base del surtidor. Coloque el surtidor en el orificio de instalación. Enrosque parcialmente dos tornillos en uno de los anillos. Por debajo de la cubierta, deslice la arandela de fibra y la arandela de acero en el vástago. Enrosque el anillo en el vástago hasta que quede a 1/4″ (6 mm) de la cubierta.
Installer l’ensemble de valve Faire glisser une rondelle en caoutchouc sur le manche et adapter celui-ci dans la rainure située dans la base de la valve. Positionner la valve dans l’orifice d’installation sur la gauche du bec. Aligner la poignée tel qu’illustré. Visser les deux vis dans l’anneau. À partir du dessous du comptoir, faire glisser une rondelle en fibres et une rondelle en acier sur le manche. Enfiler l’anneau sur le manche, jusqu’à ce qu’il se trouve dans 1/4″ (6 mm) du comptoir.
3. Install the Handspray Handspray Vaporisateur Rociador Handspray Hose Flexible de vaporisateur Manguera del rociador de mano Washer/Rondelle/Arandela Rubber Washer Rondelle en caoutchouc Arandela de goma Guide/Guide/Guía Escutcheon/Applique/Chapetón Washer/Rondelle/Arandela Nut/Écrou/Tuerca Connection Hose Tuyau de connexion Manguera de conexión Run the small end of the handspray hose through the top of the escutcheon. Insert a washer into the large end of the handspray hose.
Installer le vaporisateur (cont.) À partir du dessous du comptoir, faire glisser une rondelle sur le manche de l’applique. Visser l’écrou en plastique sur le manche de l’applique et serrer à la main. Instale el rociador de mano Pase el extremo pequeño de la manguera del rociador de mano a través de la parte superior del chapetón. Inserte una arandela en el extremo grande de la manguera del rociador de mano. Enrosque el rociador de mano en el extremo grande de la manguera del rociador de mano.
4. Connect the Hoses Adapter/Adaptateur/Adaptador Inlet Hose Tuyau d'entrée Manguera de entrada Outlet Tube Tube de sortie Tubo de salida Tee/T/T O-Ring Joint torique Arosello 3/8" NPT Connection Tube Tube de connexion 3/8" NPT Tubo de conexión 3/8" NPT 3/8" NPT Connection Tube Tube de connexion 3/8" NPT Tubo de conexión 3/8" NPT Confirm the O-ring is in place on the short end of the adapter. Attach it if missing.
Conecte las mangueras Verifique que el arosello esté en su lugar en el extremo corto del adaptador. Fíjelo si no lo tiene. Enrosque el adaptador, el extremo corto primero, en la T utilizando una llave hexagonal de 14 mm (no provista). Enrosque la manguera de conexión del rociador de mano en la salida inferior de la T. Conecte la manguera de entrada al tubo de salida (el más corto) en el montaje de la válvula. Conecte el otro extremo de la manguera de entrada al adaptador en la T del surtidor.
Complete the Installation (cont.) Check for leaks. Turn on the water to the spout and flush the spout. Divert the water to the handspray hose by pulling the diverter (located on the end of the spout) down. Flush the handspray hose. Turn the water off. Reinstall the aerator and handspray. Terminer l’installation REMARQUE: L’eau est déroutée vers la douchette en tirant l’extrémité avant du bec vers le bas lorsque l’eau coule.
Care and Cleaning For best results, keep the following in mind when caring for your KOHLER product: • Use a mild detergent such as liquid dishwashing soap and warm water for cleaning. Do not use abrasive cleaners that may scratch or dull the surface. • Carefully read the cleaner product label to ensure the cleaner is safe for use on the material. • Always test your cleaning solution on an inconspicuous area before applying to the entire surface. • Do not allow cleaners to sit or soak on the surface.
Cuidado y limpieza (cont.) Para obtener información detallada de limpieza y los limpiadores a considerar, visite www.kohler.com/clean. Para solicitar información sobre el cuidado y la limpieza, llame al 1-800-456-4537. Warranty KOHLER® Faucet Lifetime Limited Warranty Kohler Co. warrants its Faucets* manufactured after January 1, 1997, to be leak and drip free during normal residential use for as long as the original consumer purchaser owns his or her home.
Warranty (cont.) soap/lotion dispensers; and faucets used in commercial settings, and outside North America, are covered by Kohler Co.’s one-year limited warranty. **Never use cleaners containing abrasive cleansers, ammonia, bleach, acids, waxes, alcohol, solvents or other products not recommended for chrome. This will void the warranty. Garantie Garantie limitée à vie du robinet KOHLER® Kohler Co.
Garantie (cont.) pouvez également avoir d’autres droits qui varient d’un état ou d’une province à l’autre. Ceci constitue la garantie écrite exclusive de Kohler Co.
Garantía (cont.) KOHLER CO. Y/O EL VENDEDOR OFRECEN ESTAS GARANTÍAS QUE SUSTITUYEN TODAS LAS DEMÁS GARANTÍAS, EXPRESAS O IMPLÍCITAS, INCLUYENDO, ENTRE OTRAS, LAS GARANTÍAS IMPLÍCITAS DE COMERCIALIZACIÓN E IDONEIDAD PARA UN USO DETERMINADO. KOHLER CO. Y/O EL VENDEDOR DESCARGAN TODA RESPONSABILIDAD POR CONCEPTO DE DAÑOS PARTICULARES, INCIDENTALES O INDIRECTOS.
Service Parts/Pièces de rechange/Piezas de repuesto 1155854** Handle 1155858** Poignée Hardware Manija Boulonnerie Herrajes 3005770 Nut Écrou Tuerca 1155856** Body Corps Cuerpo 1155859** Spout/Bec/Surtidor A 1155855 1169594 Adapter Valve Adaptateur Valve Adaptador Válvula 1151916 Cartridge Assembly Ensemble de cartouche Montaje del cartucho 1157046 Hose A Tuyau Manguera 897637** Elbow Assembly Ensemble de coude Montaje del codo 58959 Hose Tuyau Manguera 1096037** Handshower Douchette Ducha de mano