
Installation Guide


Product Information (cont.)
Connections and Service Access
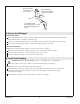
NOTICE: Provide unrestricted service access to the blower motor and check valve. The access must be
located immediately next to the blower motor. Study the roughing-in information packed with the bath.
Before installation, ensure that there is proper access to the blower motor and final connections. If the blower
motor is installed in an enclosed area, an access panel is required at the blower motor. This panel should be
18″ (45.7 cm) wide and 14″ (35.6 cm) high minimum.
Table of Contents
Important Information .............................................................. 2
Product Information ............................................................... 2
Electrical Requirements .......................................................... 2
Product Notices ................................................................ 2
Factory-Assembled Features ...................................................... 2
Connections and Service Access ................................................... 3
Tools and Materials ............................................................... 3
Before You Begin ................................................................. 4
Prepare the Site ................................................................. 5
Prepare the Site - Concrete Construction ............................................... 6
Prepare the Bath with Airjets ........................................................ 6
Secure the Unit .................................................................. 7
Option Using a Cement or Mortar Bed ............................................... 7
Option Using Construction Adhesive ................................................. 7
Secure the Whirlpool .............................................................. 8
Install the Plumbing ............................................................... 8
Make Electrical Connections ......................................................... 9
Test Run the Bath with Airjets ....................................................... 10
Complete the Finished Wall ........................................................ 11
Removing the Apron Panel ......................................................... 11
Clean-Up After Installation ......................................................... 11
Confirm Proper Operation .......................................................... 12
Fill the Bath .................................................................. 12
Troubleshooting Procedure ......................................................... 14
Troubleshooting Guide .......................................................... 14
Tools and Materials
Pencil
Safety Glasses Level
Silicone Sealant Measuring Tape
Pipe Wrench
Plus:
• Conventional Woodworking Tools
and Materials
• Drop Cloth
•
Construction Adhesive (Optional)
• Cement or Mortar (Optional)
• #6 Large-Head Galvanized Nails
• 2x4's or 2x6's
Claw
Hammer
Blade
Screwdriver
Kohler Co. 3 1040292-2-E