
Installation Guide


5. Secure the Whirlpool
Wood Construction
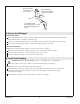
Drill a small pilot hole through the nailing-in flange at each stud. Add shims between the nailing-in
flange and the studs as needed to eliminate gaps.
Nail 1/4” (6 mm) thick furring strips to the studs to shim out to the edge of the nailing-in flange.
Use #6 large-head galvanized nails to secure the nailing-in flange to the studs.
Concrete Construction
NOTE: We recommend that the flange be secured to the wall for support.
Drill pilot holes through the nailing-in flange so they are about 16” (40.6 cm) apart.
Install concrete wall anchors to the wall at the pilot hole locations.
Secure the nailing-in flange to the wall anchors with screws.
6. Install the Plumbing
WARNING: Risk of property damage. Ensure a watertight seal on the bath drain.
Connect the drain to the trap according to the drain manufacturer’s instructions.
NOTICE: An access panel will simplify future maintenance.
Install the faucet valving according to the faucet manufacturer’s instructions. Do not install the
faucet trim until instructed. Open the hot and cold water supplies, and check the supply
connections for leakage.
Run water into the bath, and check the drain connections for leakage.
Stud
Nail 1/4" (6 mm)
thick furring strips
to the studs.
Drill a small hole
through the nailing-in
flange at each stud.
Use #6 large-head
galvanized nails to secure
the nailing-in flange to the
studs.
1040292-2-E 8 Kohler Co.