
Installation Guide


1. Prepare the Site
NOTICE: Refer to the Roughing-in Guide packed with your whirlpool for the required minimum
lb/square foot (kg/square meter) floor support loading.
Make sure the flooring offers adequate support for your whirlpool, and verify that the subfloor is
flat and level.
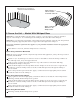
Construct 2x4 or 2x6 stud framing for the drop-in installation.
NOTICE: The whirlpool must be supported by its feet or base. Do not support the load weight of the
whirlpool by the perimeter of the rim.
For a raised installation: Frame the floor or construct a frame in accordance with the roughing-in
information packed with the whirlpool.
Carefully lay out and cut the rough deck material. Use the cut-out template, if one is provided, or
refer to the Roughing-In Guide for cutout information.
Position the plumbing according to the roughing-in information packed. Cap the supplies, and
check for leaks.
2. Prepare the Whirlpool
Install the drain to the whirlpool according to the drain manufacturer’s instructions. Do not connect
the trap at this time.
Position a clean drop cloth or similar material in the bottom of the whirlpool. Be careful not to
scratch the surface of the whirlpool.
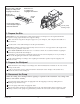
3. Disconnect the Pump
NOTE: No cutting of the whirlpool harness (piping) is required for this installation. Any cutting of the
harness will void the warranty.
Disconnect the pump and heater (if equipped) from the shipping location by cutting the two
banding straps with tin snips.
Move the pump and heater (if equipped) aside.
Relocate the pump and heater (if equipped) next to the customized inlet/outlet connections of the
whirlpool harness. The pump may protrude beyond the rim of the bath. See the rough-in details.
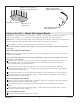
Access
Panel
Frame the floor
according to the
roughing-in information.
Construct 2x4 or 2x6 stud
framing according to the
roughing-in information.
Position the
rough plumbing.
Verify that the subfloor
offers adequate support,
and is flat and level.
Cut the pump
banding straps.
Kohler Co. 5 1055820-2-C