
Installation Guide


3. Secure the Flange
NOTICE: Ensure the subfloor is level before proceeding. If necessary, use shims to achieve level.
NOTE: For ease of installation, provide a means to feed the interface wires through the wall to the control
amplifier at this time.
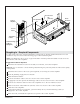
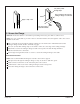
Drill a small pilot hole through the nailing-in flange at each stud location. Add shims between the
nailing-in flange and the studs to eliminate any gaps.
Nail 1/4″ (6 mm) thick furring strips to the studs to shim out to the edge of the nailing-in flange.
Attach felt at each of the nailing-in flange-to-stud contact points. The felt will help minimize
vibration transmission to the studs.
Use #6 large-head galvanized nails or screws to secure the nailing-in flange to the studs.
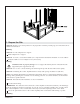
Concrete Construction
NOTE: We recommend that the flange be secured to the wall for support.
Drill pilot holes through the nailing-in flange so they are about 16″ (406 mm) apart.
Install concrete wall anchors to the wall at the pilot hole locations.
Confirm there is felt at each of the nailing-in flange-to-stud contact points.
Secure the nailing-in flange to the wall anchors with screws.
Stud
1/4" (6 mm) Thick
Furring Strips
#6 Large-Head
Galvanized Nails
Drill a small hole through the
nailing-in flange at each stud.
Apply a strip of felt.
Kohler Co. 9 1188012-2-C