
Installation Guide
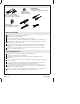
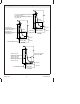
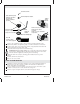

3. Attach the Drain Ell
Apply a ring of plumbers putty or other sealant around the underside of the
strainer body. Refer to the plumbers putty or sealant manufacturer’s instructions.
Set the washer (for K-11666 and K-11677 models) and gasket between the drain ell
and the underside of the bath drain outlet.
Thread the strainer body into the drain ell until snug.
WARNING: Risk of property damage. Do not reposition the drain ell after the
strainer body is tightened. Moving the drain ell may damage the seal created
when the strainer is tightened, increasing the risk of leaking.
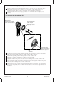
Tighten the drain ell securely by inserting pliers handles into the top of the
strainer.
Turn the strainer into the drain ell.
Remove any excess sealant.
Fixer le coude du drain
Appliquer un anneau de mastic de plombier ou un autre produit d’étanchéité sur
le dessous du corps de la crépine. Se référer aux instructions du fabricant du
mastic de plombier ou de l’étanchéité.
Placer la rondelle (pour les modèles K-11666 et K-11677) et le joint entre le coude
du drain et le dessous de la sortie du drain de la baignoire.
Visser le corps de la crépine dans le coude du drain jusqu’au serrage.
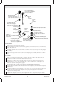
Bath
Baignoire
Bañera
Strainer Body
Corps de crépine
Cuerpo de la coladera
Gasket/Joint/Empaque
Screw/Vis/Tornillo
Strainer/Crépine/Coladera
Tighten.
Serrer.
Apriete.
Drain Ell
Coude du drain
Codo del desagüe
Apply plumbers putty.
Aplique masilla de
plomería.
Appliquer du mastic
de plomberie.
Remove the excess putty.
Limpie el exceso de masilla
de plomería.
Retirer tout excédent
de mastic.
1114757-2-A 10 Kohler Co.