
Installation Guide
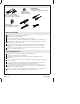
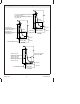
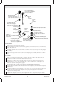
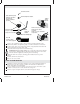

1. Assemble the Drain
Disassemble
Remove the screw from the strainer.
Disassemble the strainer, strainer body, gasket, and washer (K-11666 and K-11677)
from the drain ell.
Carefully pull the hood out from the overflow ell to access the pin on the plunger
assembly.
Remove the pin, then remove the hood and plunger assembly from the overflow
ell.
Assemble
Slide a coupling nut followed by a gasket onto the overflow ell and drain ell.
Insert the overflow ell and the drain ell into the tee.
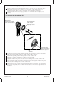
Verify the overflow ell is vertically level. If necessary, cut the drain ell to fit a
minimum of 3/4″ (1.9 cm) inside the tee so the overflow ell is vertically level.
Remove any burs using emery paper.
Hand tighten the coupling nuts. Do not wrench tighten at this time.
Apply thread sealant to the threaded end of the tailpiece, then thread the tailpiece
into the tee.
Insert the tailpiece approximately 1″ (2.5 cm) to 2″ (5.1 cm) into the trap inlet (not
shown). If necessary, cut the tailpiece to its proper length, then reinsert the
tailpiece into the trap inlet.
Tighten the tailpiece to the tee, then tighten the tee to trap inlet (not provided).
Hood and Linkage
Couvercle et tringlerie
Placa y eslabón
Overflow Ell
Coude du trop-plein
Codo del rebosadero
Gasket/Joint/Empaque
Drain Ell
Coude du drain
Codo del desagüe
Strainer/Crépine/Coladera
Strainer Body
Corps de crépine
Cuerpo de la coladera
Screw
Vis
Tornillo
Tailpiece
Pièce de raccordement
Tubo final
Tee/T/T
Gasket
Joint
Empaque
Gasket
Joint
Empaque
Coupling Nut
Écrou de couplage
Tuerca de acoplamiento
Washer/Rondelle/Arandela
Screw
Vis
Tornillo
Coupling Nut
Écrou de couplage
Tuerca de acoplamiento
1114757-2-A 6 Kohler Co.