
Installation Guide
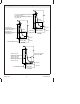

Ensamble el desagüe (cont.)
Inserte el tubo final aproximadamente entre 1″ (2,5 cm) y 2 (5,1 cm) dentro de la
entrada de la trampa (no se ilustra). Si es necesario, corte el tubo final a su
longitud correcta, luego vuelva a insertarlo en la entrada de la trampa.
Apriete el tubo final a la T, luego apriete laTalaentrada de la trampa (no se
provee).
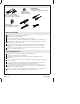
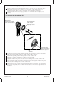
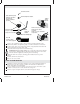
2. Attach the Overflow Ell
Position the tapered gasket with the tapered side against the overflow ell and the
thin edge of the gasket at the top of the overflow ell, as shown.
Attach the tapered gasket in this position on the overflow ell.
Align the overflow ell with the overflow hole of the bath.
Align the hold down plate over the lower mounting holes on the overflow ell.
From inside the bath, insert the two flathead screws through the hold down plate
and into the mounting holes on the overflow ell.
Thread screws into overflow ell approximately three to four turns. Do not tighten
the screws completely. The overflow ell must be loose in order to align the rest of
the drain.
Overflow Ell
Coude du trop-plein
Codo del rebosadero
Screws
Vis
Tornillos
Hold Down Plate
Plaque de maintien
Placa de sujeción
Tapered Gasket
Joint conique
Empaque cónico
1114757-2-A 8 Kohler Co.