
Installation Guide


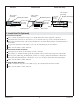


Install the Plumbing (cont.)
Provide access at the back of the plumbing wall to make drain connections to the receptor.
Install the shower valving according to the manufacturer’s instructions. Do not install the trim at
this time.
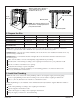
4. Prepare the Module
CAUTION: Risk of property damage. Make sure a watertight seal exists around the drain. If a
watertight seal on the drain is not obtained, water damage to the subfloor may occur.
Install the drain to the module according to the drain manufacturer’s instructions.
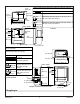
Layout and mark the location of the mixing valve, shower, and the bath spout holes on the back
surface of the module wall.
NOTE: If the supply fittings have been located accurately during rough fitting, a pilot hole template can be
used for multiple installations. Make a pilot hole template of lightweight plywood. Use the pilot hole
template to mark fitting locations on the back side of the module.
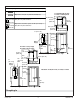
Drill 1/4″ (6 mm) pilot holes at the marked locations.
Clean the module to reduce the risk of surface damage.
Place a clean drop cloth or other similar material into the bottom of the module.
From the inside of the module (finished surface), use a hole saw of the correct diameter to carefully
drill the fitting holes.
Clean any debris from the module to reduce the risk of surface damage. Be careful not to scratch the
surface of the unit.
1030529-2-B 10 Kohler Co.