
Installation Guide

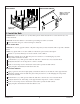

2. Install the Bath
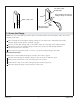
IMPORTANT! Use maximum 1/8″ (3 mm) thick spacers under the bath rim to ensure the rim does not
contact the deck.
NOTICE: Ensure the subfloor is level before proceeding. Use shims as needed.
Secure the bath using one of the following two methods.
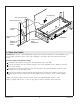
Mortar Cement Bed
NOTICE: Do not use gypsum cement or drywall compound, as these materials will not provide a durable
bond.
NOTE: Lay plastic film on wooden subfloors if desired to prevent water absorption.
Spread a 2″ (51 mm) thick layer of mortar cement on the subfloor.
With help, carefully move the bath into place. Use caution to avoid damaging any of the
components mounted to the bath.
Fit maximum 1/8″ (3 mm) spacers under the bath rim so the rim does not contact the deck.
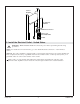
Verify that the bath is level. Reposition or shim as needed.
Position a clean drop cloth on the bottom of the bath to protect the bath surface.
Apply weight to the bath basin until the mortar sets.
Construction Adhesive
Apply a generous amount of high-quality construction adhesive to the bottom of the support blocks.
With help, carefully lower the bath into place. Take precaution to avoid damaging the components
mounted to the bath.
Fit maximum 1/8″ (3 mm) spacers under the bath rim so the rim does not contact the deck.
Verify the bath is level and resting on all support blocks. Reposition or shim as needed.
Position a clean drop cloth on the bottom of the bath to protect the bath surface.
Apply weight to the bath basin until the adhesive sets.
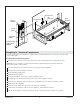
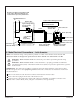
Mortar Cement Construction Adhesive
Apply construction
adhesive to the
support blocks.
Plastic Film
(Optional)
Mortar Cement
1188012-2-D 6 Kohler Co.