
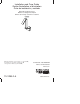
Installation Guide
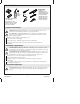
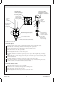

Prepare el sitio (cont.)
AVISO: No exceda un diámetro de 1-1/4″ (3,2 cm) para el orificio de fijación del
surtidor y un diámetro de 1-1/2″ (3,8 cm) para el orificio de fijación de la válvula
remota. Es necesario tener un área máxima de contacto para una instalación exitosa.
Con cuidado corte los orificios de fijación para el surtidor y la válvula remota.
Cuando sea necesario instale o cambie de lugar los suministros de agua.
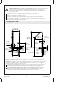
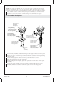
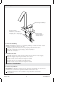
1. Assemble the Spout
If not already installed, install the O-rings to the nipple at the base of the spout.
Using care not to scratch the spout finish, slide the escutcheon and large O-ring
onto the spout.
Secure the large plate to the base of the spout with the two screws.
Slide the small plate onto the spout tube.
While holding the small plate, press the spout tube onto the base of the spout
assembly.
Secure the spout assembly to the spout tube assembly with the hex screws.
Carefully slide the escutcheon down the spout and over the large plate.
Small Plate
Petite plaque
Placa chica
Spout Tube
Tube de bec
Tubo del surtidor
Screws
Vis
Tornillos
Small O-Ring
Petit joint torique
Arosello pequeño
Escutcheon
Applique
Chapetón
Large O-Ring
Joint torique large
Arosello grande
Hex Screws
Vis hexagonales
Tornillos hexagonales
Large Plate
Grande plaque
Placa grande
Kohler Co. 5 1141280-2-A