
Installation Guide


4. Install the Diverter
For Finished Deck Installations
At the diverter install location, drill a 1-1/2″ (3.8 cm) hole.
For All Installations
NOTE: You may need assistance to align and secure the diverter.
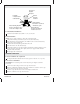
Thread the mounting nut all the way down onto the diverter body.
Slide the friction washer followed by the rubber washer over the diverter body
and down to the mounting nut.
Insert the diverter body through the deck/rim/wall.
Slide the washer onto the diverter body.
Thread the escutcheon onto the diverter body until the escutcheon bottoms out on
the diverter body. This will allow ample clearance for proper handle function.
Align the inlets and outlets.
Hand tighten the mounting nut.
Installer l’inverseur
Pour des installations de comptoir fini
À l’emplacement d’installation de l’inverseur, percer un trou de 1-1/2″ (3,8 cm).
Pour toutes les installations
REMARQUE: De l’assistance peut s’avérer nécessaire pour aligner et sécuriser
l’inverseur.
Visser l’écrou de montage à fond sur le corps de l’inverseur.
Glisser la rondelle de frottement suivie de la rondelle en caoutchouc sur le corps
de l’inverseur et jusqu’à l’écrou de montage.
Insérer le corps de l’inverseur à travers le comptoir/rebord/mur.
Glisser la rondelle sur le corps de l’inverseur.
Deck/Rim
Comptoir/rebord
Cubierta/borde
Escutcheon
Applique
Chapetón
Washer
Rondelle
Arandela
Rubber Washer
Rondelle en caoutchouc
Arandela de goma
Friction Washer
Rondelle de frottement
Arandela de fricción
Brass Mounting Nut
Écrou de montage en laiton
Tuerca de montaje de latón
1138924-2-B 10 Kohler Co.