
Installation Guide


3. Prepare the Site
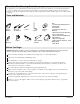
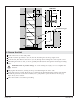
Step 1
Wrap and staple water barrier plastic sheeting into the stud pocket.
Place and staple water barrier plastic sheeting over the remaining shower area.
If applicable, install the shower basin at this time.
Step 2
Determine the desired shelving unit height from the finished floor.
Verify that this height will not compromise the watertight membrane that may be present in the
floor when fasteners are installed to the bottom flange of the unit. Adjust the height, if necessary.
Position and level the shelving unit on the studs at the desired height. Mark the corners of the
shelving unit on the studs, then set the unit aside.
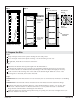
Step 3
IMPORTANT! Select wall material that is water resistant (such as cement board) and meets local building
codes.
IMPORTANT! A flush transition must exist between the wall material and the attachment flange.
Verify the wall material equals the thickness of the attachment flange, which is 1/4″ (6 mm). This
will ensure a flush transition. If a flush transition does not exist, either the studs or attachment
flange must be shimmed before installing the wall material.
Install wall material around the stud pocket leaving an opening 62″ (157.5 cm) in height and 17-1/2″
(44.5 cm) width for the seat unit.
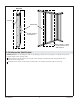
Step 1 Step 2
Install plastic sheeting.
Level, then
mark each
corner.
Level, then
mark each
corner.
Step 3
17-1/2" (44.5 cm)
Install wall
material.
Attachment
Flange
Flush
Transition
Kohler Co. 5 1071450-2-B