
Installation Guide
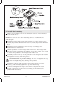
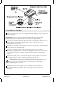

1. Preparation
Install the water supplies and drain piping according to the
roughing-in information. Install the supply stops so the handles will
not touch the pedestal when fully open.
Install sufficient backing behind the finished wall to provide a secure
material for the anchoring devices.
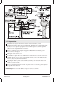
Mark the centerline on the floor.
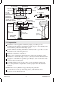
Refer to the roughing-in information. Position the pedestal on the
centerline so the back edge is 5-3/8″ (13.7cm) from the finished wall.
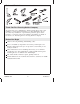
Apply two self-adhesive gaskets (provided) to each of the three ribs
on the bottom of the basin.
Carefully lift the lavatory into place on the pedestal, and slowly
move the pedestal as required to ensure proper fit in the desired
location.
NOTE: The lavatory must be supported by the pedestal.
Locate the two lavatory anchoring holes, and mark the hole
locations on the finished wall.
4" (10.2cm)
1/2" D.
(1.3cm)
MOUNTING
HOLE IN
PEDESTAL
1/2" D. (1.3cm)
ANCHOR HOLES
13-7/8"
(35.2cm)
35"
(88.9 cm)
FINISHED
FLOOR
27" (68.6cm)
3/8"
HOT
3/8" COLD
4" (10.2cm)
1-1/4"
OUTLET
7-5/8"
(19.4cm)
10"
(25.4cm)
1-1/2" (3.8cm)
2-3/4"
(7cm)
2-3/4"
(7cm)
2-3/4"
(7cm)
4" (10.2cm)
11"
(27.9cm)
FINISHED WALL
L OF
BACKING
20" (50.8cm)
8-1/4"
(21cm)
5-3/8"
(13.7cm)
K-2322-8
K-2322-1
K-2322-4
10-3/8"
(26.4cm)
9-7/8"
(25.1cm)
Kohler Co. 3 1020685-2-B